vSAN Health Alarm Check Script (Using PowerCLI)

NSX Manager to login with a local account

In the third and final part of this series I have taken my basic skeleton from the previous two blogs in order to solve the issue of bringing all of the vSAN Skyline Health checks into one central location using a vSAN Health Alarm Check Script.

My two previous blogs can be found here:
NSX Backup Check Script (Using the NSX Web API)
NSX Alarm Check Script (Using the NSX REST API)

Unfortunately this time, despite best efforts I was unable to get a suitable result using the vCenter REST API. Documentation is lacking and I was not able to get full results for the Skyline Health Checks. From asking around it seems that PowerCLI holds the answer for me, so it gave me an excuse to adapt the script again and get it to work with PowerCLI.

Again you might be asking ‘why not just use the vSAN Management Pack for vROps?’ but alas it does not keep pace with the vSAN Skyline Health and it is missing some alarms.

PowerCLI

For those not aware of everything PowerCLI can do you can find the full reference of the vSphere and vSAN cmdlets here:

https://developer.vmware.com/docs/powercli/latest/products/vmwarevsphereandvsan/

We are going to be using the Get-VSANView cmdlet in order to pull out the information from the vCenter.

The health information we can get with the “VsanVcClusterHealthSystem-vsan-cluster-health-system” Managed Object. Details of this can be found here:

https://vdc-download.vmware.com/vmwb-repository/dcr-public/3325c370-b58c-4799-99ff-58ae3baac1bd/45789cc5-aba1-48bc-a320-5e35142b50af/doc/vim.cluster.VsanVcClusterHealthSystem.html

The Code Changes

The Try Catch has been changed to connect to the vCenter first and then call a function to get the vSAN Health Summary

try{
    Connect-VIServer -Server $vCenter -Credential $encodedlogin
    $Clusters = Get-Cluster

    foreach ($Cluster in $Clusters) {
        Get-VsanHealthSummary -Cluster $Cluster
    }
 }
catch {catchFailure}

So lets have a look at the function itself.

The Get vSAN Cluster Health function

I have written a function to take in a cluster name as a parameter, find the Managed Object Reference (MORef) for the cluster, and then query the vCenter for the vSAN cluster health for that MORef and output any which are Yellow (Warning) or Red (Critical)

Function Get-VsanHealthSummary {

    param(
        [Parameter(Mandatory=$true)][String]$Cluster
    )
    
    $vchs = Get-VSANView -Id "VsanVcClusterHealthSystem-vsan-cluster-health-system"
    $cluster_view = (Get-Cluster -Name $Cluster).ExtensionData.MoRef
    $results = $vchs.VsanQueryVcClusterHealthSummary($cluster_view,$null,$null,$true,$null,$null,'defaultView')
    $healthCheckGroups = $results.groups
    $timestamp = (Get-Date).ToString("yyyy/MM/dd HH:mm:ss")

    foreach($healthCheckGroup in $healthCheckGroups) {
        
        $Health = @("Yellow","Red")
        $output = $healthCheckGroup.grouptests | where TestHealth -in $Health | select TestHealth,@{l="TestId";e={$_.testid.split(".") | select -last 1}},TestName,TestShortDescription,@{l="Group";e={$healthCheckGroup.GroupName}}
        $healthCheckTestHealth = $output.TestHealth
        $healthCheckTestName = $output.TestName
        $healthCheckTestShortDescription = $output.TestShortDescription
        
        if ($healthCheckTestHealth -eq "yellow") {
            $healthCheckTestHealthAlt = "Warning"
        }
        if ($healthCheckTestHealth -eq "red") {
            $healthCheckTestHealthAlt = "Critical"
            }
        if ($healthCheckTestName){
            Add-Content -Path $exportpath -Value "$timestamp [$healthCheckTestHealthAlt] $vCenter - vSAN Clustername $Cluster vSAN Alarm Name $healthCheckTestName Alarm Description $healthCheckTestShortDescription"
            Start-Sleep -Seconds 1
        }
    }
}

Saving Credentials

This time as we are using PowerCLI and Connect-VIServer we cannot use the encoded credentials we used last time for the Web and REST API, so we will use the cmdlet Export-CLIxml which allows us to create an XML-based representation of an object and stores it in a file.

Further details of this utility can be found here:

https://learn.microsoft.com/en-us/powershell/module/microsoft.powershell.utility/export-clixml?view=powershell-7.3

We will use the Get-Credential to bring in the username and password to store and then export it to the path defined in the variables at the top of the script.

if (-Not(Test-Path -Path  $credPath)) {
    $credential = Get-Credential
    $credential | Export-Clixml -Path $credPath

}

$encodedlogin = Import-Clixml -Path $credPath

Handling the Outputs.

As per my previous scripts the outputs are formatted to be ingested into a syslog server (vRealize Log Insight in this case) which would then send emails to the appropriate places and allow for a nice dashboard for quick whole estate checks.

The Final vSAN Health Alarm Check Script

I have put all the variables at the top and the script is designed to be run in a folder and to have another separate folder with the logs. This was done in order to manage multiple scripts logging to the same location
eg:
c:\scripts\NSXBackupCheck\NSXBackupCheck.ps1
c:\scripts\Logs\NSXBackupCheck.log

param ($vCenter)

$curDir = &{$MyInvocation.PSScriptRoot}
$exportpath = "$curDir\..\Logs\vSANAlarmCheck.log"
$credPath = "$curDir\$vCenter.cred"
$scriptName = &{$MyInvocation.ScriptName}

add-type @"
   using System.Net;
   using System.Security.Cryptography.X509Certificates;
   public class TrustAllCertsPolicy : ICertificatePolicy {
      public bool CheckValidationResult(
      ServicePoint srvPoint, X509Certificate certificate,
      WebRequest request, int certificateProblem) {
      return true;
   }
}
"@
[System.Net.ServicePointManager]::CertificatePolicy = New-Object TrustAllCertsPolicy

Function Get-VsanHealthSummary {

    param(
        [Parameter(Mandatory=$true)][String]$Cluster
    )
    
    $vchs = Get-VSANView -Id "VsanVcClusterHealthSystem-vsan-cluster-health-system"
    $cluster_view = (Get-Cluster -Name $Cluster).ExtensionData.MoRef
    $results = $vchs.VsanQueryVcClusterHealthSummary($cluster_view,$null,$null,$true,$null,$null,'defaultView')
    $healthCheckGroups = $results.groups
    $timestamp = (Get-Date).ToString("yyyy/MM/dd HH:mm:ss")

    foreach($healthCheckGroup in $healthCheckGroups) {

        
        $Health = @("Yellow","Red")
        $output = $healthCheckGroup.grouptests | where TestHealth -in $Health | select TestHealth,@{l="TestId";e={$_.testid.split(".") | select -last 1}},TestName,TestShortDescription,@{l="Group";e={$healthCheckGroup.GroupName}}
        $healthCheckTestHealth = $output.TestHealth
        $healthCheckTestName = $output.TestName
        $healthCheckTestShortDescription = $output.TestShortDescription
        
        if ($healthCheckTestHealth -eq "yellow") {
            $healthCheckTestHealthAlt = "Warning"
        }

        if ($healthCheckTestHealth -eq "red") {
            $healthCheckTestHealthAlt = "Critical"
            }


        if ($healthCheckTestName){
            Add-Content -Path $exportpath -Value "$timestamp [$healthCheckTestHealthAlt] $vCenter - vSAN Clustername $Cluster vSAN Alarm Name $healthCheckTestName Alarm Description $healthCheckTestShortDescription"
            Start-Sleep -Seconds 1
        }
    }

}

function catchFailure {
    $timestamp = (Get-Date).ToString("yyyy/MM/dd HH:mm:ss")
    if (Test-Connection -BufferSize 32 -Count 1 -ComputerName $vCenter -Quiet) {
        Add-Content -Path $exportpath -Value "$timestamp [ERROR] $vCenter - $_"
    }
    else {
        Add-Content -Path $exportpath -Value "$timestamp [ERROR] $vCenter - Host Not Found"
    }
exit
}

if (!$vCenter) {
    Write-Host "please provide parameter 'vCenter' in the format '$scriptName -vCenter [FQDN of vCenter Server]'"
    exit
    }

if (-Not(Test-Path -Path  $credPath)) {
    $credential = Get-Credential
    $credential | Export-Clixml -Path $credPath

}

$encodedlogin = Import-Clixml -Path $credPath


try{
    Connect-VIServer -Server $vCenter -Credential $encodedlogin
    $Clusters = Get-Cluster

    foreach ($Cluster in $Clusters) {
        Get-VsanHealthSummary -Cluster $Cluster
    }
 }
catch {catchFailure}

Disconnect-VIServer $vCenter -Confirm:$false

Overview

The final script above can be altered to be used as a skeleton for any other PowerShell or PowerCLI commands, as well as being adapted for REST APIs and Web API as per the previous Blogs. Important to note that these will use a different credential store function.

The two previous blogs can be found here:
NSX Backup Check Script (Using the NSX Web API)
NSX Alarm Check Script (Using the NSX REST API)

NSX Alarm Check Script (Using the NSX REST API)
NSX Manager to login with a local account

In my previous blog I created a script to get the last backup status from NSX Manager in order to quickly check multiple NSX Managers. Today I had a need to bring the alarms raised in all of these NSX Managers into one single location, which necessitated creating an NSX Alarm Check Script.
‘But surely the NSX Management Pack would allow you to do this you?’ may ask. Unfortunately it is missing some of the alarms which gets raised on the NSX Managers such as passwords expiring for example. This one being an annoyance if you do not notice until after it’s expired and you are having LDAP issues.

Now luckily this time, we CAN use the NSX REST API to get these details, and I had a script lying around which could provide a skeleton for this. You can find that script here: NSX Backup Check Script

In order to adapt this script to use REST we need to change the Invoke-WebMethod to Invoke-RestMethod

Interrogating NSX REST API

I used the documentation from VMware {code} to find this API and how to handle the results. Luckily this is a lot more detailed than the web API. You can find the NSX API details here:

https://developer.vmware.com/apis/547/nsx-t

so we want to request /api/v1/alarms in order to return a list of all alarms on the nsx managers.

$result = Invoke-RestMethod -Uri https://$nsxmgr/api/v1/alarms -Headers $Header -Method 'GET' -UseBasicParsing

Handling the Outputs.

Running this command will give a response similar to this:

{
  "result_count": 4,
  "results": [
      {
        "id": "xxxx",
        "status": "OPEN",
        "feature_name": "manager_health",
        "event_type": "manager_cpu_usage_high",
        "feature_display_name": "Manager Health",
        "event_type_display_name": "CPU Usage High",
        "node_id": "xxxx",
        "last_reported_time": 1551994806,
        "description": |
          "The CPU usage for the manager node identified by 
           appears to be\nrising.",
        "recommended_action": |
          "Use the top command to check which processes have the most CPU
           usages, and\nthen check \/var\/log\/syslog and these processes'
           local logs to see if there\nare any outstanding errors to be
           resolved.",
        "node_resource_type": "ClusterNodeConfig",
        "severity": "WARNING",
        "entity_resource_type": "ClusterNodeConfig",
      },
      ...
  ]
}

From this output I wanted to pull out the severity, status, alarm description and the node which was impacted, so I pulled these into an array and add the items to variables.

$nsxAlarms = $result.results 
    foreach ($nsxAlarm in $nsxalarms) {
        $nsxAlarmCreated = (get-date 01.01.1970).AddSeconds([int]($nsxAlarm._create_time/1000)).ToString("yyyy/MM/dd HH:mm:ss")
        $timestamp = (Get-Date).ToString("yyyy/MM/dd HH:mm:ss")
        $nsxAlarmSeverity = $nsxAlarm.severity
        $nsxAlarmStatus = $nsxAlarm.status
        $nsxAlarmNode_display_name = $nsxAlarm.node_display_name
        $nsxAlarmDescription = $nsxAlarm.description

From here I wanted to only include any alarms which had not been marked acknowledged or resolved to avoid constantly reporting a condition which was known about.

if($nsxAlarm.status -ne "ACKNOWLEDGED" -and $nsxAlarm.status -ne "RESOLVED"){ 
    Add-Content -Path $exportpath -Value "$timestamp [$nsxAlarmSeverity] $NSXMGR - Alarm Created $nsxAlarmCreated Status $nsxAlarmStatus Affected Node $nsxAlarmNode_display_name Description  $nsxAlarmDescription"
}

It is also possible to bypass this by running the following command, however I wanted to pull in all alarms for my specific use case.

GET /api/v1/alarms?status=OPEN

As per the previous script, this was wrapped in a try catch and the catch failure tested if the host was up. A full explanation can be found on the blog about this script here: NSX Backup Check Script

.

The Final NSX Alarm Check Script

param ($nsxmgr)

$curDir = &{$MyInvocation.PSScriptRoot}
$exportpath = "$curDir\..\Logs\NSXAlarmCheck.log"
$credPath = "$curDir\$nsxmgr.cred"
$scriptName = &{$MyInvocation.ScriptName}

add-type @"
   using System.Net;
   using System.Security.Cryptography.X509Certificates;
   public class TrustAllCertsPolicy : ICertificatePolicy {
      public bool CheckValidationResult(
      ServicePoint srvPoint, X509Certificate certificate,
      WebRequest request, int certificateProblem) {
      return true;
   }
}
"@
[System.Net.ServicePointManager]::CertificatePolicy = New-Object TrustAllCertsPolicy

function catchFailure {
    $timestamp = (Get-Date).ToString("yyyy/MM/dd HH:mm:ss")
    if (Test-Connection -BufferSize 32 -Count 1 -ComputerName $nsxmgr -Quiet) {
        Add-Content -Path $exportpath -Value "$timestamp [ERROR] $NSXMGR - $_"
    }
    else {
        Add-Content -Path $exportpath -Value "$timestamp [ERROR] $NSXMGR - Host Not Found"
    }
exit
}

if (!$nsxmgr) {
    Write-Host "please provide parameter 'nsxmgr' in the format '$scriptName -nsxmgr [FQDN of NSX Manager]'"
    exit
    }

if (-Not(Test-Path -Path  $credPath)) {
    $username = Read-Host "Enter username for NSX Manager" 
    $pass = Read-Host "Enter password" -AsSecureString 
    $password = [System.Runtime.InteropServices.Marshal]::PtrToStringAuto([System.Runtime.InteropServices.Marshal]::SecureStringToBSTR($pass))
    $userpass  = $username + ":" + $password

    $bytes= [System.Text.Encoding]::UTF8.GetBytes($userpass)
    $encodedlogin=[Convert]::ToBase64String($bytes)
    
    Set-Content -Path $credPath -Value $encodedlogin
}

$encodedlogin = Get-Content -Path $credPath

$authheader = "Basic " + $encodedlogin
$header = New-Object "System.Collections.Generic.Dictionary[[String],[String]]"
$header.Add("Authorization",$authheader)

try{
    $result = Invoke-RestMethod -Uri https://$nsxmgr/api/v1/alarms -Headers $Header -Method 'GET' -UseBasicParsing

        $nsxAlarms = $result.results 
        foreach ($nsxAlarm in $nsxalarms) {
            
            $nsxAlarmCreated = (get-date 01.01.1970).AddSeconds([int]($nsxAlarm._create_time/1000)).ToString("yyyy/MM/dd HH:mm:ss")
            $timestamp = (Get-Date).ToString("yyyy/MM/dd HH:mm:ss")
            $nsxAlarmSeverity = $nsxAlarm.severity
            $nsxAlarmStatus = $nsxAlarm.status
            $nsxAlarmNode_display_name = $nsxAlarm.node_display_name
            $nsxAlarmDescription = $nsxAlarm.description

            if($nsxAlarm.status -ne "ACKNOWLEDGED" -and $nsxAlarm.status -ne "RESOLVED"){ 
                Add-Content -Path $exportpath -Value "$timestamp [$nsxAlarmSeverity] $NSXMGR - Alarm Created $nsxAlarmCreated Status $nsxAlarmStatus Affected Node $nsxAlarmNode_display_name Description  $nsxAlarmDescription"
            }
        
    }
 }
catch {catchFailure}

Overview

The final script above can be altered to be used as a skeleton for any other Invoke-RestRequest APIs as well as simply being adapted for Web API. I will be following up this post with further updates to adapt the script in order to use PowerCLI, which required a different credential store.


NSX Backup Check Script (Using the NSX Web API)
NSX Manager to login with a local account

I was recently asked for a way to have a simple check and report on the last backup status for a global company with multiple VMware NSX managers.

For some reason their NSX Managers were not reporting the backup status via syslog to VMware vRealize Log Insight (vRLI) and even if it was, they only have one vRLI cluster per site and wanted one simple place to do their daily checks.
So let’s make an NSX backup check script, PowerShell and REST API to the rescue! … right?

So … no, you cannot get the backup status via REST API

Great.

But you can via the WebAPI!

Hurrah! Lets throw in some Invoke-WebRequest and get the data we need.

After some basic checks, I got the info I wanted – now I need to schedule it and have it run a short period after the backup window.

This part resulted in a path of trying to figure out a way to hold account passwords in a usable manner without them being written in clear-text anywhere because that’s just no good. There are a few different ways to do this, but they either tie it to one user profile and computer, or don’t work with the basic auth needed to run against NSX to get the data via webrequest. I will go into how I achieved that further down, but first, the web API to get backup status.

Interrogating NSX Web API

After some looking around, I discovered the following URL called via Invoke-WebRequest would give us the backup results:

Invoke-WebRequest -Uri https://[nsxmgr]/api/v1/cluster/backups/overview -Headers $Header 

Now the big problem with Invoke-WebRequest is that you would have assumed that it would return any response status such as 403 Forbidden. Nope!

You don’t get any helpful error catching, it either works or bombs out. Not much good for an unattended script that you want to tell you about any issues.

So the best fix I came up with was using a try and catch

try { 
    $result = Invoke-WebRequest -Uri https://...
    }
catch {catchFailure}

I then created a function to run in the event of the failure which will ping the host to see if it’s online and if it is output the error, if it isn’t output that the host is unreachable.

if (Test-Connection -BufferSize 32 -Count 1 -ComputerName $nsxmgr -Quiet) {
        <error output>
    } else { <host offline output> } exit

Job jobbed, no more bombing out with red text.

Dealing with certificates

When you run Invoke-WebRequest against an NSX manager with self signed certificates you get the error "The Underlying connection was closed: Could not establish trust relationship for the SSL/TLS secure channel"

The fix for this is to add in this code near the top of your script to resolve the error.

add-type @"
   using System.Net;
   using System.Security.Cryptography.X509Certificates;
   public class TrustAllCertsPolicy : ICertificatePolicy {
      public bool CheckValidationResult(
      ServicePoint srvPoint, X509Certificate certificate,
      WebRequest request, int certificateProblem) {
      return true;
   }
}
"@
[System.Net.ServicePointManager]::CertificatePolicy = New-Object TrustAllCertsPolicy

Password Management

Great stuff I now have a working Script, but ideally, I want it to be scheduled and unattended.

This is where I spun around for a while trying different ways to store credentials in a secure format, because passwords in plain text is uncool.

I initially was trying to use the encoded credentials modules but having little luck getting it passed as a header value, so bugged a colleague (@pauldavey_79) for some help and ideas from his many years of experience prodding APIs.

What we came up with was to take the username and password as an requested input via Read-Host and encode it in the Base 64 format required to pass via the header in Invoke-WebRequest and store that in a text file.

[System.Runtime.InteropServices.Marshal]::PtrToStringAuto([System.Runtime.InteropServices.Marshal]::SecureStringToBSTR($pass))
    $userpass  = $username + ":" + $password

    $bytes= [System.Text.Encoding]::UTF8.GetBytes($userpass)
    $encodedlogin=[Convert]::ToBase64String($bytes)
    
    Set-Content -Path $credPath -Value $encodedlogin

This worked a charm.

Handling the Outputs.

With this script I wanted to feed the output into a syslog server (vRealize Log Insight in this case) which would then send emails to the appropriate places and allow for a nice dashboard for quick whole estate checks.

In order to achieve this, I used the Add-Content command to append the data to a .log file which was monitored by the Log Insight Agent and sent off to the Log Insight Server.

if($LatestBackup.success -eq $true){ 
  Add-Content -Path $exportpath -Value "$timestamp [INFO] $NSXMGR - Last backup successful. Start time $start End time $end"
} else{ 
  Add-Content -Path $exportpath -Value "$timestamp [ERROR] $NSXMGR - Last backup failed $start $end"

This gives us a nice syslog formatted output which can be easily manipulated within Log Insight. Hurrah.

One thing to note is that the NSX WebAPI returned the start and end times in the usual unix format, so I needed to convert that to a more suitable human readable date, that was done with the line:

 $var = (get-date 01.01.1970).AddSeconds([int]($LatestBackup.end_time/1000))

I also needed to get my try-catch error collector to output the error messages in the same format so that was done as so:

Add-Content -Path $exportpath -Value "$timestamp [ERROR] $NSXMGR - $_"

Pulling all of that together we get the final script which can be used as a skeleton for any future work required. A few of them will be posted at a later date.

The Final NSX Backup Check Script

I have put all the variables at the top and the script is designed to be run in a folder and to have another separate folder with the logs. This was done in order to manage multiple scripts logging to the same location
eg:
c:\scripts\NSXBackupCheck\NSXBackupCheck.ps1
c:\scripts\Logs\NSXBackupCheck.log

param ($nsxmgr)

$curDir = &{$MyInvocation.PSScriptRoot}
$exportpath = "$curDir\..\Logs\NSXBackupCheck.log"
$credPath = "$curDir\$nsxmgr.cred"
$scriptName = &{$MyInvocation.ScriptName}

add-type @"
   using System.Net;
   using System.Security.Cryptography.X509Certificates;
   public class TrustAllCertsPolicy : ICertificatePolicy {
      public bool CheckValidationResult(
      ServicePoint srvPoint, X509Certificate certificate,
      WebRequest request, int certificateProblem) {
      return true;
   }
}
"@
[System.Net.ServicePointManager]::CertificatePolicy = New-Object TrustAllCertsPolicy

function catchFailure {
    $timestamp = (Get-Date).ToString("yyyy/MM/dd HH:mm:ss")
    if (Test-Connection -BufferSize 32 -Count 1 -ComputerName $nsxmgr -Quiet) {
        Add-Content -Path $exportpath -Value "$timestamp [ERROR] $NSXMGR - $_"
    }
    else {
        Add-Content -Path $exportpath -Value "$timestamp [ERROR] $NSXMGR - Host Not Found"
    }
exit
}

if (!$nsxmgr) {
    Write-Host "please provide parameter 'nsxmgr' in the format '$scriptName -nsxmgr [FQDN of NSX Manager]'"
    exit
    }

if (-Not(Test-Path -Path  $credPath)) {
    $username = Read-Host "Enter username for NSX Manager" 
    $pass = Read-Host "Enter password" -AsSecureString 
    $password = [System.Runtime.InteropServices.Marshal]::PtrToStringAuto([System.Runtime.InteropServices.Marshal]::SecureStringToBSTR($pass))
    $userpass  = $username + ":" + $password

    $bytes= [System.Text.Encoding]::UTF8.GetBytes($userpass)
    $encodedlogin=[Convert]::ToBase64String($bytes)
    
    Set-Content -Path $credPath -Value $encodedlogin
}

$encodedlogin = Get-Content -Path $credPath

$authheader = "Basic " + $encodedlogin
$header = New-Object "System.Collections.Generic.Dictionary[[String],[String]]"
$header.Add("Authorization",$authheader)

try{
    $result = Invoke-WebRequest -Uri https://$nsxmgr/api/v1/cluster/backups/overview -Headers $Header -UseBasicParsing
    if($result.StatusCode -eq 200) {
        $nsxbackups = $result.Content | ConvertFrom-Json
        $LatestBackup = $nsxbackups.backup_operation_history.cluster_backup_statuses
        $start = (get-date 01.01.1970).AddSeconds([int]($LatestBackup.start_time/1000))
        $end = (get-date 01.01.1970).AddSeconds([int]($LatestBackup.end_time/1000))
        $timestamp = (Get-Date).ToString("yyyy/MM/dd HH:mm:ss")
        if($LatestBackup.success -eq $true){ 
            Add-Content -Path $exportpath -Value "$timestamp [INFO] $NSXMGR - Last backup successful. Start time $start End time $end"
        } else{ 
            Add-Content -Path $exportpath -Value "$timestamp [ERROR] $NSXMGR - Last backup failed $start $end"
        }
    }
 }
catch {catchFailure}

Overview

The final script above can be altered to be used as a skeleton for any other Invoke-WebRequest APIs as well as simply being adapted for REST API. I will be following up this post with further updates to this script using RESTAPI and also an adaption to use PowerCLI which required a different credential store.

The REST API Script can be found here: NSX Alarm Check Script

VMware NSX Manager Login with Local Account

NSX Manager to login with a local account

My client has an NSX environment deployed with integration with VMware Workspace One, which works great most of the time, but sometimes you will need to get NSX Manager to login with a local account, such as when WS1 is playing up. How is this possible?

To force the NSX Manager to login with a local account, provide this specific URL:

https://[NSXManagerFQDN]/login.jsp?local=true

Horizon 2206 fails to connect to SQL Server – An error occurred while attempting to configure the database.

I’ve just come across a new issue where the latest release of Horizon fails to connect to an SQL Server to configure the Event Database. The only error message you get is “An error occurred while attempting to configure the database. Double check the database parameters and ensure that the database is not down, restarting, or otherwise unavailable. “

An error occurred while attempting to configure the database.

This problem is caused by Horizon dropping support for certificate signature algorithms including SHA1 and SHA512.

Finding the cause of an error occurred while attempting to configure the database.

To confirm this is the problem you are experiencing, lets check in the Connection Server debug log stored in the following location on your Connection Server:

C:\ProgramData\VMware\VDM\logs\ debug-[year]-[month]-[timestamp].txt

For confirmation that this is the issue you are facing, you are looking for the keyphrase “DATABASE_CONNECTION_FAILED#” which shows that “Certificates do not conform to algorithm constraints.” 

ERROR (1EF4-23E0) <ajp-nio-127.0.0.1-8009-exec-8> [FaultUtilBase] InvalidRequest: {#DATABASE_CONNECTION_FAILED#} Unable to update database settings; database connection failed: SQL exception when connecting to database: The driver could not establish a secure connection to SQL Server by using Secure Sockets Layer (SSL) encryption. Error: "Certificates do not conform to algorithm constraints". ClientConnectionId:xxxx
ERROR (1EF4-23E0) <ajp-nio-127.0.0.1-8009-exec-8> [RestApiServlet] Unexpected fault:(vdi.fault.InvalidRequest) {
   errorMessage = {#DATABASE_CONNECTION_FAILED#} Unable to update database settings; database connection failed: SQL exception when connecting to database: The driver could not establish a secure connection to SQL Server by using Secure Sockets Layer (SSL) encryption. Error: "Certificates do not conform to algorithm constraints". ClientConnectionId:xxxx
} for uri /view-vlsi/rest/v1/EventDatabase/update

Unfortunately this does not tell us about what certificate algorithm is being used by the SQL server.

The Database Server being used for the Event Database is using Windows Server 2016 and SQL Server 2016. The DBA had not configured an SSL certificate against the database, or the SQL Server as a whole, so without full access to confirm, we worked on the assumption that had a default self signed certificate from when it was originally installed and this was likely SHA1.

To fix this we need to add these certificate signature algorithms to the override in the Horizon ADAM database.

You can find details about connecting to the ADAM Database on VMware KB2012377

Connect to the Horizon ADAM Database

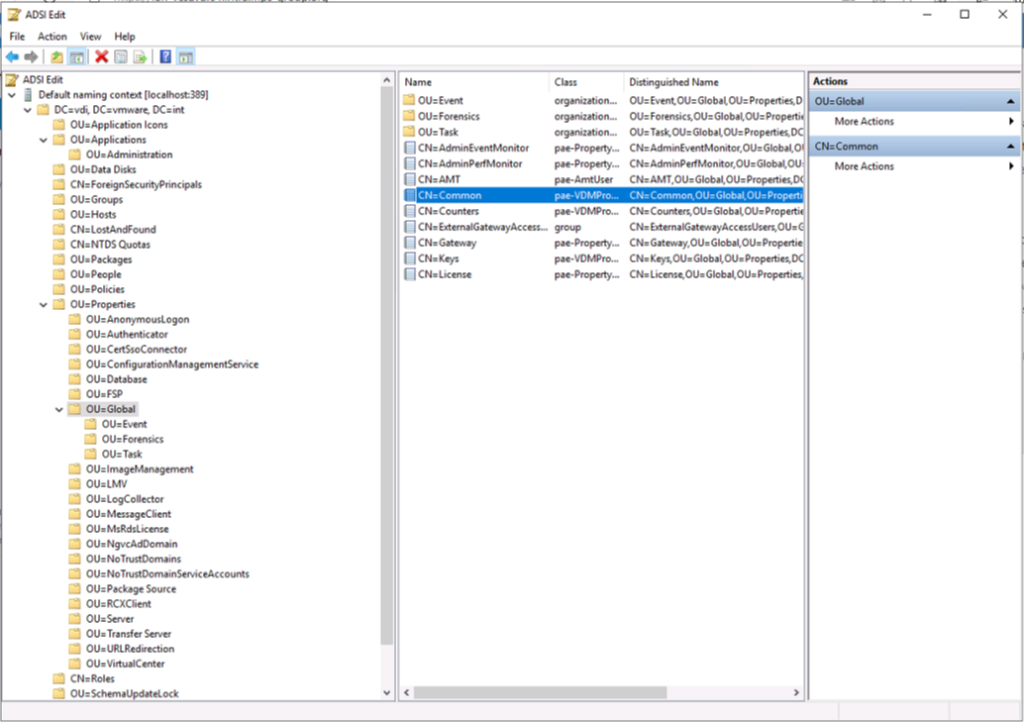
  1. Start the ADSI Edit utility on your Horizon Connection Server.
  2. In the console tree, select Connect to.
  3. In the Select or type a Distinguished Name or Naming Context text box, type the distinguished name DC=vdi, DC=vmware, DC=int
  4. In the Select or type a domain or server text box, select or type localhost:389 or the fully qualified domain name (FQDN) of the View Connection Server computer followed by port 389.
  5. Click OK.
  6. Select and expand DC=vdi,dc=vmware,dc=int to expand.
  7. Go to ou=properties then ou=global and go to properties on cn=common
  1. Find the LDAP attribute pae-SSLServerSignatureSchemes and add the following entry: \LIST:rsa_pkcs1_sha256,rsa_pkcs1_sha384,rsa_pkcs1_sha1
  2. Find the LDAP attribute pae-SSLClientSignatureSchemes and add the following entry: \LIST:rsa_pkcs1_sha256,rsa_pkcs1_sha384,rsa_pkcs1_sha1
    • IMPORTANT: The new list must include at least rsa_pkcs1_sha256 and rsa_pkcs1_sha384 to avoid breaking other outgoing connections.
    • In my example below I have needed to add SHA512withRSA as well as SHA1 for my vCenter Connection.
  1. Restart the Connection server service on all brokers in the cluster.
  2. Configure your Event Configuration as required and you should no longer receive the “An error occurred while attempting to configure the database.” error message and you will start recording events.

References

For reference, the default list of schemes is as follows:

rsa_pss_rsae_sha384
rsa_pss_rsae_sha256
rsa_pss_pss_sha384
rsa_pss_pss_sha256
rsa_pkcs1_sha384
rsa_pkcs1_sha256

If you require SHA1 you need to add

rsa_pkcs1_sha1,rsa_pss_rsae_sha1,rsa_pss_pss_sha1

If you require SHA512 you need to add

rsa_pkcs1_sha512,rsa_pss_rsae_sha512,rsa_pss_pss_sha512

If you require both SHA1 for SQL and SHA512 for the vCenter connection, like I did, you need to add the following otherwise the vCenter connection will fail again.

rsa_pkcs1_sha1, rsa_pkcs1_sha512,rsa_pss_rsae_sha512,rsa_pss_pss_sha512

VMware have also depreciated other protocols and ciphers in Horizon

The following protocols and ciphers are disabled by default:

  • SSLv3
  • TLSv1 and TLSv1.1
  • RC4

NOTE: It is not possible to enable support for ECDSA certificates. These certificates have never been supported.

Further details of these are HERE

Horizon 2206 fails to connect to the vCenter: Certificate validation failed

I’ve just come across a new issue where the latest release of Horizon fails to connect to the vCenter. The only error message you get is “Certificate validation failed”

This problem is caused by Horizon dropping support for certificate signature algorithms including SHA512withRSA

Finding the cause of Certificate validation failed

To confirm this is the problem you are experiencing, lets check in the Connection Server debug log stored in the following location on your Connection Server:

C:\ProgramData\VMware\VDM\logs\ debug-[year]-[month]-[timestamp].txt

For confirmation that this is the issue you are facing, you are looking for the keyphrase “SSLHandshakeException” which shows that “Certificates do not conform to algorithm constraints.” 

Caused by: javax.net.ssl.SSLHandshakeException: SSLHandshakeException invoking https://vcenter.vsphere.local:443/sdk: Certificates do not conform to algorithm constraints

Next we need to confirm which signature algorithm is being used by your vCenter’s certificate.

Caused by: java.security.cert.CertPathValidatorException: Algorithm constraints check failed on signature algorithm: SHA512withRSA

So we can see that it is failing on signature algorithm SHA512withRSA.

To fix this we need to add these certificate signature algorithms to the override in the Horizon ADAM database.

You can find details about connecting to the ADAM Database on VMware KB2012377

Connect to the Horizon ADAM Database

  1. Start the ADSI Edit utility on your Horizon Connection Server.
  2. In the console tree, select Connect to.
  3. In the Select or type a Distinguished Name or Naming Context text box, type the distinguished name DC=vdi, DC=vmware, DC=int
  4. In the Select or type a domain or server text box, select or type localhost:389 or the fully qualified domain name (FQDN) of the View Connection Server computer followed by port 389.
  5. Click OK.
  6. Select and expand DC=vdi,dc=vmware,dc=int to expand.
  7. Go to ou=properties then ou=global and go to properties on cn=common
  1. Find the LDAP attribute pae-SSLServerSignatureSchemes and add the following entry: \LIST:rsa_pkcs1_sha256,rsa_pkcs1_sha384,rsa_pkcs1_sha512,rsa_pss_rsae_sha512,rsa_pss_pss_sha512
  2. Find the LDAP attribute pae-SSLClientSignatureSchemes and add the following entry: \LIST:rsa_pkcs1_sha256,rsa_pkcs1_sha384,rsa_pkcs1_sha512,rsa_pss_rsae_sha512,rsa_pss_pss_sha512
    • IMPORTANT: The new list must include at least rsa_pkcs1_sha256 and rsa_pkcs1_sha384 to avoid breaking other outgoing connections.
  1. Restart the Connection server service on all brokers in the cluster.

References

For reference, the default list of schemes is as follows:

rsa_pss_rsae_sha384
rsa_pss_rsae_sha256
rsa_pss_pss_sha384
rsa_pss_pss_sha256
rsa_pkcs1_sha384
rsa_pkcs1_sha256

If you require SHA1 you need to add

rsa_pkcs1_sha1,rsa_pss_rsae_sha1,rsa_pss_pss_sha1

If you require SHA512 you need to add

rsa_pkcs1_sha512,rsa_pss_rsae_sha512,rsa_pss_pss_sha512

VMware have also depreciated other protocols and ciphers in Horizon

The following protocols and ciphers are disabled by default:

  • SSLv3
  • TLSv1 and TLSv1.1
  • RC4

NOTE: It is not possible to enable support for ECDSA certificates. These certificates have never been supported.

Further details of these are HERE

Extending a Hard Drive Partition on Ubuntu Linux Virtual Machine

I needed to add some storage on a shell only Ubuntu Linux VM and due to having more experience with RedHat and via GUIs along with there being little information out there I thought it would be worth putting up a post for posterity.

So first step lets shut down and increase the VMDK

First Step Shut Down Guest OS

Now lets edit the VM settings

In the settings lets increase Hard Disk 1 on this VM

Lets go ahead and turn on the VM again and then we can SSH into the VM once it is back online.

(you could also take a snapshot at this point just in case)

Now onto the in-guest re partitioning bit.

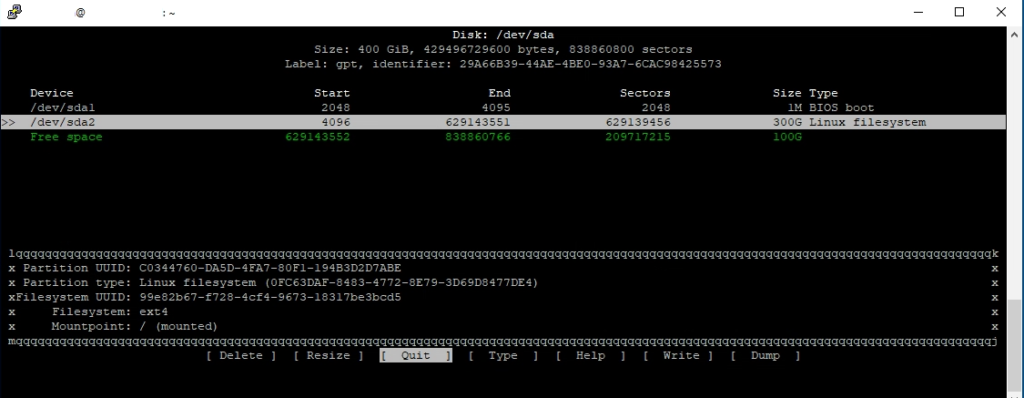
First lets resize sda2 to use the extra space. On Ubuntu this is done using the command

sudo cfdisk

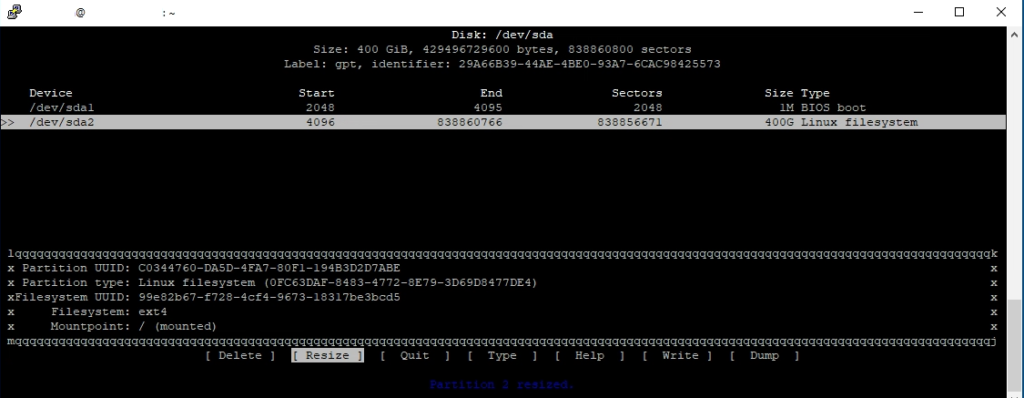
in here we select sda2 and then select [ Resize ] and enter the new desired size. By default it will suggest using all available space

Once this is done you will see the new size, and from here you need to [ Write ] the change and type “yes”

Now you can go ahead and [ Quit ] cfdisk

Here is another difference with RedHat, we must now run

sudo resize2fs /dev/sda2

If you run df -h you will see that /dev/sda2 is now using the increased size

And we are done. If you took a snapshot don’t forget to go ahead and remove it.

IF Function in vROps Super Metrics aka Ternary Expressions

vRealize Operations. Using vROps Super Metric Ternary Expressions IF Function

Have you ever just wanted an IF Function when creating Super Metrics? Good news, there is one!

Leading on from the last post I did on determining the number of VMs which will fit into cluster, I have decided to further expand it with an IF function to take the Host Admission Policy failure to tolerate level into account as well.

Previously we used a flat 20% overhead as that was the company policy, however that reserved way too many resources on larger clusters, and setting it to a flat two host failures

We wanted to set any Cluster Compute Resource with less than 10 hosts, to only allow for a single host failure, but clusters of 10 and above should allow for two host failures.

In vROps terms this requires a Ternary Expression, or as most people know them, an IF Function.

You can use the ternary operator in an expression to run conditional expressions in the same way you would an IF Function.

This is done in the format:

expression_condition ? expression_if_true : expression_if_false.

So for our example we want to take the metric summary|total_number_hosts and check if the number of hosts is less than 10.

This means our expression condition is:

${this, metric=summary|total_number_hosts}<10

as we want to return a “1” for one host failure if this is true, and “2” for two host failures if it’s 10 or more our full expression is:

(${this, metric=summary|total_number_hosts}<10?1:2)

This means our full code is:

floor(min([(((((${this, metric=cpu|corecount_provisioned})-(((${this, metric=cpu|corecount_provisioned})/${this, metric=summary|total_number_hosts}))*(${this, metric=summary|total_number_hosts}<10?1:2))*4)-(${this, metric=cpu|vcpus_allocated_on_all_vms}))/8),(((((${this, metric=mem|host_provisioned})*((${this, metric=mem|host_provisioned}/${this, metric=summary|total_number_hosts})*(${this, metric=summary|total_number_hosts}<10?1:2)))-(${this, metric=mem|memory_allocated_on_all_vms, depth=1}))/1048576)/32),((((${this, metric=diskspace|total_capacity})*0.7-(${this, metric=diskspace|total_provisioned, depth=1}))/1.33)/(500+32))]))

VMware vExpert 2020

I’m proud to announce that I have been awarded vExpert for 2020. It’s a great honour to be recognised and receive these awards. The vExpert and vCommunity as a whole is extremely welcoming and helpful.

Load Balanced VMware Workspace One Network Identification

Load Balanced VMware Workspace One Network Identification

I recently had a customer who wanted to make certain users on their network use Multi Factor Authentication, but not others.

Users connect to a Netscalar load balancer for the two UAG applicances, which then reverse proxy the WorkspaceOne Identity Manager (vIDM aka WSOne Access) cluster via another Netscalar load balancer.

The problem is that even if you configure the Loadbalancer to pass the client source IP as a X-Forwarded-For header, vIDM does not recognise which of the IPs listed is the client’s actual IP and will usually use the wrong IP, bypassing the Network Range policy rules. What we want is to ignore certain IPs in the XFF header.

The fix for this is to tell vIDM all of the IPs that you want to ignore and disregard. This list would be the IP of every Loadbalancer and UAG appliance on the route from your client to the vIDM instance.

First step is to follow your Load Balancer vendor’s guide to enable client ip X-Forwarded-For URL rewrite. Carl Stalhood has thankfully done one for how to configure Netscaler here: https://www.carlstalhood.com/vmware-horizon-unified-access-gateway-load-balancing-netscaler-12/

Next we need to add our IPs to each vIDM appliance in the runtime-confile.properties file. In my case I have six of them so this took the best part of an hour waiting for everything to come back up. When restarting vIDM services you MUST ensure that they are fully up on the node before progressing to the next node. This can be monitored from the Admin System Diagnostics Dashboard. Wait for all the green ticks unless you want to spend a few hours cleaning up unassigned shards (see HERE for how to fix that)

Via SSH/Console connect to each vIDM appliance and run the following commands to make a copy of the original file and open it for editing:

cd /usr/local/horizon/conf/
cp runtime-config.properties runtime-config.properties.bak
vi runtime-config.properties

Scroll to the end of the document, hit the [Insert] Key on your keyboard to put vi into edit mode and add the following line to the very end of the file:

service.ipsToIgnoreInXffHeader=X.X.X.X,Y.Y.Y.Y/26

Where X.X.X.X is a specific IP you wish to ignore, and Y.Y.Y.Y/26 is a specific Subnet you wish to ignore.

Now restart the service

service horizon-workspace restart

and now browse to the System Diagnostics Dashboard on the admin interface and wait for the services to come back up before moving on to the next node.

Congratulations, WorkspaceOne can now identify users by their actual client IP.

Script to Add Custom Icons to a Horizon Application

Script to add icon to horizon application

Quick way to get a list of icons:

Get-HVApplication | Select-Object name,displayname |Export-Csv -path C:\HVIcons\newlist.csv

I wrote the following script to take a csv file of application name and description, and then connect to a Horizon Connection Server and cycle through the csv looking for an icon file in the format desc.png or desc-0.png and apply the icon to the application.

It is made up of three modules, one of which is a lightly modified version of a VMware staffer’s module, which included a load of “breaks” which I had to remove to ensure it would complete the full array.


############################################################
### Add Icons to Horizon Application from a CSV File
### .NOTES
###    Author                      : Chris Mitchell
###    Author email                : mitchellc@vmware.com
###    Version                     : 1.0
###
###    ===Tested Against Environment====
###    Horizon View Server Version : 7.7
###    PowerCLI Version            : PowerCLI 11.3
###    PowerShell Version          : 5.1
###
###    Add-HVAppIcon -h VCS01.local.net -csv apps.csv -u admin -p Password01
###
############################################################

param (
    [string]$h = $(Read-Host "Horizon Connection Server Name:"),
    [string]$c = $(Read-Host "csv filename:"),
    [string]$u = $(Read-Host "username:"),
    [string]$p = $(Read-Host "password:")
    )


function Get-ViewAPIService {
  param(
    [Parameter(Mandatory = $false)]
    $HvServer
  )
  if ($null -ne $hvServer) {
    if ($hvServer.GetType().name -ne 'ViewServerImpl') {
      $type = $hvServer.GetType().name
      Write-Error "Expected hvServer type is ViewServerImpl, but received: [$type]"
      return $null
    }
    elseif ($hvServer.IsConnected) {
      return $hvServer.ExtensionData
    }
  } elseif ($global:DefaultHVServers.Length -gt 0) {
     $hvServer = $global:DefaultHVServers[0]
     return $hvServer.ExtensionData
  }
  return $null
}


function HVApplicationIcon {
<#
.SYNOPSIS
   Used to create/update an icon association for a given application.

.DESCRIPTION
   This function is used to create an application icon and associate it with the given application. If the specified icon already exists in the LDAP, it will just updates the icon association to the application. Any of the existing customized icon association to the given application will be overwritten.

.PARAMETER ApplicationName
   Name of the application to which the association to be made.

.PARAMETER IconPath
   Path of the icon.

.PARAMETER HvServer
   View API service object of Connect-HVServer cmdlet.

.EXAMPLE
   Creating the icon I1 and associating with application A1. Same command is used for update icon also.
   Set-HVApplicationIcon -ApplicationName A1 -IconPath C:\I1.ico -HvServer $hvServer

.OUTPUTS
   None

.NOTES
    Author                      : Paramesh Oddepally.
    Author email                : poddepally@vmware.com
    Version                     : 1.1

    ===Tested Against Environment====
    Horizon View Server Version : 7.1
    PowerCLI Version            : PowerCLI 6.5.1
    PowerShell Version          : 5.0
#>

  [CmdletBinding(
    SupportsShouldProcess = $true,
    ConfirmImpact = 'High'
  )]

  param(
   [Parameter(Mandatory = $true)]
   [string] $ApplicationName,

   [Parameter(Mandatory = $true)]
   $IconPath,

   [Parameter(Mandatory = $false)]
   $HvServer = $null
  )

  begin {
    $services = Get-ViewAPIService -HvServer $HvServer
    if ($null -eq $services) {
      Write-Error "Could not retrieve ViewApi services from connection object."
      
    }
    Add-Type -AssemblyName System.Drawing
  }

  process {
	if (!(Test-Path $IconPath)) {
      Write-Error "File:[$IconPath] does not exist."
      
    }

    if ([IO.Path]::GetExtension($IconPath) -ne '.png') {
      Write-Error "Unsupported file format:[$IconPath]. Only PNG image files are supported."
      
    }

    try {
      $appInfo = Get-HVQueryResult -EntityType ApplicationInfo -Filter (Get-HVQueryFilter data.name -Eq $ApplicationName) -HvServer $HvServer
    } catch {
      # EntityNotFound, InsufficientPermission, InvalidArgument, InvalidType, UnexpectedFault
      Write-Error "Error in querying the ApplicationInfo for Application:[$ApplicationName] $_"
      
    }

    if ($null -eq $appInfo) {
      Write-Error "No application found with specified name:[$ApplicationName]."
      
    }

    $spec = New-Object VMware.Hv.ApplicationIconSpec
    $base = New-Object VMware.Hv.ApplicationIconBase

    try {
      $fileHash = Get-FileHash -Path $IconPath -Algorithm MD5
      $base.IconHash = $fileHash.Hash
      $base.Data = (Get-Content $iconPath -Encoding byte)
      $bitMap = [System.Drawing.Bitmap]::FromFile($iconPath)
      $base.Width = $bitMap.Width
      $base.Height = $bitMap.Height
      $base.IconSource = "broker"
      $base.Applications = @($appInfo.Id)
      $spec.ExecutionData = $base
    } catch {
      Write-Error "Error in reading the icon parameters: $_"
      
    }

    if ($base.Height -gt 256 -or $base.Width -gt 256) {
      Write-Error "Invalid image resolution. Maximum resolution for an icon should be 256*256."
      
    }

    $ApplicationIconHelper = New-Object VMware.Hv.ApplicationIconService
    try {
      $ApplicationIconId = $ApplicationIconHelper.ApplicationIcon_CreateAndAssociate($services, $spec)
    } catch {
        if ($_.Exception.InnerException.MethodFault.GetType().name.Equals('EntityAlreadyExists')) {
           # This icon is already part of LDAP and associated with some other application(s).
           # In this case, call updateAssociations
           $applicationIconId = $_.Exception.InnerException.MethodFault.Id
           Write-Host "Some application(s) already have an association for the specified icon."
           $ApplicationIconHelper.ApplicationIcon_UpdateAssociations($services, $applicationIconId, @($appInfo.Id))
           Write-Host "Successfully updated customized icon association for Application:[$ApplicationName]."
           
        }
        Write-Host "Error in associating customized icon for Application:[$ApplicationName] $_"
        
    }
    Write-Host "Successfully associated customized icon for Application:[$ApplicationName]."
  }

  end {
    [System.gc]::collect()
  }
}


Function AddIconToApp($a) {

    foreach($Item in $a)
    {
        $IconFile = $IconFolder+"\"+$Item.DisplayName+".png"
        if (!(Test-Path $IconFile)) { 
            $IconFile = $IconFolder+"\"+$Item.DisplayName+"-0.png"
        }
        Write-Host Trying $IconFile
        if (Test-Path $IconFile) { 
            Write-Host "Adding Icon to" $Item.DisplayName
            $ItemName = $Item.Name
            HVApplicationIcon -ApplicationName $ItemName -IconPath $IconFile -ErrorAction SilentlyContinue
        } else {
                Write-Host "File Doesn't Exist"
        }  
        
    }
}


$dir = Get-Location

$IconFolder = $dir.Path + "\png"


Connect-HVServer $h -u $u -p $p

$csv = Import-Csv .\$c

AddIconToApp $csv

Disconnect-HVServer -Server * -confirm:$false


Double Achievement Day: VMware Advanced Architecture Course and vExpert Cloud Management 2019

I have spent the last two weeks completing the VMware Centre for Advanced Learning’s Advanced Architecture Course in La Defense in Paris.

They don’t announce individual scores but the lowest was 82 out of 100 and the highest 92, so everyone did extremely well and I am proud to have been part of this cohort. I’m especially proud of my Team SSRC (Source) made up of [S]urjit Randhawa, Hus[S]am Abbas, [R]aeed Aldawood all from VMware PSO METNA and myself for getting the third best solution presentation when we were up against VMware PreSales, VCDXs, VCDX panel members, and VMware Staff Architects

Team SSRC with VMware’s Principal Architect Carsten Schaefer making me feel short

Additionally I received the Best Partner award and Surj received the award for Value Added and Expertise

Me with Andrea Siviero VMware Principal Architect
Surjit with Mitesh Pancholy and TJ Vatsa both Principal Consulting Architects

The AAC is a course intended to:

Strengthen architectural & solution outcome skills in VMware Sr Consultants, Architects and Partners by establishing a baseline and model to interact with VMware Customers, leading the discovery, design and effectively communicate VMware solutions.

The Advanced Architecture Course is a very comprehensive program covering not just technical content across solutions; but it also includes presentation and business skills, our VMware IT Value Model and Digital Workspace Journey Model, solution design best practices, and internal and industry standard architectural methodologies.

If you are ever offered a chance to attend this course I can highly recommend it. But it’s not a course to be taken lightly. There was 32 hours of prerequisite training, as well as needing to learn a Case Study which would be used for the final Presentation, which is completed throughout the course. The course itself started at 8am every day and generally we did not finish the team work until at least 10pm most nights

Additionally, on the same day I passed the AAC, the VMware vExpert Cloud Management 2019 announcement has been released, and I have been recognised for community contributions in the cloud management space!

vRealize Log Insight 4.8 has been released

Image result for log insight logo

After months of waiting vRealize Log Insight 4.8 (vRLI 4.8) was released last night.

I’ve been waiting on this release as it fixes a number of minor CVEs (Java of course) and the major improvement which has been ask for by almost every customer who I’ve spoken to – Data retention configuration options based on time!

You now have the option to configure the data retention period based on your needs from a few days to 12 months instead of having to exactly size the appliances to guestimate your retention needs.

Another major additions is that there is now a JSON parser so that JSON logs can be easily sent and parsed into vRLI. Additionally the parser can be configured for conditional parsing. Users can specify if a parser should be applied based on the value of a parsed field.

There have been a number of minor security improvements including one which could delay upgrade for those with older SSL certificates. From 4.8, the minimum key size for the virtual appliance certificate must be 2048 bits or greater.

There are a couple of resolved issues which have bugged me (and clients) in the previous releases

  • Launch in context for vROps is now working correctly.
  • Queries now support time-related terms that when entered are automatically translated to the current time.
  • The “From” date bug is fixed

VMware are yet to update the Interoperability Matrix but hopefully there won’t be any major surprises in store.

So all in all, more minor evolution than revolution. as many were expecting the next release of vRLI to herald the change to PhotonOS like many other VMware appliances, but it is welcome all the same.

The download is already available on my.vmware.com, and as per usual you must be running vRealize Log Insight 4.7 or 4.7.1 to upgrade to 4.8. Follow my guide HERE for upgrading Log Insight.

The full release notes can be found HERE

How to add Historic User Session Latency to vROps for Horizon.

This post was written by Cameron Fore and is being reproduced here just for posterity purposes for a future implementation. Original link HERE

vROps for Horizon provides end-to-end visibility into key User session statistics that make it easy for Horizon admins to visualise and alert on performance problems impacting the user’s of their environment. One of the key metrics used in determining how well user’s are connected to their virtual app or desktop session is Session Latency (ms), as it most visually impacts the user’s perspective of their session performance.  The lower the session latency, the quicker video, keyboard, and mouse inputs are redirected to and from a user’s endpoint client, giving the user a more native-like PC experience.

As the latency trends higher (>180ms), the experience begins to degrade, and the user can begin to notice “sluggishness“ – slow keyboard, mouse, and video responsiveness.

vROps for Horizon gives us direct visibility into when these issues are occurring across all of the Active User Sessions of the Horizon View environment.  However, once the session becomes inactive, it will go into a stale object state and be removed from vROps during a clean-up window.

To be able to view this information historically on Pools and User objects, you can create Super Metrics that simply maps the session latency to the objects you want to report on.

Creating the Super Metric

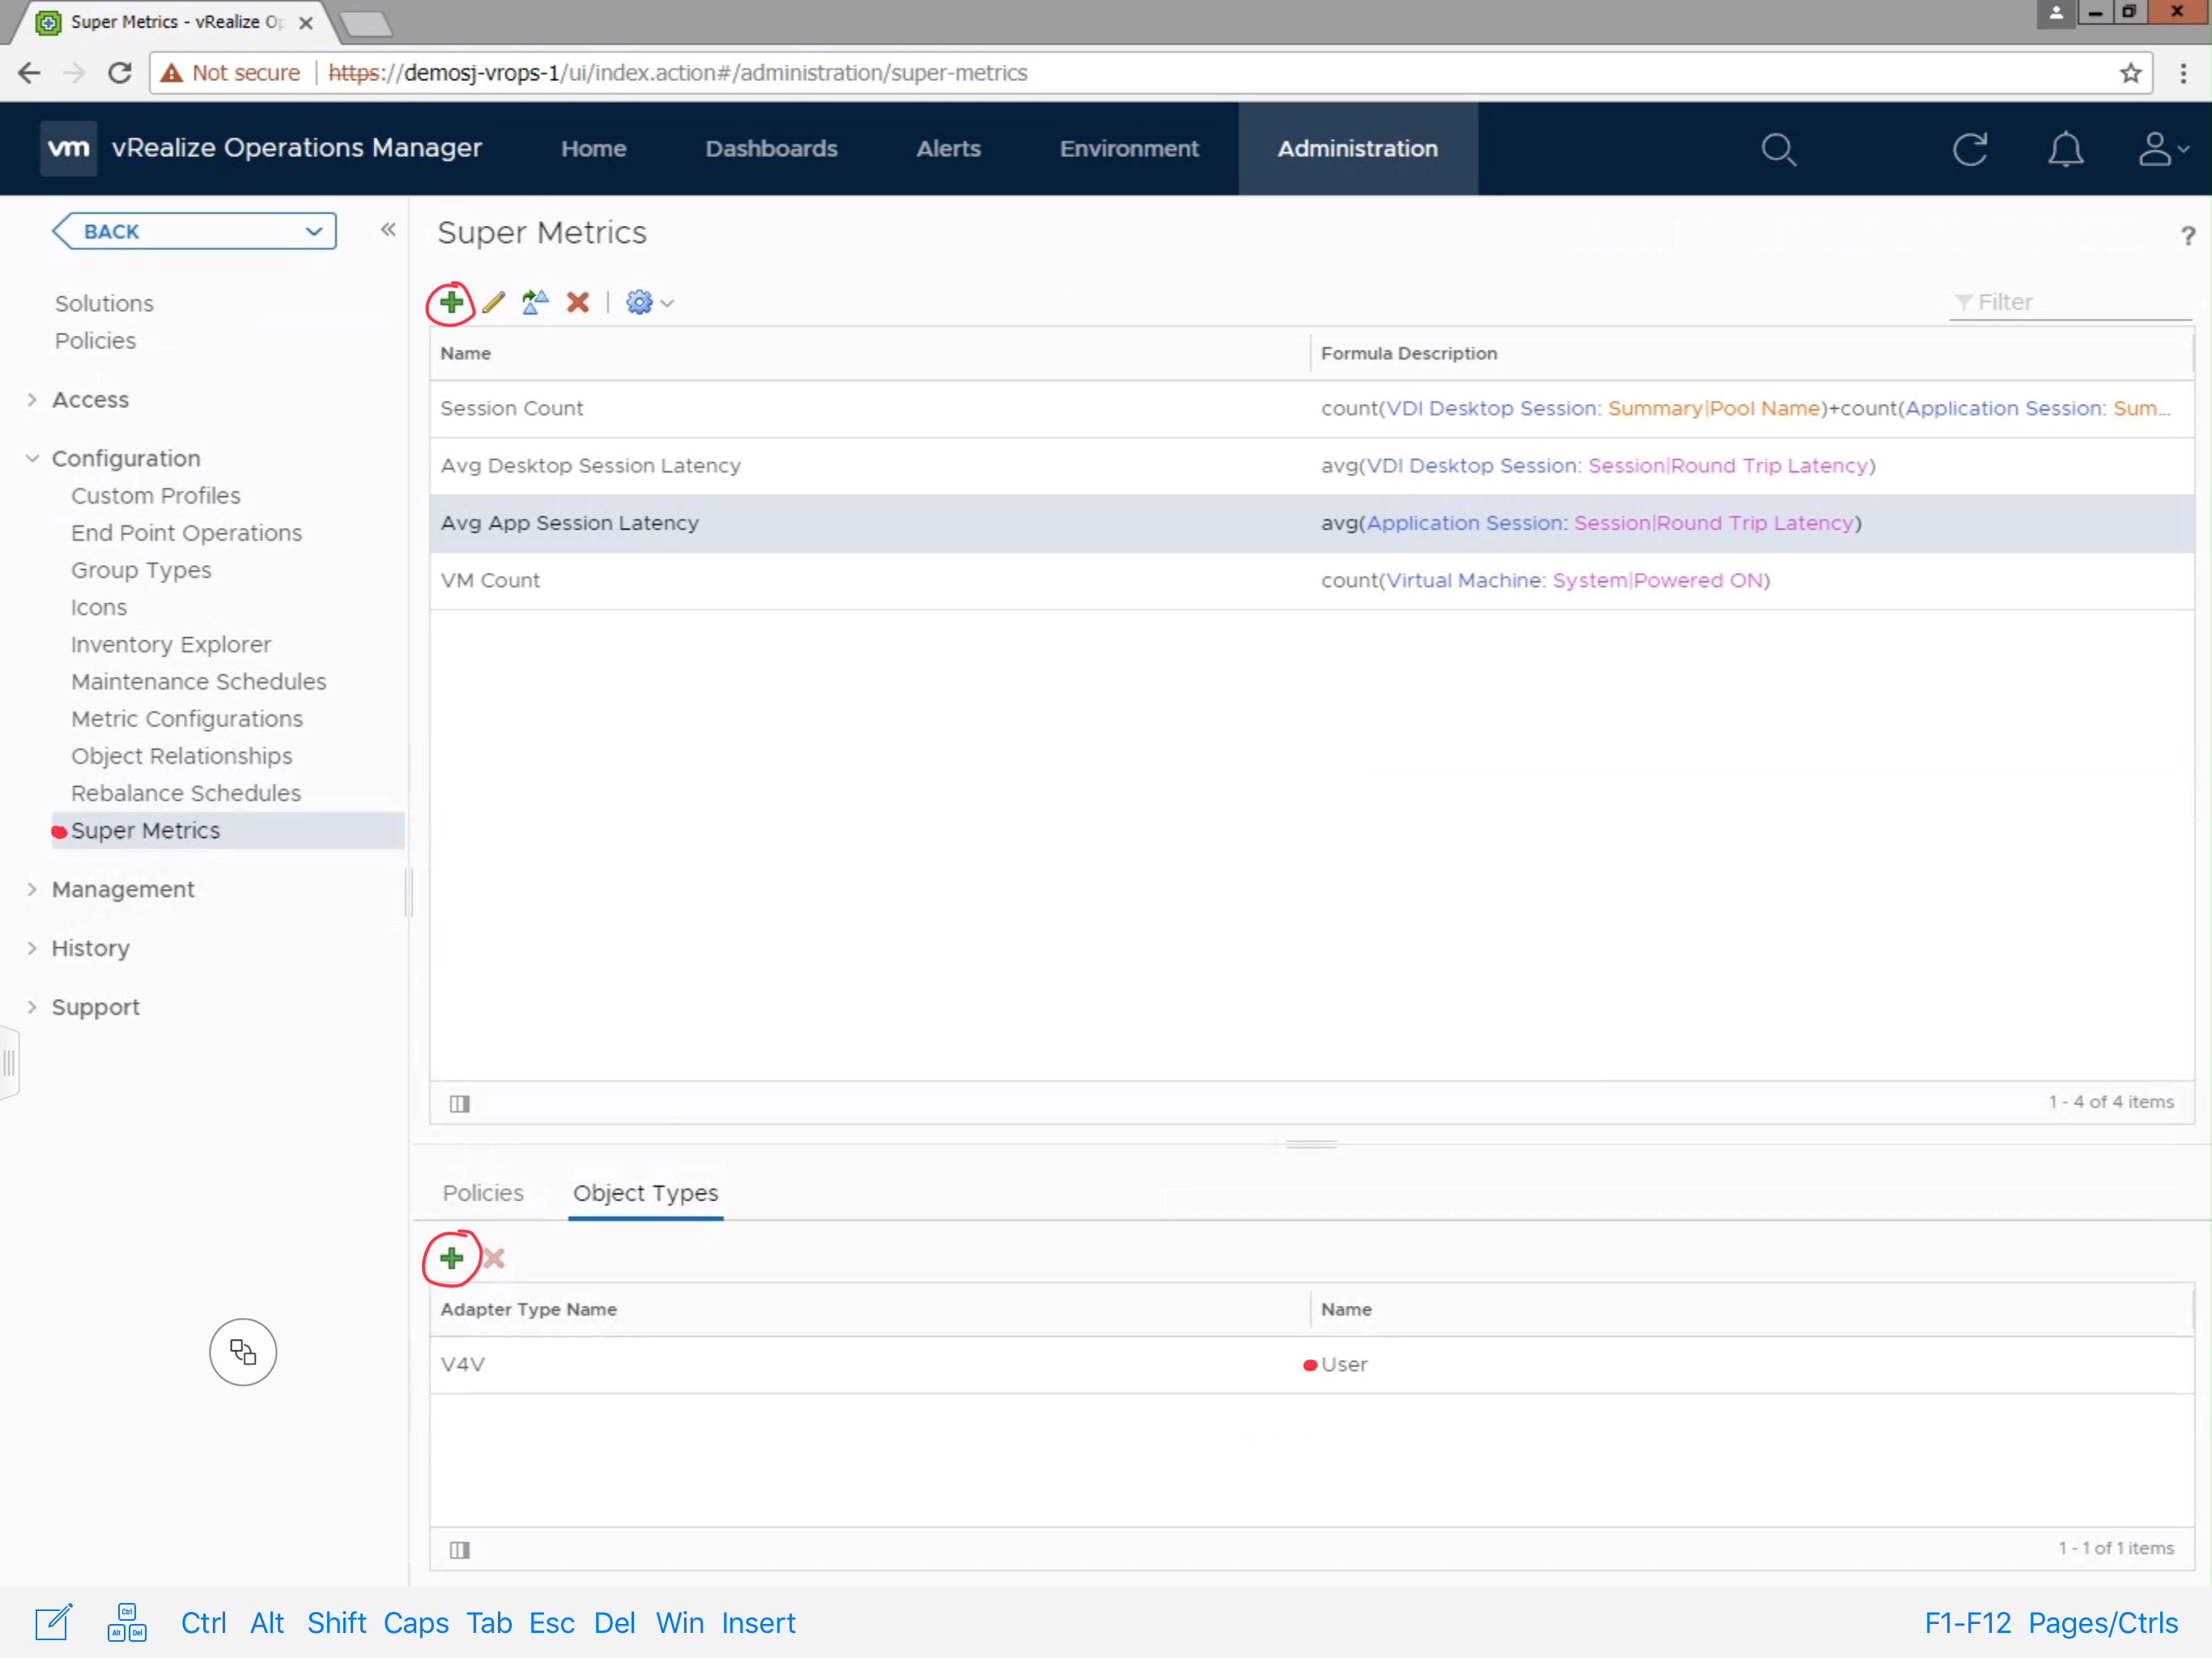
To create the Super Metric, Navigate to Administration -> Configuration -> Super Metrics.  Click the green + sign to create a new Super Metric.

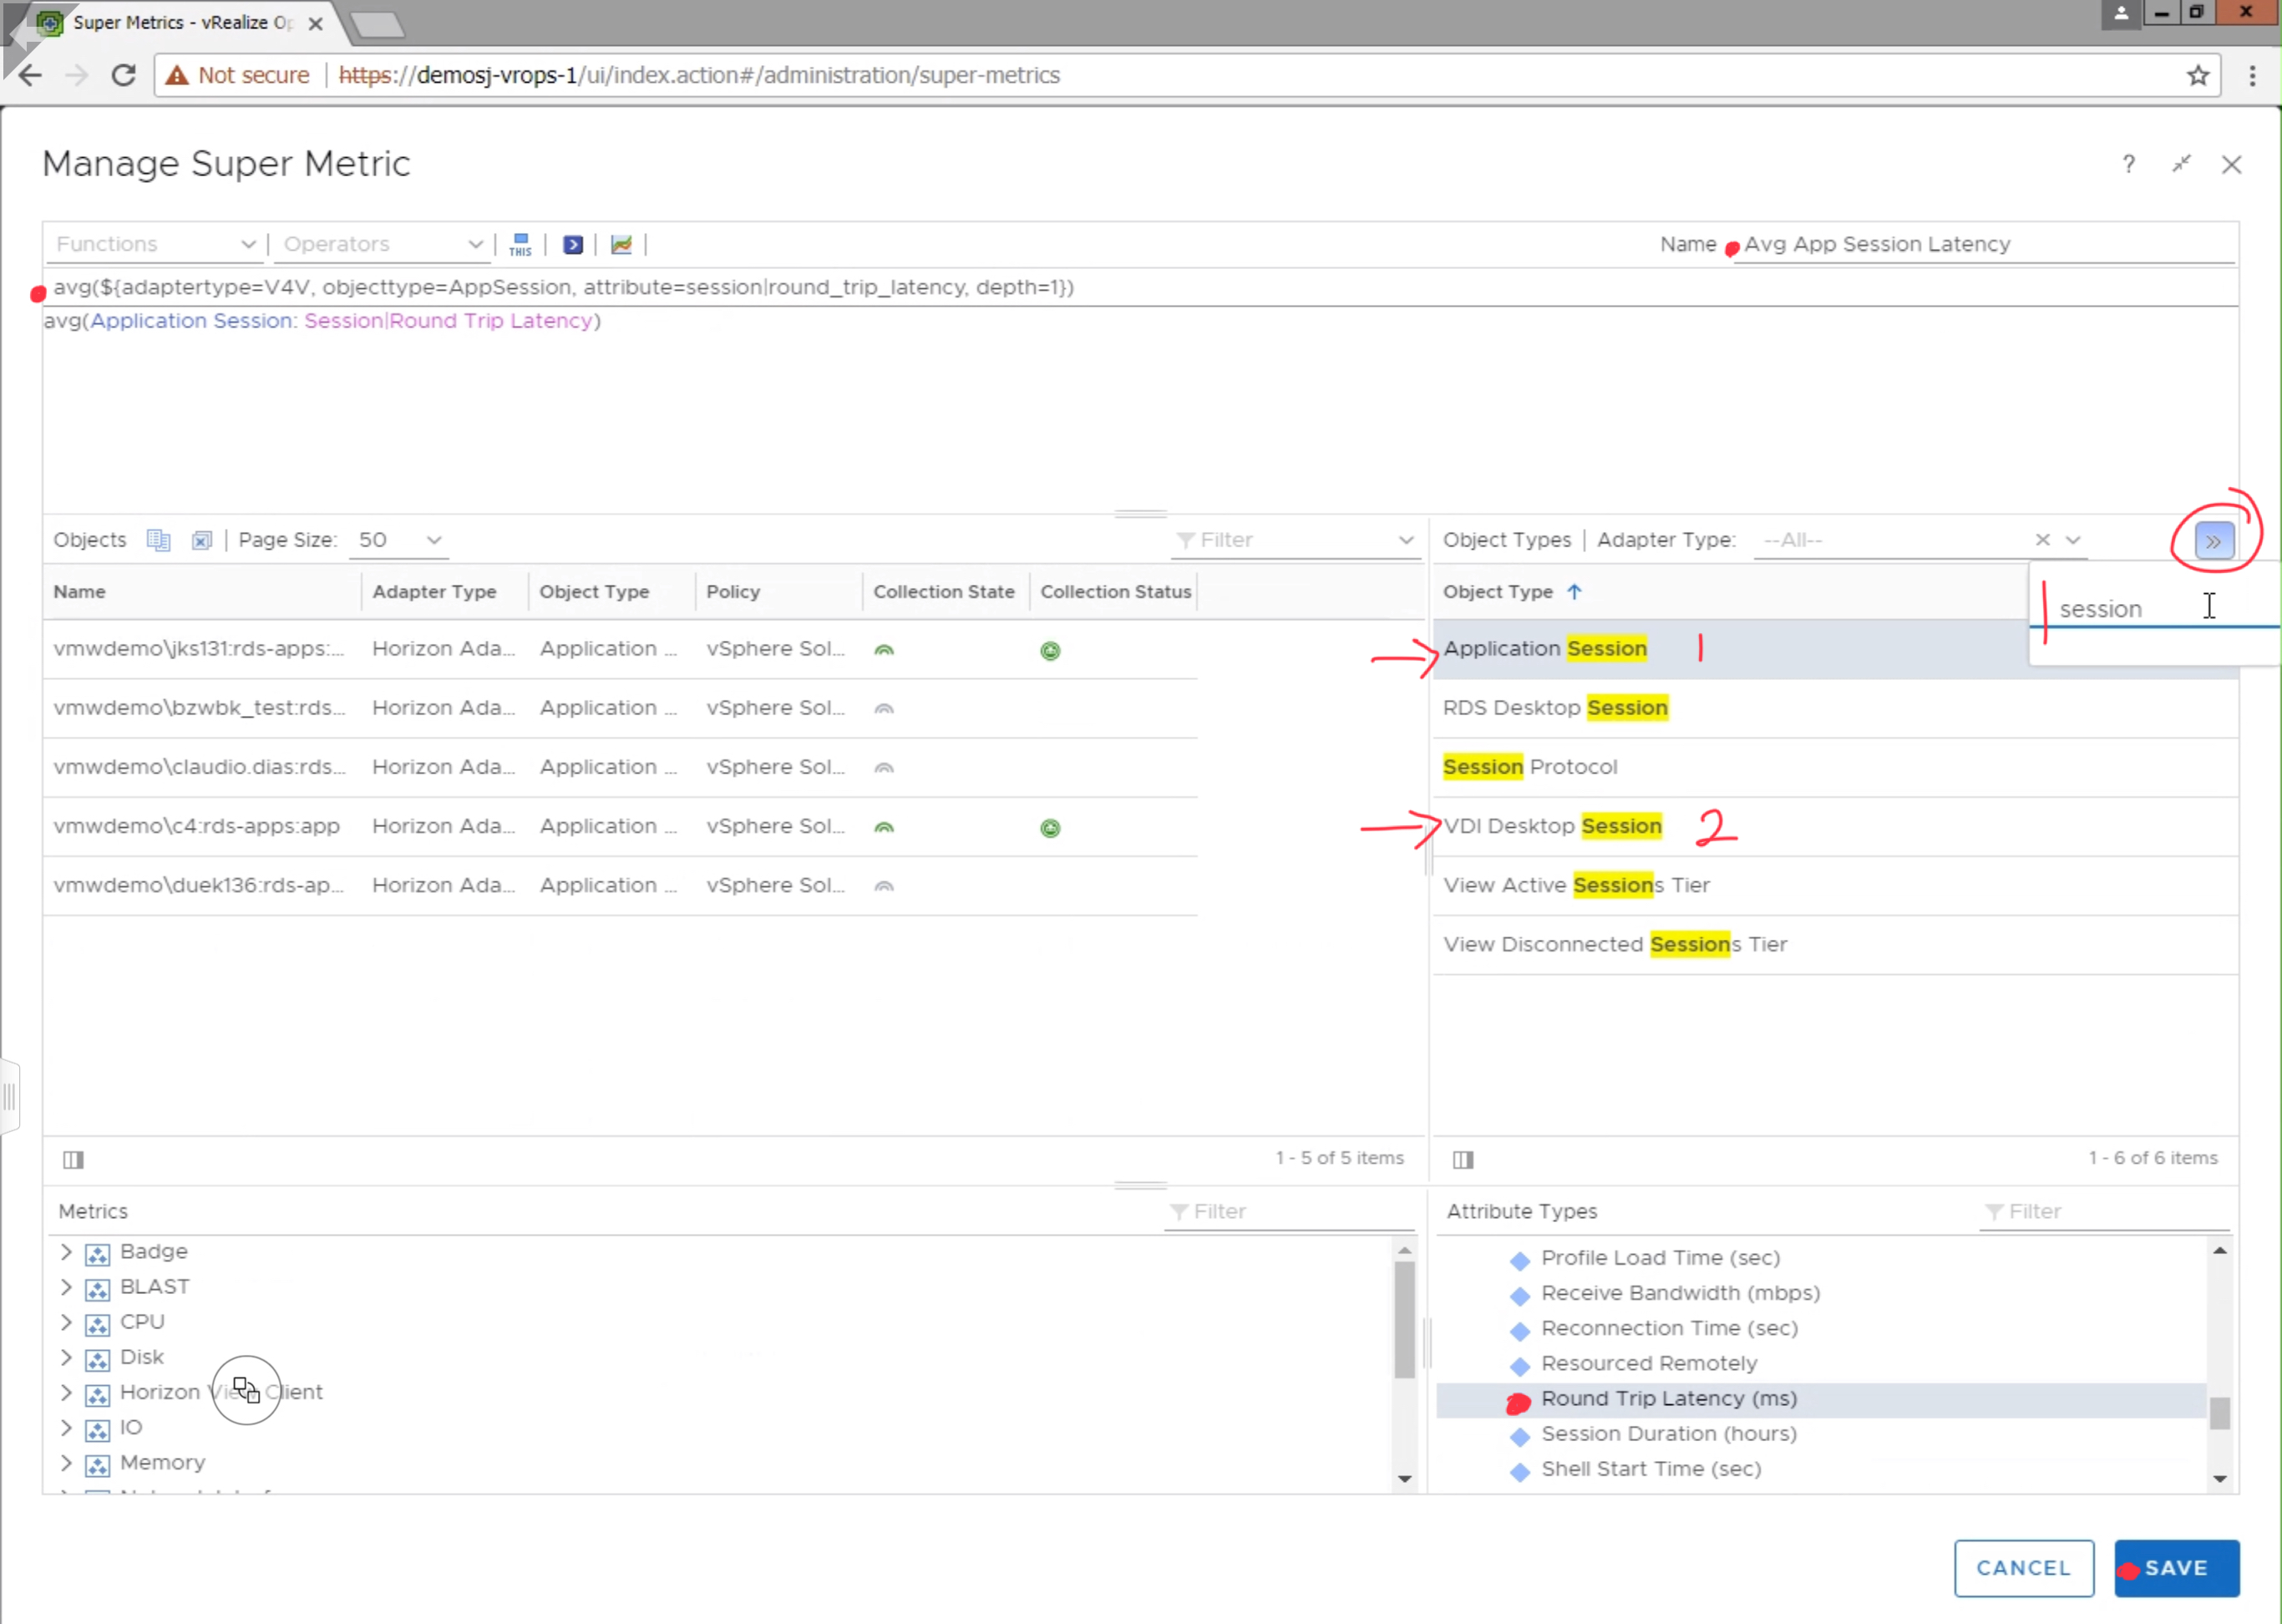
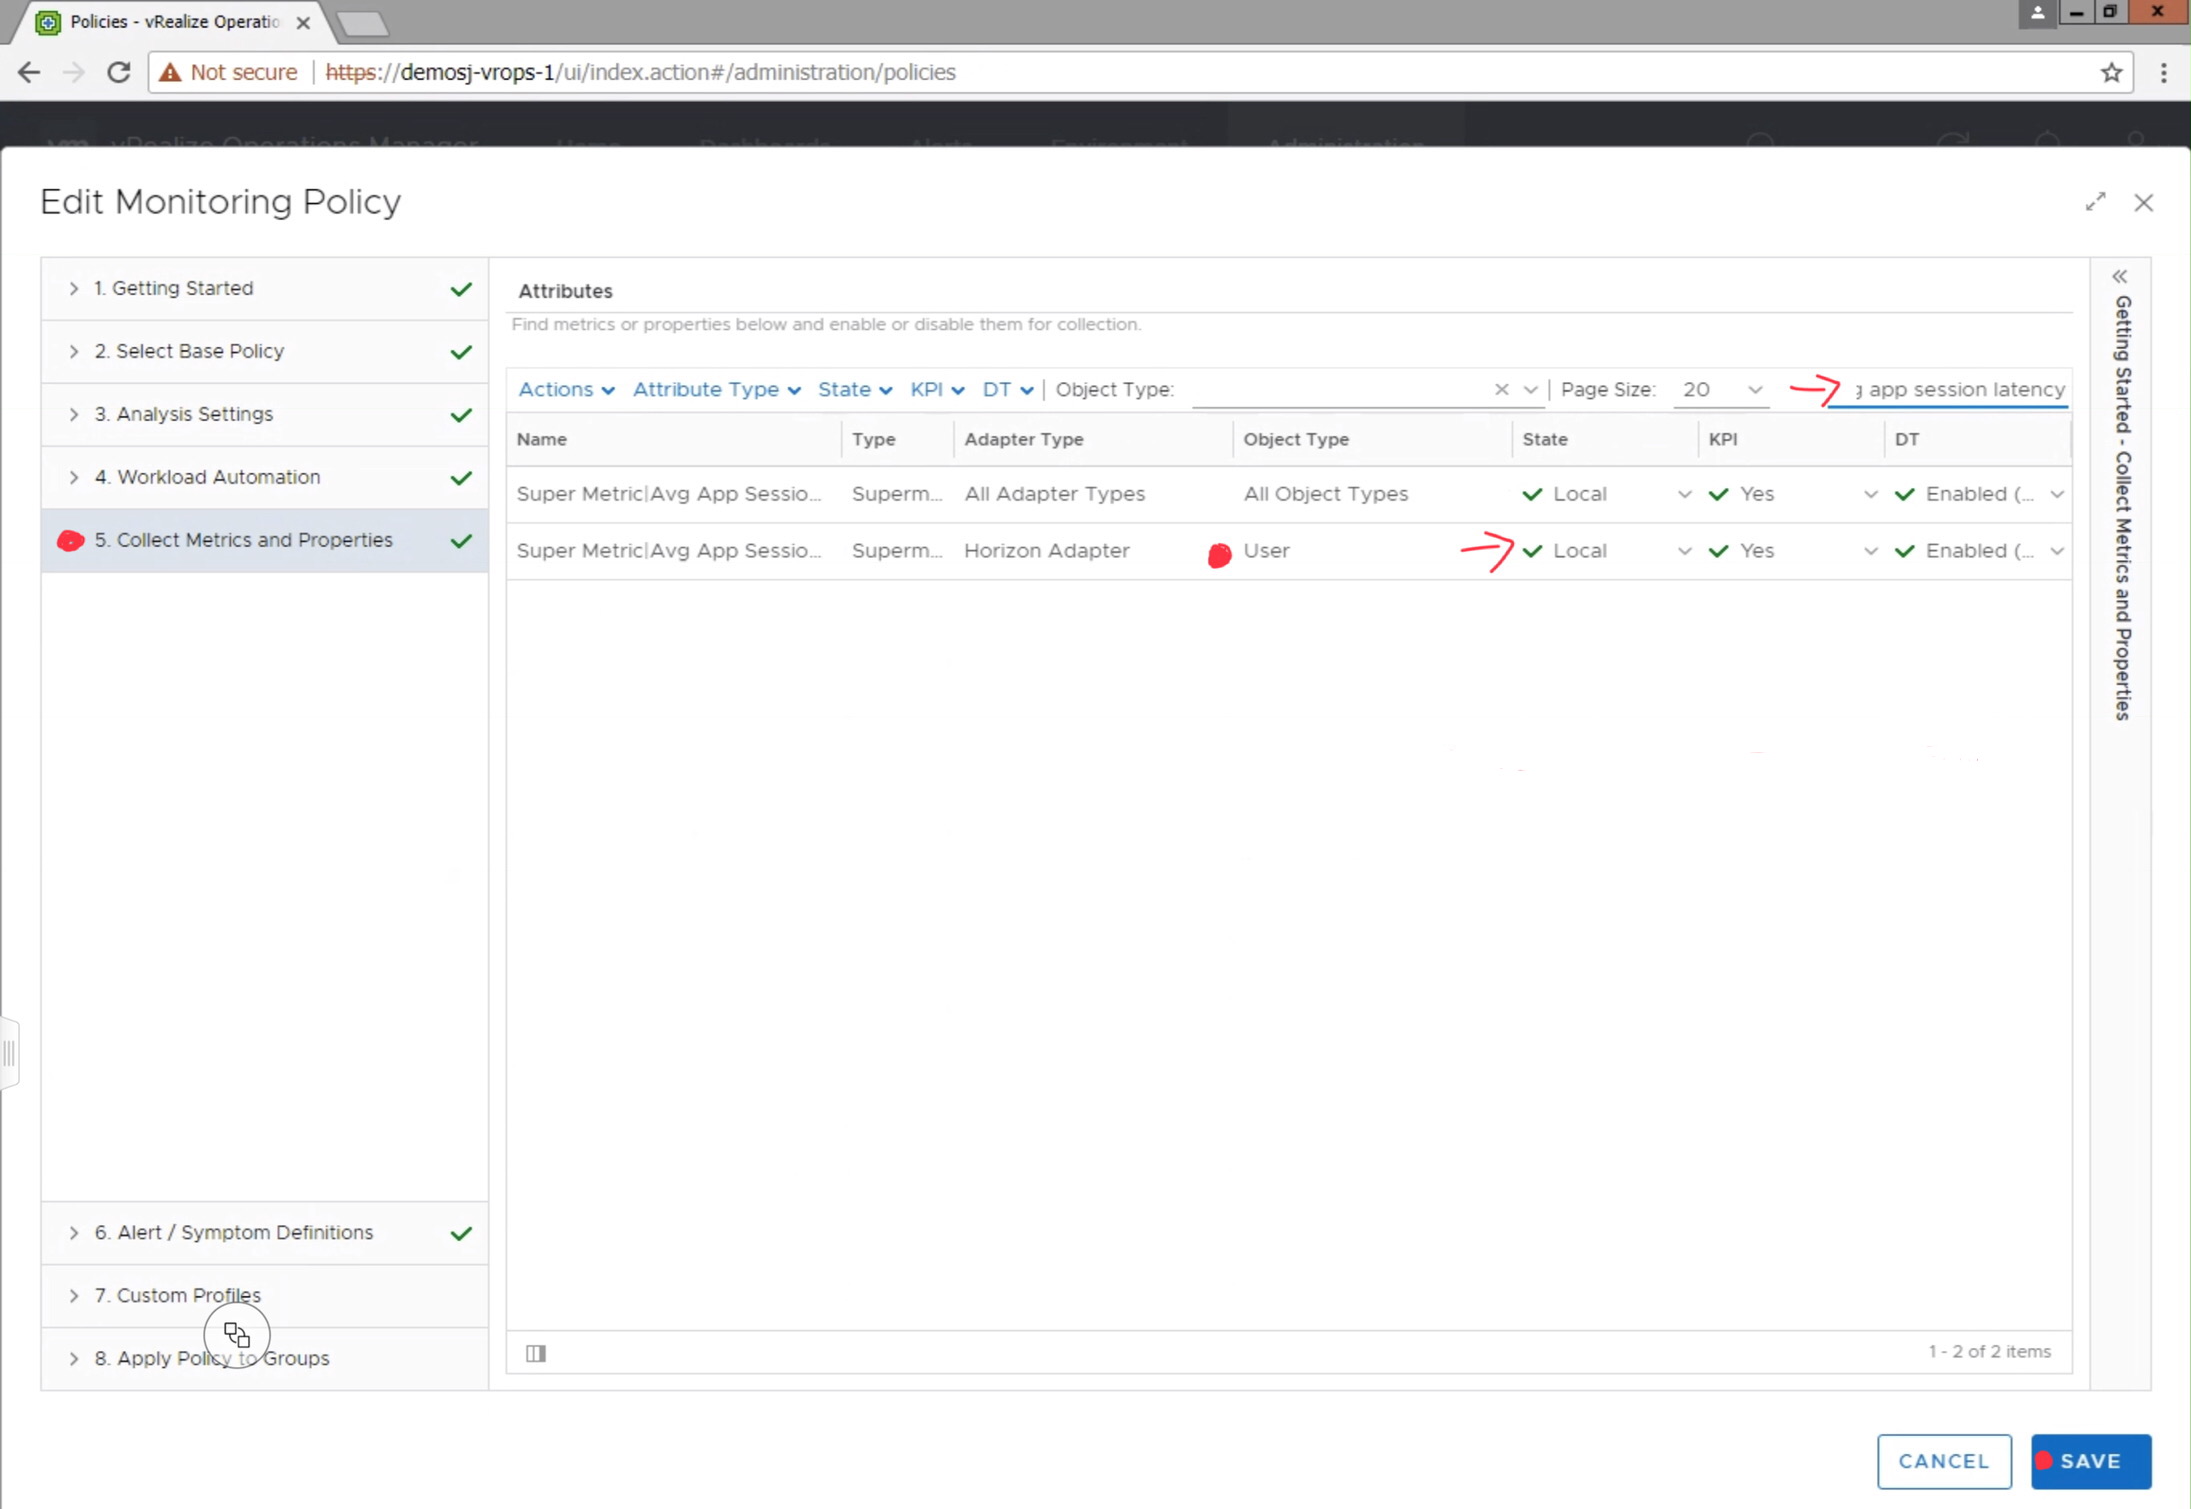
Provide the Super Metric a unique name, in this case we are using “Avg App Session Latency”.  Search for the  “Application Session” Object Type, and click “Round Trip Latency (ms)” to add it to the Super Metric.  Since, we are looking for the average latency, select “avg” from the available functions list, making sure that the average function applies to the metric by encapsulating it parenthesis as demonstrated in the image below.  Click Save to finish the Super Metric.


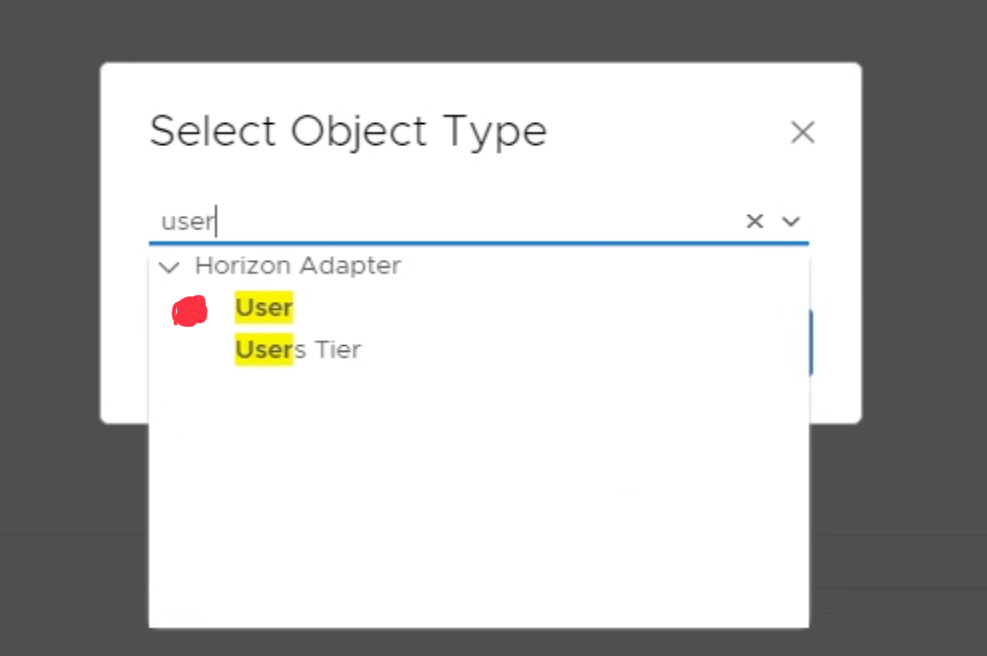
Next, you will need to add the Super Metric to the “User” object type.  Click the green + sign under the “Object Types” section.  Search and select the “User” object type.

Before the Super Metric will begin collecting data, you will need to navigate to Administration-> Policies, and edit the active monitoring policy to enable the metric for collection.

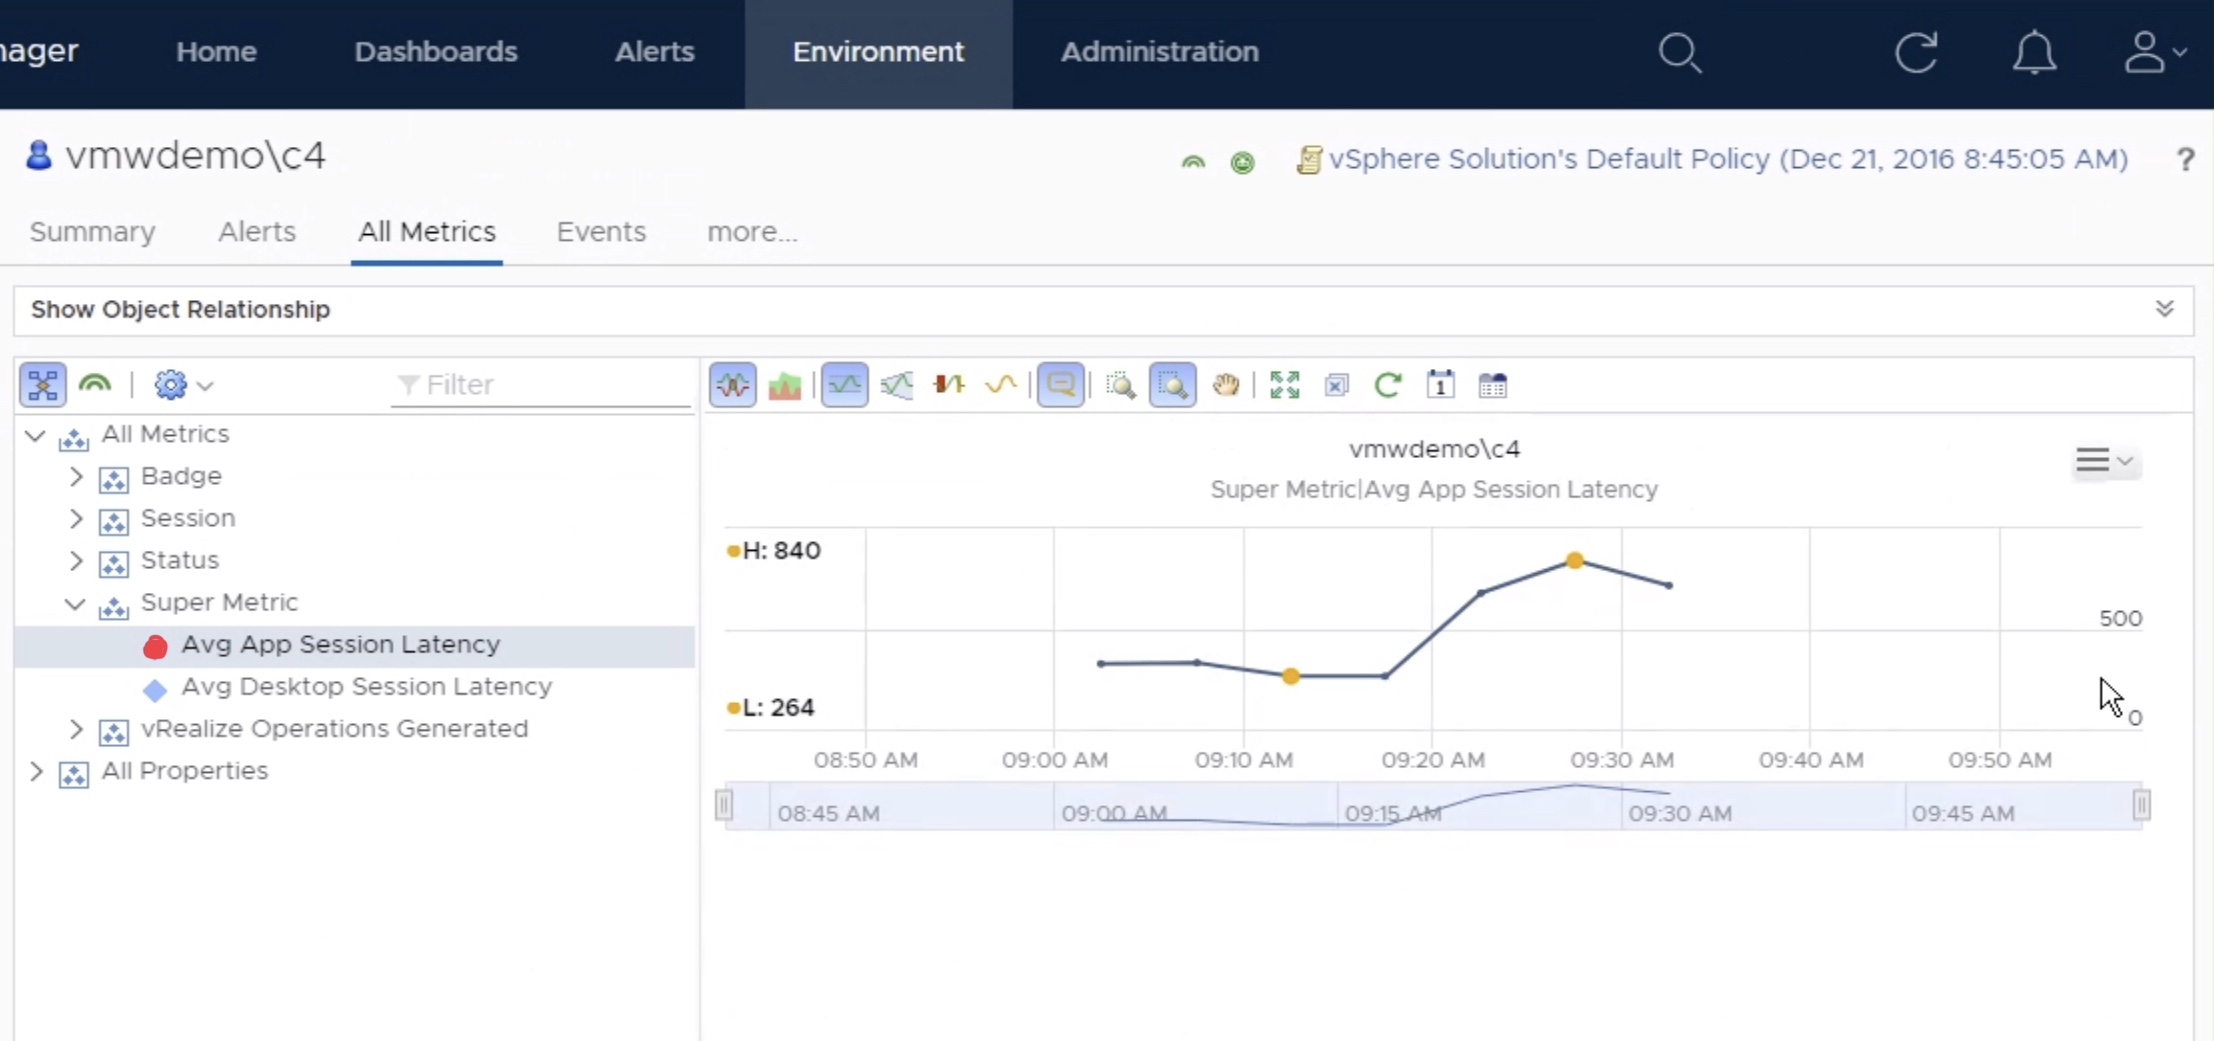
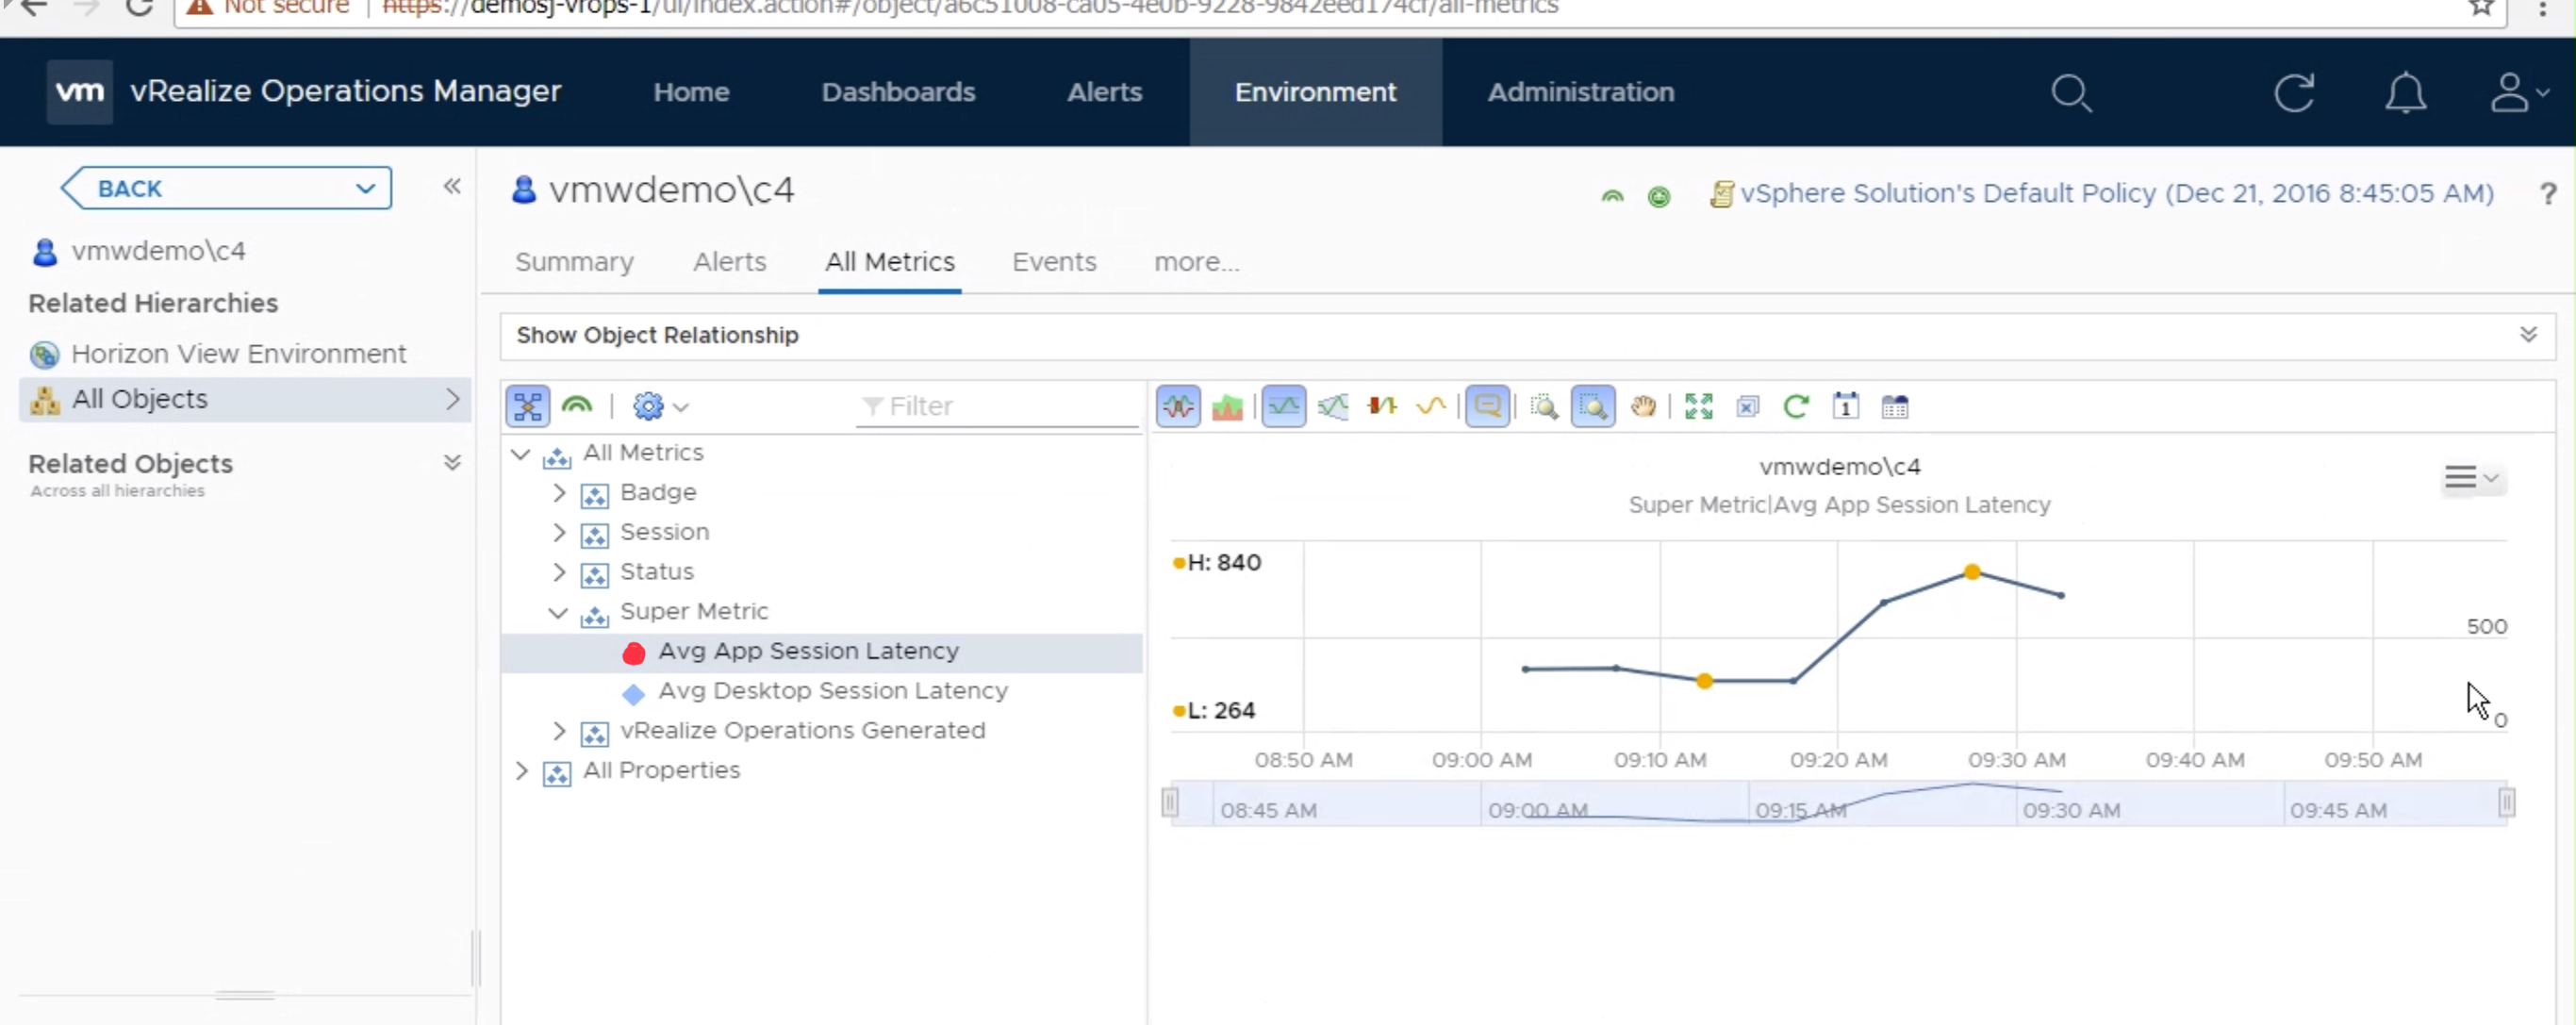
Once the metric has started to collect data, you can view the data on a individual “User” object by selecting “All Metrics” -> Super Metric -> select metric.

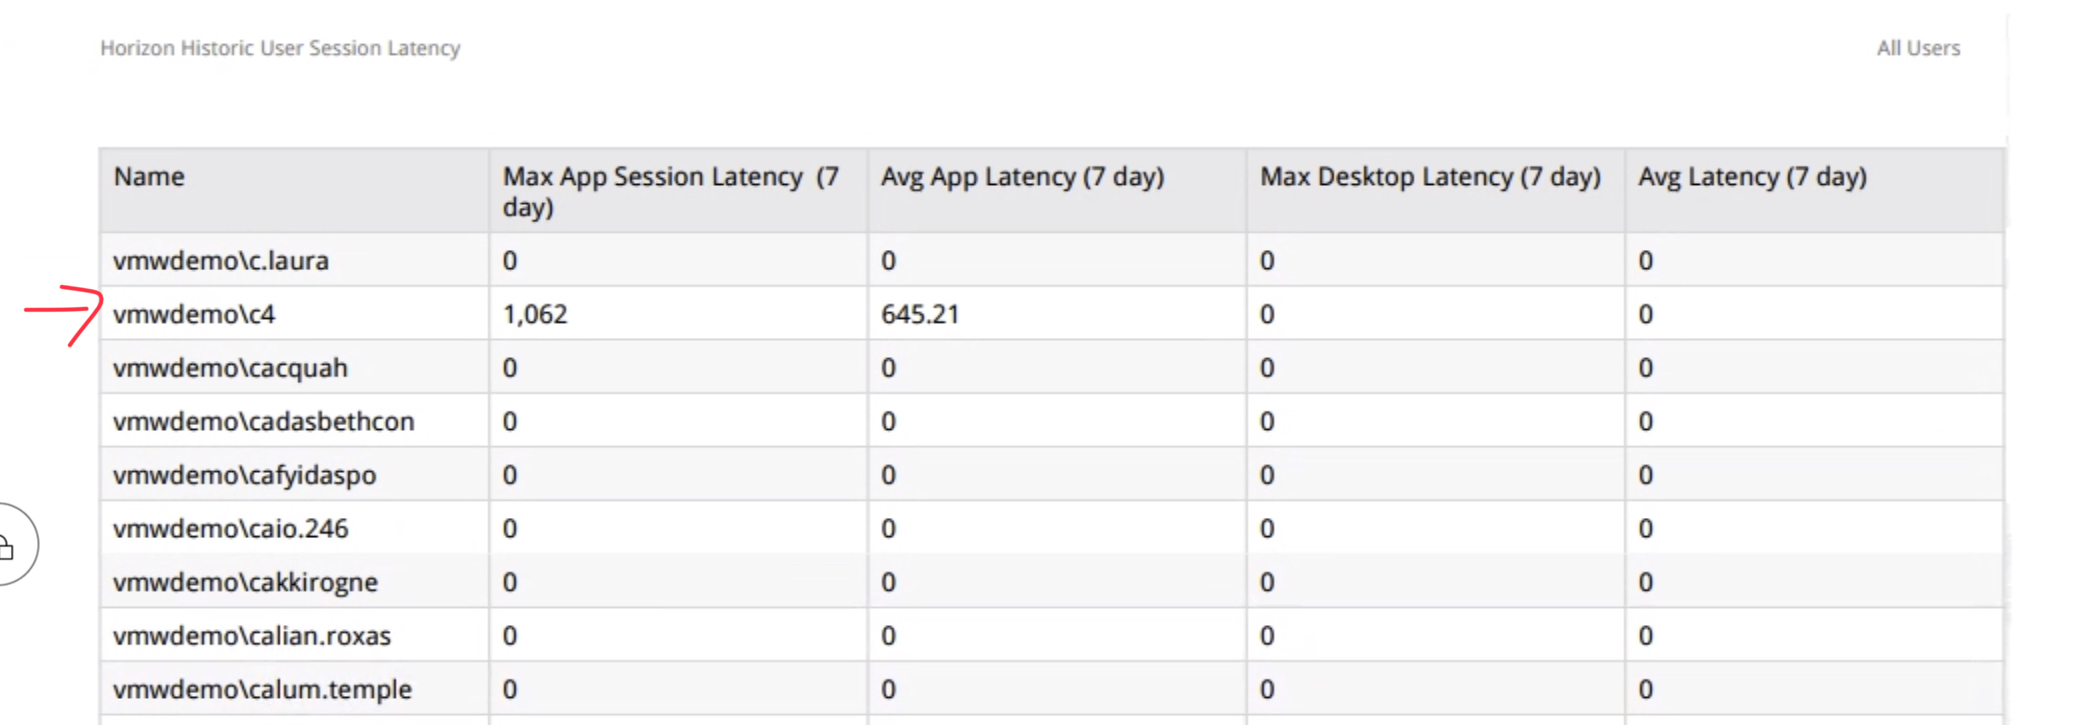
You can also create custom Views that display the historical latency for all users of the environment, as well as perform simple roll-up statistics.

Identifying VMs with RDMs for Categorisation in vRealize Operations

I had a customer with a very large legacy estate of very large VMs with RDMs attached, both physical and virtual. We were implementing vRealize Operations (vROps) and the customer wished for a way to automatically categorise and discover all VMs which had an RDM attached to them in the vROps dashboards and reports.

There are many ways to attempt to do this but it was decided that the simplest was to create a PowerCLI script to add a vCenter Custom Attribute to all VMs with an RDM attached. This Custom Attribute will automatically show as a property in vROps against the VM object, allowing for a new Custom Group to be created for VMs with and without RDMs. As vROps custom groups can be set for dynamic membership, the groups can be kept up to date without further configuration within vROps.

This script is designed to be run on a regular basis in order to account for new machines being added.

#load VMware PowerCLI module
if ((Get-PSSnapin | where {$_.Name -ilike "VMware.VimAutomation.Core"}).Name -ine "VMware.VimAutomation.Core"){
	Write-Host "Loading VMware PowerCLI"
	Add-PSSnapin VMware.VimAutomation.Core -ErrorAction SilentlyContinue
}

#Disconnect from any active vCenter sessions
If ($global:DefaultVIServers) {
    Disconnect-VIServer -Server $global:DefaultVIServers -Confirm:$false -Force:$true
    }

#define variables
$VMwithRDM=@()

#Retrieve Local Hostname
$LocalvCenter=[System.Net.Dns]::GetHostByName((hostname)).HostName

#Connect to servers

Write-Host "Connecting to Local vCenter"
Connect-VIServer $LocalvCenter 

try {
	#Check if CustomAttributes Exist, if not create them
	if ((Get-CustomAttribute -Name 'RDMAttached' -TargetType VirtualMachine -ErrorAction:SilentlyContinue) -eq $null){
			Write-Host "Creating Custom Attribute RDMAttached"
			New-CustomAttribute -Name "RDMAttached" -TargetType VirtualMachine
	}
	
	
	#Write Annotations for VMs with RDMs Attached
	Write-Host "Writing Annotations" -NoNewline
	
	$VMwithRDM = Get-VM | Where-Object {$_ | Get-HardDisk -DiskType "RawPhysical","RawVirtual"}


	foreach($vm in $VMwithRDM){
		#Write annotations
		$vm|Set-Annotation -CustomAttribute "RDMAttached" -Value "True"
		Write-Host "." -NoNewline
	}#end Write Annotation
	Write-Host "`n"	


} #end of try

Catch {
	Write-Host $_.Exception.Message -ForegroundColor Red
}

Finally{
	Write-Host "Disconnecting from vCenter"
	Disconnect-VIServer -Confirm:$false -Force:$true
}

End User Computing – The Road to a Modern Desktop

This is a prezi presentation for at a talk I presented at a TechnologyUG event discussing the steps involved in planning any EUC project and the pitfalls to avoid.

I promise it was better with the full talk around the highlighted points, but it covers the major steps of going through an EUC project. Note that I say “EUC” not “VMware Horizon VDI” because it is better to discover the correct fit for a customer. I have seen projects fail because a consultant or customer have been doggedly attached to a specific idea or vendor where another solution or approach might be a better fit.

It doesn’t go into the greater detail of Application Virtualisation technologies such as AppVolumes, FlexApp, App-V, ThinApp due to time constraints but the greatest take away I want to push is that you must do a pre assessment of the current state. Without that you are doomed to failure.

[prezi url=”http://prezi.com/nwj6prlyaysz/” width=”550″ height=”400″ zoom_freely=”Y” ]

Script for restarting vSAN services on ESXi hosts

On a recent project we discovered an issue with vSAN which necessitated restarting the vSAN services on all of the hosts in the affected vSAN cluster.

So digging into the bag brought out the script detailed in an earlier post for updating Likewise settings on ESXi hosts http://www.caenotech.co.uk/vmware/script-for-updating-likewise-and-registry-configuration-on-esxi/

This is an adaption of that script, advanced and simplified for restarting vSAN Services, which might be more applicable and useful for reuse in the future without the complexity of escape characters and spaces within the Likewise registry

This script is designed to run on a Windows Server 2012 R2 server using Powershell 4.0 along with plink (a command-line interface to the PuTTY back ends) which can be downloaded from https://www.putty.org

If you run the script it will produce a csv file called hosts.csv in the folder c:\temp to be used as a template. Running the script again with the csv file completed will proceed to run the script connecting to each host listed in the csv file and then output a csv file called export.csv in the c:\temp\ folder with the results.

$hostList = "c:\temp\Hosts.csv"


if (-NOT (Test-Path $hostList)) {


	[pscustomobject]@{ Hostname =  'Host1'; Password = 'Password1' } | Export-Csv -Path  $hostList -Append -NoTypeInformation

	" "
	"----------------------------------------------"
	"-------- Host file CSV does not exist --------"
	"-- Creating empty file in" + $hostList + " --"
	"---- Please complete and run script again ----"
	"----------------------------------------------"
	" "		


	exit
}

$csv = Import-Csv $hostList


$table=@()


foreach($item in $csv)
	{
		" "
		"-------------------------------------------"
		"-- Hostname = "+$($item.Hostname)+" --"
		"-------------------------------------------"
		" "		
		
		$plink = '"C:\Program Files\PuTTY\plink.exe" -v -batch -pw'
        $plinkCachekey = 'echo y | "C:\Program Files\PuTTY\plink.exe" -pw'
		$esxUser = ' root@'
        $exitCmd = ' exit'
		$serviceCmd = ' /etc/init.d/vsanmgtd status'
		$serviceCmd2 = ' /etc/init.d/vsanmgtd restart'
		$serviceCmd3 = ' /etc/init.d/vsanvpd status'
		$serviceCmd4 = ' /etc/init.d/vsanvpd restart'
		
		$grep = '| grep '
		$quote = '"'

        $plinkCacheKeyCmd = $plinkCachekey + " " + $($item.Password) + $esxUser + $($item.Hostname) + $exitCmd


		$serviceRestartCmd = $plink + " " + $($item.Password) + $esxUser + $($item.Hostname) + $serviceCmd
		$serviceRestartCmd2 = $plink + " " + $($item.Password) + $esxUser + $($item.Hostname) + $serviceCmd2
		$serviceRestartCmd3 = $plink + " " + $($item.Password) + $esxUser + $($item.Hostname) + $serviceCmd3
		$serviceRestartCmd4 = $plink + " " + $($item.Password) + $esxUser + $($item.Hostname) + $serviceCmd4


		" "
		"----------------------------------"
		"-------- Cacheing SSH Key --------"
		"----------------------------------"
		" "
        
        Invoke-Expression -command 'cmd.exe /c $plinkCacheKeyCmd'
        

			" "
			"----------------------------------"
			"-------- Status vsanmgtd Service -------"
			"----------------------------------"
			" "

			$StatusResult = Invoke-Expression -command 'cmd.exe /c $serviceRestartCmd'
			$StatusResult1 = $StatusResult
			
			" "
			"----------------------------------"
			"------- Restarting vsanmgtd Service -------"
			"----------------------------------"
			" "

			Invoke-Expression -command 'cmd.exe /c $serviceRestartCmd2'
			$table += $row
		
					" "
			"----------------------------------"
			"-------- Status vsanvpd Service -------"
			"----------------------------------"
			" "

			$StatusResult = Invoke-Expression -command 'cmd.exe /c $serviceRestartCmd3'
			$StatusResult2 = $StatusResult
			
			" "
			"----------------------------------"
			"------- Restarting vsanvpd Service -------"
			"----------------------------------"
			" "

			Invoke-Expression -command 'cmd.exe /c $serviceRestartCmd4'
			$row = new-object PSObject -Property @{
				Hostname = $($item.Hostname);
				StatusResult1 = $StatusResult1;
				State1 = 'Complete'
				StatusResult2 = $StatusResult2;
				State2 = 'Complete'
				}
			$table += $row
		
		" "
		"--------------------------------------------------------"
		"-- Finished with Hostname = "+$($item.Hostname)+" --"
		"--------------------------------------------------------"
		" "	


	}

$table | Select-Object Hostname,StatusResult1,StatusResult2,State1,State2 | Export-Csv -Path C:\temp\export.csv -NoTypeInformation 

Script for Updating Likewise and registry configuration on ESXi

On my latest project we had an issue with ESXi hosts joined to a disjointed namespace domain which resulted in a large amount of logfiles which quickly overwhelmed the host’s local log buffer and quickly reduced our Log Insight cluster’s planned retention period. The workaround was to make a change to the Registry in Likewise (setting DomainManagerIgnoreAllTrusts to “1”) on each host, which necessitated logging into each host and running some commands.

With the sheer number of hosts we were faced with, each with their own unique complex root password, and limited change windows, a script to automate this was called for. Especially if it can be quickly altered for reuse with other commands.

I apologise in advance to all my Powershell aficionado colleagues for the quality, but needs must.

This script is designed to run on a Windows Server 2012 R2 server using just Powershell 4.0 (no PowerCLI) along with plink (a command-line interface to the PuTTY back ends) which can be downloaded from https://www.putty.org

If you run the script it will produce a csv file called hosts.csv in the folder c:\temp to be used as a template. Running the script again with the csv file completed will proceed to run the script connecting to each host listed in the csv file and then output a csv file called export.csv in the c:\temp\ folder with the results.

$hostList = "c:\temp\Hosts.csv"


if (-NOT (Test-Path $hostList)) {

	" "
	"----------------------------------------------"
	"-------- Host file CSV does not exist --------"
	"-- Creating empty file in" + $hostList --"
	"---- Please complete and run script again ----"
	"----------------------------------------------"
	" "		


	[pscustomobject]@{ Hostname =  'Host1'; Password = 'Password1' } | Export-Csv -Path  $hostList -Append -NoTypeInformation
	exit
}

$csv = Import-Csv $hostList


$table=@()


foreach($item in $csv)
	{
		" "
		"-------------------------------------------"
		"-- Hostname = "+$($item.Hostname)+" --"
		"-------------------------------------------"
		" "		
		
		$plink = '"C:\Program Files\PuTTY\plink.exe" -v -batch -pw'
        $plinkCachekey = 'echo y | "C:\Program Files\PuTTY\plink.exe" -pw'
		$esxUser = ' root@'
        $exitCmd = ' exit'
		$remoteCmd1 = ' .//usr/lib/vmware/likewise/bin/lwregshell set_value ''[HKEY_THIS_MACHINE\Services\lsass\Parameters\Providers\ActiveDirectory]'''
		$remoteCmd2 = ' "DomainManagerIgnoreAllTrusts"'
		$remoteCmdTest = ' ".//usr/lib/vmware/likewise/bin/lwregshell ls ''[HKEY_THIS_MACHINE\Services\lsass\Parameters\Providers\ActiveDirectory]'''
		$serviceCmd = ' /etc/init.d/lwsmd reload'
		$serviceCmd2 = ' /etc/init.d/lwsmd restart'
		$serviceCmd3 = ' /etc/init.d/lwsmd start'
		$grep = '| grep '
		$quote = '"'

        $plinkCacheKeyCmd = $plinkCachekey + " " + $($item.Password) + $esxUser + $($item.Hostname) + $exitCmd

		$finalCmd = $plink + " " + $($item.Password) + $esxUser + $($item.Hostname) + $remoteCmd1 + $remoteCmd2 + " 1"
		$finalCmdTest = $plink + " " + $($item.Password) + $esxUser + $($item.Hostname) + $remoteCmdTest + $grep + $remoteCmd2 + $quote

		$serviceRestartCmd = $plink + " " + $($item.Password) + $esxUser + $($item.Hostname) + $serviceCmd
		$serviceRestartCmd2 = $plink + " " + $($item.Password) + $esxUser + $($item.Hostname) + $serviceCmd2
		$serviceRestartCmd3 = $plink + " " + $($item.Password) + $esxUser + $($item.Hostname) + $serviceCmd3

		" "
		"----------------------------------"
		"-------- Cacheing SSH Key --------"
		"----------------------------------"
		" "
        
        Invoke-Expression -command 'cmd.exe /c $plinkCacheKeyCmd'
        
		" "
		"----------------------------------"
		"---- Checking Current Setting ----"
		"----------------------------------"
		" "
        

		$regKeyCheck = Invoke-Expression -command 'cmd.exe /c $finalCmdTest'
        
        "keyreg = " + $regKeyCheck 
		
        If($regKeyCheck -ne $null){

            $regKeyCheck = $regKeyCheck.Substring($regKeyCheck.get_Length()-2)
		    $regKeyCheck = $regKeyCheck.Substring(0,1)
			$likewiseEnabledAtStart = 'Yes'
        }
		Else{
			$regKeyCheck = '0'
			Invoke-Expression -command 'cmd.exe /c $serviceRestartCmd3'
			$likewiseEnabledAtStart = 'No'

		}

		If($regKeyCheck -eq '0') {
		
			" "
			"----------------------------------"
			"--------- Applying Change --------"
			"----------------------------------"
			" "

			Invoke-Expression -command 'cmd.exe /c $finalCmd'		

			" "
			"----------------------------------"
			"------------ Checking ------------"
			"----------------------------------"
			" "
            
			$regKey = Invoke-Expression -command 'cmd.exe /c $finalCmdTest'

			$regKey = $regKey.Substring($regKey.get_Length()-2)
			$regKey = $regKey.Substring(0,1)


			" "
			"----------------------------------"
			"-------- Reloading Service -------"
			"----------------------------------"
			" "

			$reloadResult = Invoke-Expression -command 'cmd.exe /c $serviceRestartCmd'
			$reloadResult = $reloadResult.Substring($reloadResult.get_Length()-2)
			
			" "
			"----------------------------------"
			"------- Restarting Service -------"
			"----------------------------------"
			" "

			Invoke-Expression -command 'cmd.exe /c $serviceRestartCmd2'
			$row = new-object PSObject -Property @{
				Hostname = $($item.Hostname);
				KeyValue = $regKey;
				ReloadResult = $reloadResult;
				likewiseEnabledAtStart = $likewiseEnabledAtStart;
				State = 'Complete'
				}
			$table += $row
			
		}
		Else{
			$row = new-object PSObject -Property @{
				Hostname = $($item.Hostname);
				KeyValue = $regKeyCheck;
				ReloadResult = 'NA';
				likewiseEnabledAtStart = $likewiseEnabledAtStart;
				State = 'Not Required'
				}
			$table += $row
		}
		
		
		" "
		"--------------------------------------------------------"
		"-- Finished with Hostname = "+$($item.Hostname)+" --"
		"--------------------------------------------------------"
		" "	


	}

$table | Select-Object Hostname,KeyValue,ReloadResult,likewiseEnabledAtStart,State | Export-Csv -Path C:\temp\export.csv -NoTypeInformation 

[Podcast] What is VDI anyway?

I was asked to join a podcast with my colleague Matt Tupper to discuss all things VDI.

Joining us in this episode are Senior Consultants, Matt Tupper and Chris Mitchell, who talk us through Virtual Desktop Infrastructure (VDI). Our guests investigate the importance of VDI, its appeal to organisations, the key players within the space and the benefits that it’s adoption is bringing.

Matt and Chris also explore the trends in the adoption of VDI that Xtravirt are seeing among their clients, the potential pitfalls clients come across when moving towards it and the questions to ask to avoid mistakes, as well as where the future is heading.

  • What is VDI and why is it important?
  • Which market factors are driving adoption of the VDI model?
  • Who are the key players within VDI?
  • What are the potential pitfalls when moving towards a VDI model?
  • Where is the future heading?

Upgrading VMware Log Insight

Upgrading the existing VMware Log Insight (vRLI) appliances using upgrade pak method. The steps are for 4.6.0 to 4.6.1 but are applicable to all 4.x upgrades.

Overview

This will detail the steps required for the In-place Upgrade Procedure of a VMware vRealize Log Insight (vRLI) Appliance

Pre-requisites:

  1. Verify that VMware Log Insight is properly configured.
  • Download required upgrade files and update script.
    • Download Upgrade Files: VMware vRealize Log Insight 4.6.1 – Upgrade Package from my.vmware.com.
  • Upgrading must be done from the master node’s FQDN. Upgrading with the Integrated Load Balancer IP address is not supported.
  • When performing a manual upgrade, you must upgrade workers one at a time. Upgrading multiple workers at the same time causes an upgrade failure. When you upgrade the master node to vRealize Log Insight 4.6.1, a rolling upgrade occurs unless specifically disabled.
  • If the vRealize Log Insight upgrade (.pak file) has a  new JRE version, then the user-installed certificates in a vRealize Log Insight setup (such as for event forwarding) become invisible after upgrade. 

Upgrade Method:

  1. Take snapshots of the VMware Log Insight nodes. 
    1. Recommendation: Shutdown appliances before taking snapshots if you cannot guarantee application consistency.
  2. To apply the update we need to login into our Log Insight appliance web interface. Choose Administration in the upper right corner.
  • In the navigation bar on the left side we select Management > Cluster > Upgrade Cluster.
  • After clicking Upgrade Cluster you need to browse to the PAK file which was downloaded.
  • After clicking “Upgrade” the package will be uploaded to the appliance.
  • Accept the EULA to start the update. The procedure will take a couple of minutes.
  • After successfully updating the appliance you’ll get a message with the now active version of vRealize Log Insight. There’s no need for a reboot.

Configuration of rSyslog on VMware vCenter Appliance VCSA and PSC for Logging Authentication and Authorisation Activities

Introduction

As part of a client’s environment, there was a requirement from the end customer to forward additional logging information above the default logs forwarded by vCenter Server and Platform Services Controller (PSC).

In order to provide these additional logs configuration of rSyslog is required to specify these files.

This post is intended to provide steps to implement these changes.

Additional logging available from non default vCenter logs

Single Sign-On Activities

  • Successful SSO Login
  • Successful SSO Logout
  • Successful SSO Active Directory Login
  • Successful SSO Active Directory Logout
  • Failed SSO Login
  • Failed SSO Login (User not found)
  • Failed SSO Active Directory Login
  • Failed SSO Active Directory Login (User not found)
  • SSO User Creation
  • SSO User Password Change
  • SSO User Deletion
  • SSO Group Creation
  • SSO Group Assignment
  • SSO Group Deletion
  • SSO Password policy update

vCenter Server Activities

  • Successful vCenter Server Login
  • Successful vCenter Server Logout
  • vSphere Permission Created
  • vSphere Permission Updated
  • vSphere Permission Deleted
  • vSphere Role Creation
  • vSphere Role Update
  • vSphere Role Deletion

In order to capture the above activities, you will need to forward the following log files:

  • /var/log/vmware/sso/vmware-sts-idmd.log
  • /var/log/vmware/sso/ssoAdminServer.log
  • /var/log/vmware/vpxd-svcs/vpxd-svcs.log
  • /var/log/vmware/vpx/vpxd.log

NOTE: I am not including the vpxd.log in my implementation below as it is an extremely verbose log and we did not require it for the security events we wished to capture. Additionally I don’t want someone blindly copying the config below without understanding it and accidentally upsetting their environment.

Implementation Steps

VMware Appliance Management Interface (VAMI)

Step 1 – Connect to the VAMI interface for all vCenters and PSCs on HTTPS with port 5480

https://<appliancename>:5480

Step 2 – Configure Syslog with the following settings.

  • Common Log Level
    • Info
  • Remote Syslog Host
    • <vRLI-LoadBalancer-VIP>
  • Remote Syslog Port
    • 6514
  • Remote Syslog Protocol
    • TLS

vCenter Server Appliance

Step 1 – SSH to the VCSA and open the following file /etc/rsyslog.conf for editing.

vi /etc/rsyslog.conf

Step 2 – Press [Insert] to put vi into insert mode and add following entry towards the top of the file at the bottom of the ###### Module declarations ###### section.

$ModLoad imfile

Step 3 – Add the following right below the “###### Rule declarations
######” section of the rsyslog configuration file

$InputFileName /var/log/vmware/vpxd-svcs/vpxd-svcs.log
$InputFileTag vpxd-svcs
$InputFileStateFile vpxd-svcs
$InputFileSeverity info
$InputFileFacility local7
$InputRunFileMonitor
$InputFilePollInterval 20

$InputFileName specifies the log file that we want to forward.

$InputFileTag is the appname that will show up when it is forwarded to your remote syslog server

$InputFileStateFile is the log monitoring file.

$InputFilePollInterval is set 20 seconds, the default is 10 if you leave it blank.

Step 4 – Save your changes by pressing [Esc] and typing and pressing enter:

 :wq

Step 5 – Restart the rsyslog service in the VCSA for the changes to go into effect by running the following command:

systemctl restart rsyslog

Platform Services Controller Appliance

Step 1 – SSH to the PSC and open the following file /etc/rsyslog.conf for editing.

 vi /etc/rsyslog.conf

Step 2 – Press [Insert] to put vi into insert mode and add following entry towards the top of the file at the bottom of the ###### Module declarations ###### section.

$ModLoad imfile

Step 3 – Add the following right below the “###### Rule declarations ######” section of the rsyslog configuration file

$InputFileName /var/log/vmware/vpxd-svcs/vpxd-svcs.log
$InputFileTag vpxd-svcs
$InputFileStateFile vpxd-svcs
$InputFileSeverity info
$InputFileFacility local7
$InputRunFileMonitor
$InputFilePollInterval 20
  • $InputFileName specifies the log file that we want to forward.
  • $InputFileTag is the appname that will show up when it is forwarded to your remote syslog server
  • $InputFileStateFile is the log monitoring file.
  • $InputFilePollInterval is set 20 seconds, the default is 10 if you leave it blank.

Step 4 – Save your changes by pressing [Esc] and typing and pressing enter:

 :wq

Step 5 – Restart the rsyslog service in the VCSA for the changes to go into effect by running the following command:

systemctl restart rsyslog