Following on from obtaining VCAP-DTM, I’ve spent the last several months using my evenings to learn about VMware Airwatch to augment my vIDM knowledge. I am happy to say this has all paid off, and this weekend I have passed the exam for VMware Certified Professional – Digital Workspace (VCP-DW 2020)
I’ve used the old names here as everyone knows them, but for those that aren’t aware, late last year there was a few name changes to a number of the products.
Airwatch has been renamed to Workspace One Unified Endpoint Management (WS1 UEM)
As this will cause confusion with another EUC product called UEM…
VMware User Environment Manager, has been renamed to VMware Dynamic Environment Manager (DEM) …. although vRA still has a component called “DEM” …
and finally
VMware Identity Manager (vIDM) has been renamed to Workspace One Access. Which actually makes sense, since vIDM wasn’t a real Identity Manager, and caused a lot of confusion with new customers when trying to explain it’s role in the EUC stack. However it causes more confusion when it is deployed without an EUC stack, to use for authentication and SSO for vROps and vRLI.
For anyone wishing to attempt the VCP-DW I can confirm that it is not a simple exam, due to requiring knowledge of vIDM/WS1A, UAGs, Airwatch/WS1UEM, VMware Tunnel, Horizon integration, and managing Android, iOS and Windows 10 devices.
The starting place is with the VMware Exam Blueprint which will highlight all the areas you require to study and the Exam Prep Guide lists all the recommended reading.
As always, the ever helpful Kyran Brophy (EUC-Kiwi) has compiling a lot of the VCP-DW collateral and helpful websites together into one zip file which can be obtained from here: LINK
You must remember that he sat the exam in 2018 and a few areas of the VMware products have changed since then, not least the names, so grabbing newer versions of the product PDFs would be recommended as well.
Some additional recommended reading is listed below which was compiled by Michael Rebmann (Cloud13.ch)
I recently had a customer who wanted to make certain users on their network use Multi Factor Authentication, but not others.
Users connect to a Netscalar load balancer for the two UAG applicances, which then reverse proxy the WorkspaceOne Identity Manager (vIDM aka WSOne Access) cluster via another Netscalar load balancer.
The problem is that even if you configure the Loadbalancer to pass the client source IP as a X-Forwarded-For header, vIDM does not recognise which of the IPs listed is the client’s actual IP and will usually use the wrong IP, bypassing the Network Range policy rules. What we want is to ignore certain IPs in the XFF header.
The fix for this is to tell vIDM all of the IPs that you want to ignore and disregard. This list would be the IP of every Loadbalancer and UAG appliance on the route from your client to the vIDM instance.
Next we need to add our IPs to each vIDM appliance in the runtime-confile.properties file. In my case I have six of them so this took the best part of an hour waiting for everything to come back up. When restarting vIDM services you MUST ensure that they are fully up on the node before progressing to the next node. This can be monitored from the Admin System Diagnostics Dashboard. Wait for all the green ticks unless you want to spend a few hours cleaning up unassigned shards (see HERE for how to fix that)
Via SSH/Console connect to each vIDM appliance and run the following commands to make a copy of the original file and open it for editing:
cd /usr/local/horizon/conf/
cp runtime-config.properties runtime-config.properties.bak
vi runtime-config.properties
Scroll to the end of the document, hit the [Insert] Key on your keyboard to put vi into edit mode and add the following line to the very end of the file:
service.ipsToIgnoreInXffHeader=X.X.X.X,Y.Y.Y.Y/26
Where X.X.X.X is a specific IP you wish to ignore, and Y.Y.Y.Y/26 is a specific Subnet you wish to ignore.
Now restart the service
service horizon-workspace restart
and now browse to the System Diagnostics Dashboard on the admin interface and wait for the services to come back up before moving on to the next node.
Congratulations, WorkspaceOne can now identify users by their actual client IP.
Have you had the misfortune of receiving the error message “Failure: Error while running package installation” “Update failed, revert to snapshot and try again” whilst running an upgrade of your vIDM appliances? You aren’t alone, I’ve come across this multiple times in different environments.
This error potentially indicates that the appliance has exhausted all the inodes available, and consumed all disk space
If you check the log Updatecli.log might see the message of no space error in location /var/ .
You can check inode disk space using command
df -i
From here you will have to delete some files in the /var mount to clean up inode disk space.
Here are steps to clean inode disk space
1.Execute below command to check ,which folder under /var/ is having high number of files.
for i in /var/*; do echo $i; find $i |wc -l; done
2. if /var/spool/clientmqueue occupies large space. Please execute below command to delete files in /var/spool/clientmqueue
cd /var/spool/clientmqueue
echo * | xargs -n 100 rm
3. To delete /var/log files .Execute below command .This deletes anything ending with extension bz2 in location /var/log that is older than 60 days
cd /var/log
find ./*.bz2 -mtime +60 -exec rm {} \;
4. Run “df -i” again so see if /var shows sufficient space
5. Enable update debug mode by creating a file called rpm.debug in the flags folder in order to see verbose logs for the update.
cd /usr/local/horizon/conf/flags
touch rpm.debug
6. Perform upgrade again
Tomcat.pid
If during the upgrade you get the following message
"/opt/vmware/horizon/workspace/logs/tomcat.pid" was not found
This is due to the tomcat service not running. Please start the service using the command
service horizon-workspace start
Some additional ways to get more inode information:
Using “du”:
du --inodes -S | sort -rh | sed -n \'1,50{/^.\{71\}/s/^\(.\{30\}\).*\(.\{37\}\)$/\1...\2/;p}'
Using “ls” *
ls ~/test -AiR1U |
sed -rn '/^[./]/{h;n;};G;
    s|^ *([0-9][0-9]*)[^0-9][^/]*([~./].*):|\1:\2|p' |
sort -t : -uk1.1,1n |
cut -d: -f2 | sort -V |
uniq -c |sort -rn | head -n10
* If you’re curious, the heart-and-soul of that tedious bit of regex there is replacing the filename in each of ls's recursive search results with the directory name in which it was found. From there it’s just a matter of squeezing repeated inode numbers then counting repeated directory names and sorting accordingly.
The -U option is especially helpful with the sorting in that it specifically does not sort, and instead presents the directory list in original order – or, in other words, by inode number.
And of course -1 is incredibly helpful in that it ensures a single result per line, regardless of possibly included newlines in filenames or other spectacularly unfortunate problems that might occur when you attempt to parse a list.
And of course -A for all and -i for inode and -R for recursive and that’s the long and short of it.
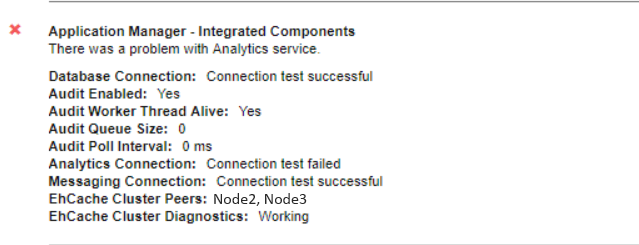
If you get the “there was a problem with analytics service” error in the Health status post upgrade it usually means there is an issue with ElasticSearch, and usually due to unassigned shards.
First step is the usual turn it off and on again just to make sure. Shutdown the whole cluster leaving the master until last and then startup with master first.
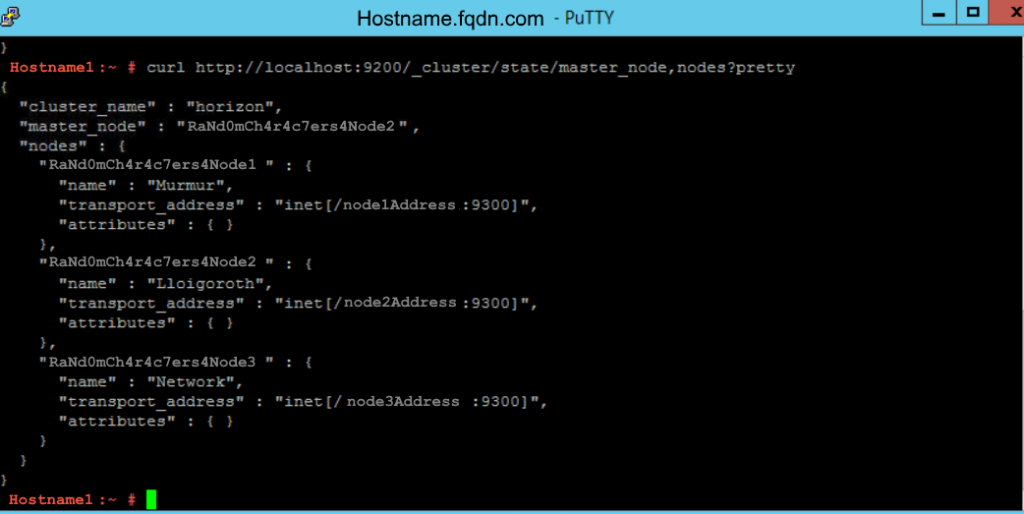
2. Run the following command to determine if you have unassigned shards.
curl http://localhost:9200/_cluster/health?pretty
2. Run the following command to view the unassigned shards.
Upgrading VMware Identity Manager (vIDM) or WorkspaceOne appliances can result in some difficult issues, so in order to save you having to bug GSS, below is the detail for upgrading from 2.9.1 to 3.3 using the offline upgrade method. Make sure to follow all of the pre-requisite and post upgrade sections.
Overview
You can upgrade VMware Identity Manager online or offline. In version 2.9.x and below the only officially supported route was using the online or local web host method.
By default the VMware Identity Manager appliance uses the VMware web site for the upgrade procedure, which requires the appliance to have Internet connectivity. You must also configure proxy server settings for the appliance, if applicable.
Thanks to an unadvertised Knowledge Base article KB2147931https://kb.vmware.com/s/article/2147931 it is now possible to upgrade via the offline upgrade script which was previously only offered in 3.1 and above.
The following procedure can be used to upgrade vIDM appliances from 2.9.1 through to 3.3. When necessary please download the relevant updates and associated offline upgrade scripts found in the appendix of this document.
Due to additional VMware solutions deployed the following sequence is recommended. (note: there is not direct upgrade path from 2.9.2.1 to 3.3)
Upgrade vIDM from 2.9.1 to 2.9.2.1
Upgrade vRealize Operations Manager to 6.7
Upgrade vRealize Log Insight to 4.6
Upgrade vIDM from 2.9.2.1 to 3.1
Upgrade vIDM from 3.1 to 3.2.0.1
Please refer to the 3.2 upgrade pre-requisites before upgrading from 3.1 to 3.2
Upgrade vIDM from 3.2.0.1 to 3.3
Please refer to the 3.3 upgrade pre-requisites before upgrading from 3.2 to 3.3
Available upgrade options:
Online upgrade (requires connectivity to vmware.com).
Offline upgrade with local Web Server hosting update files.
Offline upgrade with script and update binaries.
Offline upgrade with manual steps and update binaries if
method 3 fails.
Due to security restrictions imposed,
we will be using option 3, or option 4 if that fails.
Important: Expect some downtime
during the upgrade process as all services are stopped during the upgrade.
Pre-requisites:
Verify that VMware Identity Manager is properly configured.
Verify that at least 4 GB of disk space is available on the primary root partition of the virtual appliances
If you are using an external database, take a snapshot or backup of the database. If you are unable to perform application consistent backup, shutdown component before taking snapshot.
Download required upgrade files and update script.
Download the following Upgrade Files from my.vmware.com :
Apply the new iptables rule by running the following script:
/usr/local/horizon/scripts/updateiptables.hzn
7. Run the migration report.
In a browser, go to http://<ES_NODE_FQDN>:9200/_plugin/migration, where <ES_NODE_FQDN> is the fully-qualified domain name of the VMware Identity Manager node on which you installed the migration plugin.
Click the Run checks now button.
8. View the migration report and look for red indices.
Indices that are red
because they are closed are expected items on the report and can be ignored.
Any indices that are red for any reason other than that they are closed, for
example, due to mapping conflicts, need to be deleted. Use the following
command to delete the indices:
curl -XDELETE http://localhost:9200/<INDEX_NAME>
9. Block port 9200 again.
Edit the /usr/local/horizon/conf/iptables/elasticsearch file and set ELASTICSEARCH_tcp_all to “”.
There are two potential upgrade faults when upgrading to
3.3. Please apply these workarounds before completing the upgrade else there is
a potential for the upgrade to fail and the only fix is to revert the snapshot.
Recommendation: Shutdown appliances before taking snapshots if you cannot guarantee application consistency.
Remove all nodes except one from the NSX load balancer.
Requires NSX management plane access
From the Home menu of the vSphere Web Client, select Networking & Security.
In the Navigator, click NSX Edges.
From the NSX Manager drop-down menu, select <NSX Manager IP> and double-click the <NSX Edge providing LB functionality> NSX Edge to open its network settings.
On the Manage tab, click the Load Balancer tab and click Pools.
Select the VIDM pool that contains the vRealize Identity Manager appliances and click Edit.
In the Edit Pool dialog box, select the secondary node, click Edit, select Disable from the State drop-down menu, and click OK.
In the Edit Pool dialog box, select NONE from the Monitors drop-down menu and click OK.
Upgrade Method 3: Perform
Offline Upgrade using script and update files.
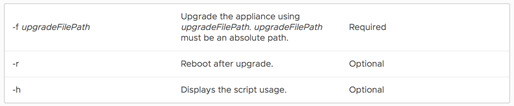
1 .Upgrade the node that is still connected to the load balancer. You can use the updateoffline.hzn script to perform an offline upgrade of the VMware Identity Manager virtual appliance
2. Run the updateoffline.hzn script as the root user.
If upgrade fails proceed to Upgrade Method 4: Manual Steps.
2. If you did not use the -r option with the script, restart the virtual appliance after upgrade is complete.
Reboot
3. After the node is upgraded, leave it connected to the load balancer. This ensures that the VMware Identity Manager service is available while you upgrade the other nodes.
4. Upgrade the other nodes one at a time.
5. If upgrading to 3.2, complete post 3.2 upgrade tasks
Upgrade Method 4: Perform
Offline Upgrade using manual steps and update files.
Download the
updaterepo.zip and copy under /var/tmp
mkdir /var/tmp/update
cd /var/tmp/update
unzip ../identity<fullfilename>.zip
iptables -A INPUT -p tcp --dport 8008 -m state --state NEW,ESTABLISHED -j ACCEPT
python -m SimpleHTTPServer 8008 2>/dev/null &
/usr/local/horizon/update/updatelocal.hzn seturl http://localhost:8008/
2. confirm from a browser that you can browse files for http://hostname:8008
3. Run the following commands to install the update
4. Restart the virtual appliance after upgrade is complete.
Reboot
5. After the node is upgraded, leave it connected to the load balancer. This ensures that the VMware Identity Manager service is available while you upgrade the other nodes.
6. Upgrade the other nodes one at a time.
7. If upgrading to 3.2, complete post 3.2 upgrade tasks to fix ElasticSearch
8. Perform Upgrade Validation
9. If upgrade fails and there is a message referencing inode usage see this post HERE
Upgrade Validation
After all the nodes are upgraded, add them back to the load balancer.
Validate health of vIDM
Validate vIDM functionality
Validate health of elastic search cluster is green with no unallocated shards
5. Remove old update files and consolidate snapshots.
Post 2.9.2 Upgrade Validation
Verify that RabbitMQ is not running in cluster mode in the upgraded nodes.
In 2.9.1 and later releases, RabbitMQ clustering has been disabled.
Follow these commands for each upgraded node.
Log in to the upgraded node.
Run the following command:
rabbitmqctl cluster_status
The
command should return status similar to the following:
sva-1:~ # rabbitmqctl cluster_status
Cluster status of node 'rabbitmq@sva-1' ...
[{nodes,[{disc,['rabbitmq@sva-1']}]},
 {running_nodes,['rabbitmq@sva-1']},
 {cluster_name,<<"rabbitmq@sva-1.hs.trcint.com">>},
 {partitions,[]},
 {alarms,[{'rabbitmq@sva-1',[]}]}]
3. If the status includes references to any node other than the one on which you ran the rabbitmqctl cluster_status command, run the following commands:
service elasticsearch restart
service horizon-workspace restart
Wait at least 15 minutes for the services to fully restart before continuing to the next node.
Troubleshooting
If you get the “there was a problem with analytics service” error in the Health status post upgrade it usually means there is an issue with ElasticSearch, and usually due to unassigned shards.
1. Run the following command to determine if you have unassigned shards.
curl http://localhost:9200/_cluster/health?pretty
2. Run the following command to view the unassigned shards.