Upgrading the existing VMware Log Insight (vRLI) appliances using upgrade pak method. The steps are for 4.6.0 to 4.6.1 but are applicable to all 4.x upgrades.
Overview
This will detail the steps required for the In-place Upgrade Procedure of a VMware vRealize Log Insight (vRLI) Appliance
Pre-requisites:
Verify that VMware Log Insight is properly
configured.
Download required upgrade files and update
script.
Upgrading must be done from the master
node’s FQDN. Upgrading with the Integrated Load Balancer IP address is not
supported.
When performing a manual upgrade, you must
upgrade workers one at a time. Upgrading multiple workers at the same time
causes an upgrade failure. When you upgrade the master node to vRealize Log
Insight 4.6.1, a rolling upgrade occurs unless specifically disabled.
If the vRealize Log Insight upgrade (.pak
file) has a new JRE version, then the
user-installed certificates in a vRealize Log Insight setup (such as for event
forwarding) become invisible after upgrade.
Upgrade Method:
Take snapshots of the VMware Log Insight nodes.
Recommendation: Shutdown appliances before taking snapshots if you cannot guarantee application consistency.
To apply the update we need to login into our Log Insight appliance web interface. Choose Administration in the upper right corner.
In the navigation bar on the left side we select Management > Cluster > Upgrade Cluster.
After clicking Upgrade Cluster you need to browse to the PAK file which was downloaded.
After clicking “Upgrade” the package will be uploaded to the appliance.
Accept the EULA to start the update. The procedure will take a couple of minutes.
After successfully updating the appliance you’ll get a message with the now active version of vRealize Log Insight. There’s no need for a reboot.
Upgrading VMware Identity Manager (vIDM) or WorkspaceOne appliances can result in some difficult issues, so in order to save you having to bug GSS, below is the detail for upgrading from 2.9.1 to 3.3 using the offline upgrade method. Make sure to follow all of the pre-requisite and post upgrade sections.
Overview
You can upgrade VMware Identity Manager online or offline. In version 2.9.x and below the only officially supported route was using the online or local web host method.
By default the VMware Identity Manager appliance uses the VMware web site for the upgrade procedure, which requires the appliance to have Internet connectivity. You must also configure proxy server settings for the appliance, if applicable.
Thanks to an unadvertised Knowledge Base article KB2147931https://kb.vmware.com/s/article/2147931 it is now possible to upgrade via the offline upgrade script which was previously only offered in 3.1 and above.
The following procedure can be used to upgrade vIDM appliances from 2.9.1 through to 3.3. When necessary please download the relevant updates and associated offline upgrade scripts found in the appendix of this document.
Due to additional VMware solutions deployed the following sequence is recommended. (note: there is not direct upgrade path from 2.9.2.1 to 3.3)
Upgrade vIDM from 2.9.1 to 2.9.2.1
Upgrade vRealize Operations Manager to 6.7
Upgrade vRealize Log Insight to 4.6
Upgrade vIDM from 2.9.2.1 to 3.1
Upgrade vIDM from 3.1 to 3.2.0.1
Please refer to the 3.2 upgrade pre-requisites before upgrading from 3.1 to 3.2
Upgrade vIDM from 3.2.0.1 to 3.3
Please refer to the 3.3 upgrade pre-requisites before upgrading from 3.2 to 3.3
Available upgrade options:
Online upgrade (requires connectivity to vmware.com).
Offline upgrade with local Web Server hosting update files.
Offline upgrade with script and update binaries.
Offline upgrade with manual steps and update binaries if
method 3 fails.
Due to security restrictions imposed,
we will be using option 3, or option 4 if that fails.
Important: Expect some downtime
during the upgrade process as all services are stopped during the upgrade.
Pre-requisites:
Verify that VMware Identity Manager is properly configured.
Verify that at least 4 GB of disk space is available on the primary root partition of the virtual appliances
If you are using an external database, take a snapshot or backup of the database. If you are unable to perform application consistent backup, shutdown component before taking snapshot.
Download required upgrade files and update script.
Download the following Upgrade Files from my.vmware.com :
Apply the new iptables rule by running the following script:
/usr/local/horizon/scripts/updateiptables.hzn
7. Run the migration report.
In a browser, go to http://<ES_NODE_FQDN>:9200/_plugin/migration, where <ES_NODE_FQDN> is the fully-qualified domain name of the VMware Identity Manager node on which you installed the migration plugin.
Click the Run checks now button.
8. View the migration report and look for red indices.
Indices that are red
because they are closed are expected items on the report and can be ignored.
Any indices that are red for any reason other than that they are closed, for
example, due to mapping conflicts, need to be deleted. Use the following
command to delete the indices:
curl -XDELETE http://localhost:9200/<INDEX_NAME>
9. Block port 9200 again.
Edit the /usr/local/horizon/conf/iptables/elasticsearch file and set ELASTICSEARCH_tcp_all to “”.
There are two potential upgrade faults when upgrading to
3.3. Please apply these workarounds before completing the upgrade else there is
a potential for the upgrade to fail and the only fix is to revert the snapshot.
Recommendation: Shutdown appliances before taking snapshots if you cannot guarantee application consistency.
Remove all nodes except one from the NSX load balancer.
Requires NSX management plane access
From the Home menu of the vSphere Web Client, select Networking & Security.
In the Navigator, click NSX Edges.
From the NSX Manager drop-down menu, select <NSX Manager IP> and double-click the <NSX Edge providing LB functionality> NSX Edge to open its network settings.
On the Manage tab, click the Load Balancer tab and click Pools.
Select the VIDM pool that contains the vRealize Identity Manager appliances and click Edit.
In the Edit Pool dialog box, select the secondary node, click Edit, select Disable from the State drop-down menu, and click OK.
In the Edit Pool dialog box, select NONE from the Monitors drop-down menu and click OK.
Upgrade Method 3: Perform
Offline Upgrade using script and update files.
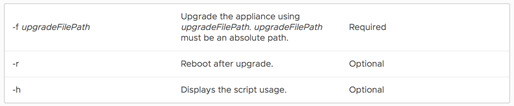
1 .Upgrade the node that is still connected to the load balancer. You can use the updateoffline.hzn script to perform an offline upgrade of the VMware Identity Manager virtual appliance
2. Run the updateoffline.hzn script as the root user.
If upgrade fails proceed to Upgrade Method 4: Manual Steps.
2. If you did not use the -r option with the script, restart the virtual appliance after upgrade is complete.
Reboot
3. After the node is upgraded, leave it connected to the load balancer. This ensures that the VMware Identity Manager service is available while you upgrade the other nodes.
4. Upgrade the other nodes one at a time.
5. If upgrading to 3.2, complete post 3.2 upgrade tasks
Upgrade Method 4: Perform
Offline Upgrade using manual steps and update files.
Download the
updaterepo.zip and copy under /var/tmp
mkdir /var/tmp/update
cd /var/tmp/update
unzip ../identity<fullfilename>.zip
iptables -A INPUT -p tcp --dport 8008 -m state --state NEW,ESTABLISHED -j ACCEPT
python -m SimpleHTTPServer 8008 2>/dev/null &
/usr/local/horizon/update/updatelocal.hzn seturl http://localhost:8008/
2. confirm from a browser that you can browse files for http://hostname:8008
3. Run the following commands to install the update
4. Restart the virtual appliance after upgrade is complete.
Reboot
5. After the node is upgraded, leave it connected to the load balancer. This ensures that the VMware Identity Manager service is available while you upgrade the other nodes.
6. Upgrade the other nodes one at a time.
7. If upgrading to 3.2, complete post 3.2 upgrade tasks to fix ElasticSearch
8. Perform Upgrade Validation
9. If upgrade fails and there is a message referencing inode usage see this post HERE
Upgrade Validation
After all the nodes are upgraded, add them back to the load balancer.
Validate health of vIDM
Validate vIDM functionality
Validate health of elastic search cluster is green with no unallocated shards
5. Remove old update files and consolidate snapshots.
Post 2.9.2 Upgrade Validation
Verify that RabbitMQ is not running in cluster mode in the upgraded nodes.
In 2.9.1 and later releases, RabbitMQ clustering has been disabled.
Follow these commands for each upgraded node.
Log in to the upgraded node.
Run the following command:
rabbitmqctl cluster_status
The
command should return status similar to the following:
sva-1:~ # rabbitmqctl cluster_status
Cluster status of node 'rabbitmq@sva-1' ...
[{nodes,[{disc,['rabbitmq@sva-1']}]},
 {running_nodes,['rabbitmq@sva-1']},
 {cluster_name,<<"rabbitmq@sva-1.hs.trcint.com">>},
 {partitions,[]},
 {alarms,[{'rabbitmq@sva-1',[]}]}]
3. If the status includes references to any node other than the one on which you ran the rabbitmqctl cluster_status command, run the following commands:
service elasticsearch restart
service horizon-workspace restart
Wait at least 15 minutes for the services to fully restart before continuing to the next node.
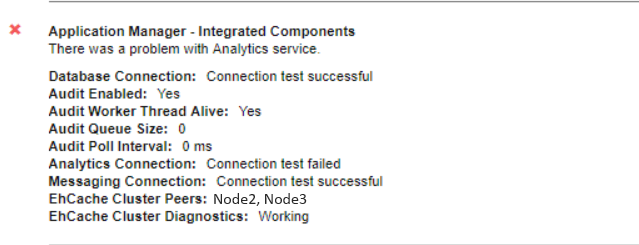
Troubleshooting
If you get the “there was a problem with analytics service” error in the Health status post upgrade it usually means there is an issue with ElasticSearch, and usually due to unassigned shards.
1. Run the following command to determine if you have unassigned shards.
curl http://localhost:9200/_cluster/health?pretty
2. Run the following command to view the unassigned shards.