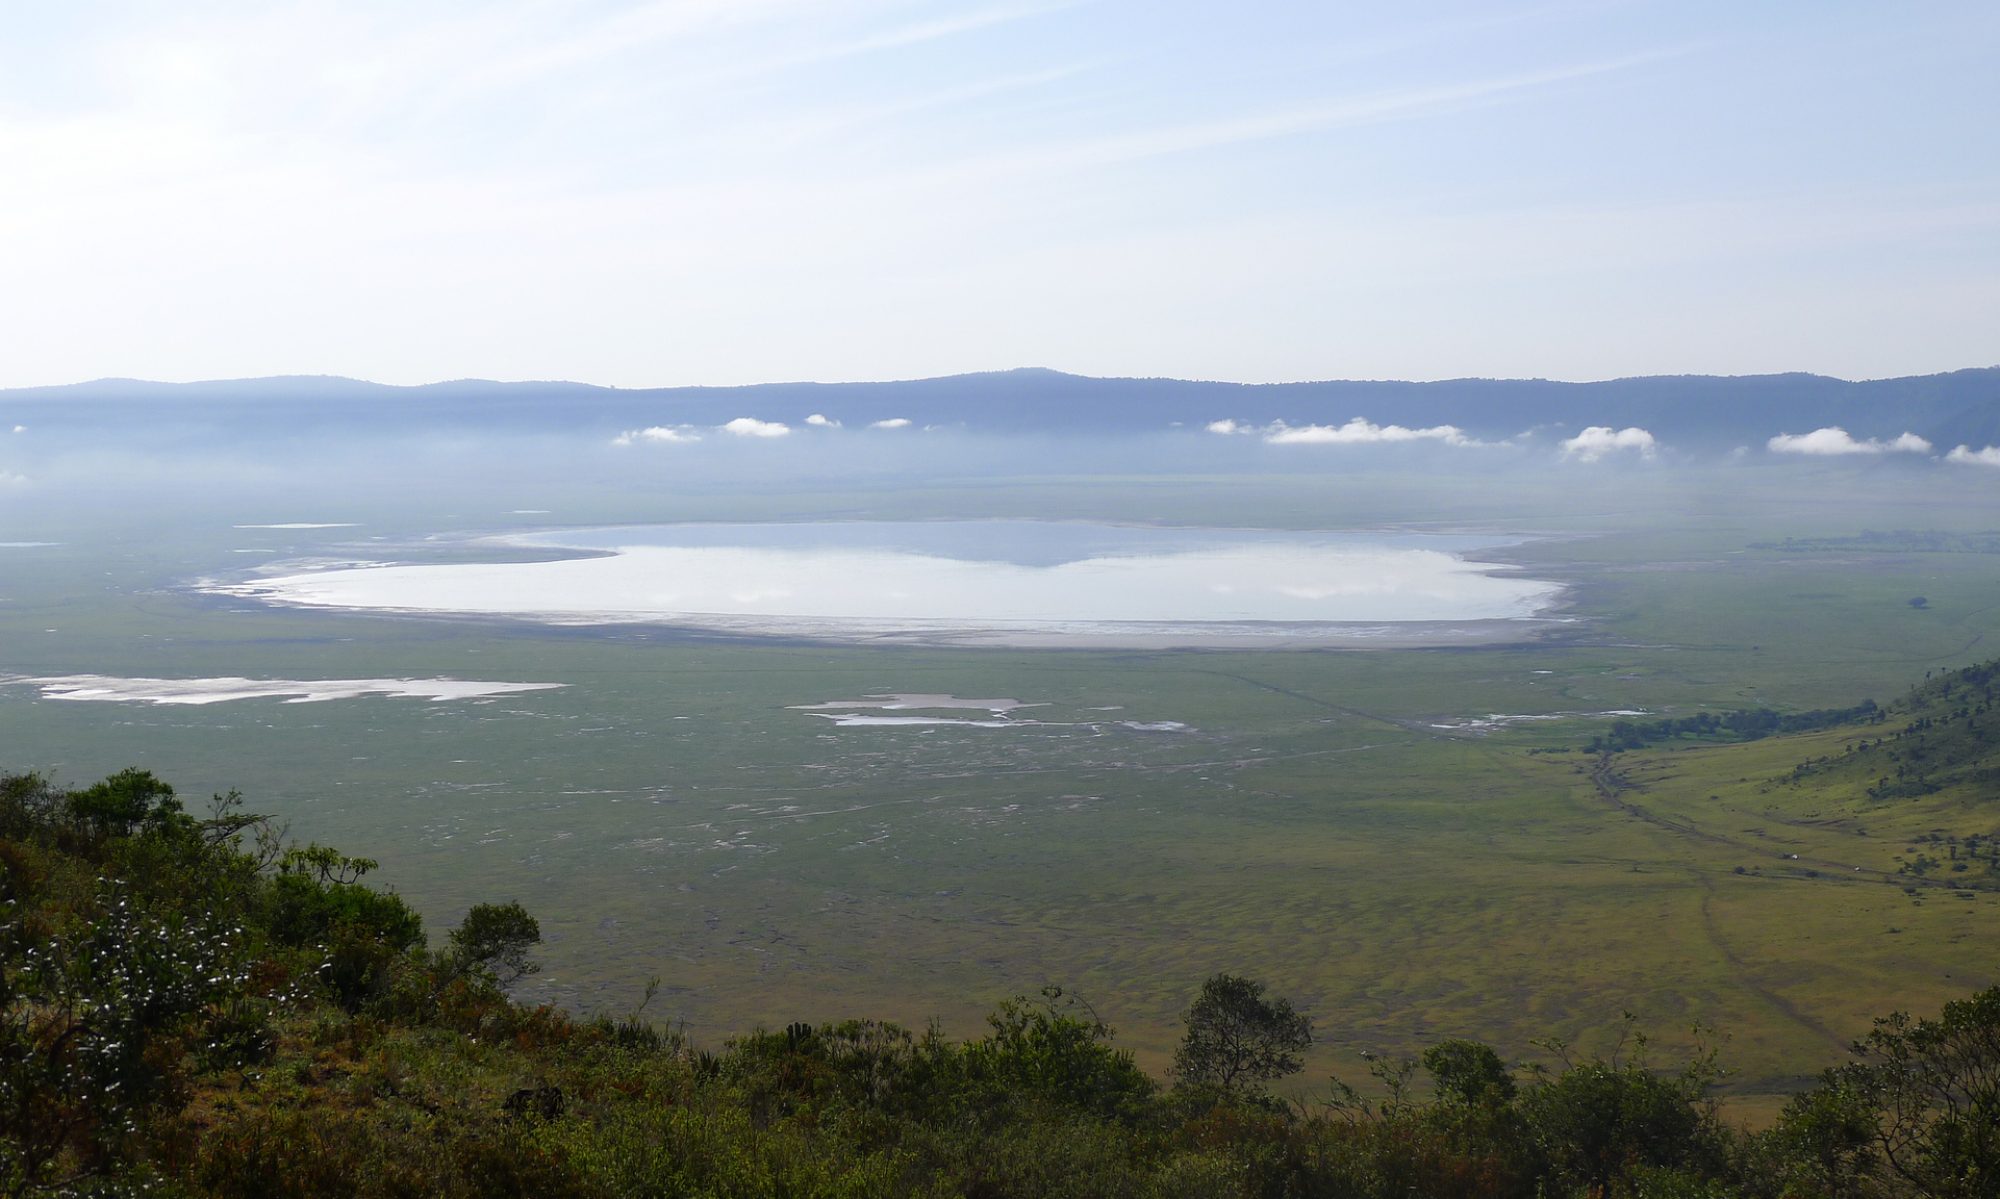
I’ve just come across a new issue where the latest release of Horizon fails to connect to an SQL Server to configure the Event Database. The only error message you get is “An error occurred while attempting to configure the database. Double check the database parameters and ensure that the database is not down, restarting, or otherwise unavailable. “
An error occurred while attempting to configure the database.
This problem is caused by Horizon dropping support for certificate signature algorithms including SHA1 and SHA512.
Finding the cause of an error occurred while attempting to configure the database.
To confirm this is the problem you are experiencing, lets check in the Connection Server debug log stored in the following location on your Connection Server:
For confirmation that this is the issue you are facing, you are looking for the keyphrase “DATABASE_CONNECTION_FAILED#” which shows that “Certificates do not conform to algorithm constraints.”
ERROR (1EF4-23E0) <ajp-nio-127.0.0.1-8009-exec-8> [FaultUtilBase] InvalidRequest: {#DATABASE_CONNECTION_FAILED#} Unable to update database settings; database connection failed: SQL exception when connecting to database: The driver could not establish a secure connection to SQL Server by using Secure Sockets Layer (SSL) encryption. Error: "Certificates do not conform to algorithm constraints". ClientConnectionId:xxxx
ERROR (1EF4-23E0) <ajp-nio-127.0.0.1-8009-exec-8> [RestApiServlet] Unexpected fault:(vdi.fault.InvalidRequest) {
   errorMessage = {#DATABASE_CONNECTION_FAILED#} Unable to update database settings; database connection failed: SQL exception when connecting to database: The driver could not establish a secure connection to SQL Server by using Secure Sockets Layer (SSL) encryption. Error: "Certificates do not conform to algorithm constraints". ClientConnectionId:xxxx
} for uri /view-vlsi/rest/v1/EventDatabase/update
Unfortunately this does not tell us about what certificate algorithm is being used by the SQL server.
The Database Server being used for the Event Database is using Windows Server 2016 and SQL Server 2016. The DBA had not configured an SSL certificate against the database, or the SQL Server as a whole, so without full access to confirm, we worked on the assumption that had a default self signed certificate from when it was originally installed and this was likely SHA1.
To fix this we need to add these certificate signature algorithms to the override in the Horizon ADAM database.
You can find details about connecting to the ADAM Database on VMware KB2012377
Connect to the Horizon ADAM Database
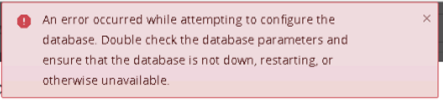
Start the ADSI Edit utility on your Horizon Connection Server.
In the console tree, select Connect to.
In the Select or type a Distinguished Name or Naming Context text box, type the distinguished name DC=vdi, DC=vmware, DC=int
In the Select or type a domain or server text box, select or type localhost:389 or the fully qualified domain name (FQDN) of the View Connection Server computer followed by port 389.
Click OK.
Select and expand DC=vdi,dc=vmware,dc=int to expand.
Go to ou=properties then ou=global and go to properties on cn=common
Find the LDAP attribute pae-SSLServerSignatureSchemes and add the following entry: \LIST:rsa_pkcs1_sha256,rsa_pkcs1_sha384,rsa_pkcs1_sha1
Find the LDAP attribute pae-SSLClientSignatureSchemes and add the following entry: \LIST:rsa_pkcs1_sha256,rsa_pkcs1_sha384,rsa_pkcs1_sha1
IMPORTANT: The new list must include at least rsa_pkcs1_sha256 and rsa_pkcs1_sha384 to avoid breaking other outgoing connections.
In my example below I have needed to add SHA512withRSA as well as SHA1 for my vCenter Connection.
Restart the Connection server service on all brokers in the cluster.
Configure your Event Configuration as required and you should no longer receive the “An error occurred while attempting to configure the database.” error message and you will start recording events.
References
For reference, the default list of schemes is as follows:
If you require both SHA1 for SQL and SHA512 for the vCenter connection, like I did, you need to add the following otherwise the vCenter connection will fail again.
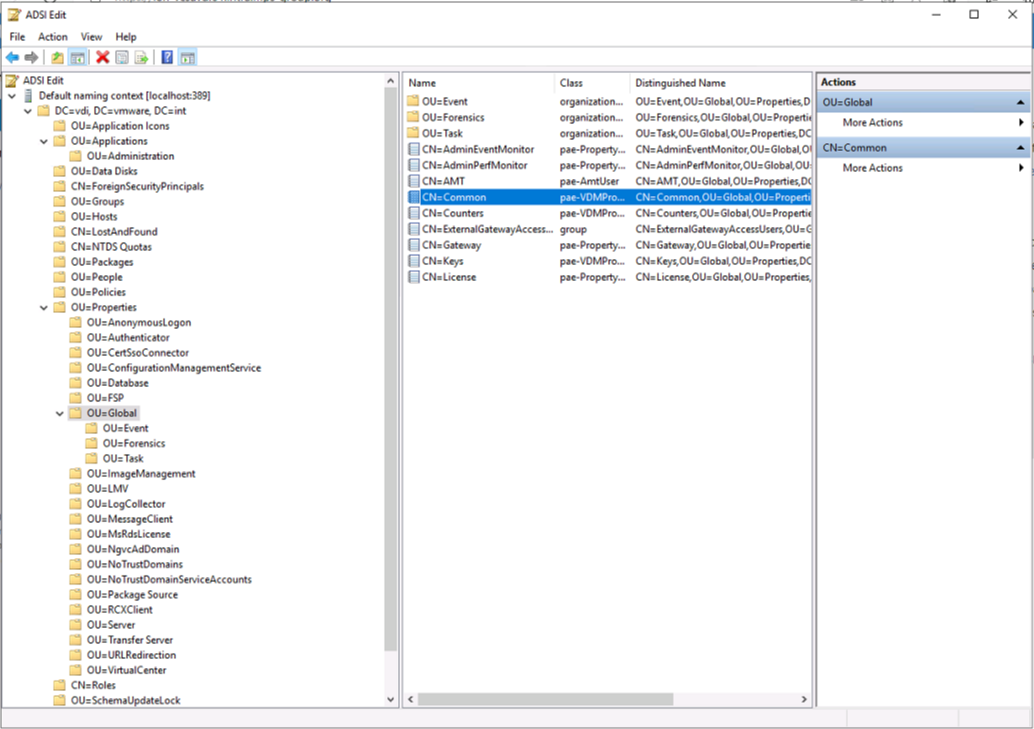
I’ve just come across a new issue where the latest release of Horizon fails to connect to the vCenter. The only error message you get is “Certificate validation failed”
This problem is caused by Horizon dropping support for certificate signature algorithms including SHA512withRSA
Finding the cause of Certificate validation failed
To confirm this is the problem you are experiencing, lets check in the Connection Server debug log stored in the following location on your Connection Server:
For confirmation that this is the issue you are facing, you are looking for the keyphrase “SSLHandshakeException” which shows that “Certificates do not conform to algorithm constraints.”
Caused by: javax.net.ssl.SSLHandshakeException: SSLHandshakeException invoking https://vcenter.vsphere.local:443/sdk: Certificates do not conform to algorithm constraints
Next we need to confirm which signature algorithm is being used by your vCenter’s certificate.
So we can see that it is failing on signature algorithm SHA512withRSA.
To fix this we need to add these certificate signature algorithms to the override in the Horizon ADAM database.
You can find details about connecting to the ADAM Database on VMware KB2012377
Connect to the Horizon ADAM Database
Start the ADSI Edit utility on your Horizon Connection Server.
In the console tree, select Connect to.
In the Select or type a Distinguished Name or Naming Context text box, type the distinguished name DC=vdi, DC=vmware, DC=int
In the Select or type a domain or server text box, select or type localhost:389 or the fully qualified domain name (FQDN) of the View Connection Server computer followed by port 389.
Click OK.
Select and expand DC=vdi,dc=vmware,dc=int to expand.
Go to ou=properties then ou=global and go to properties on cn=common
Find the LDAP attribute pae-SSLServerSignatureSchemes and add the following entry: \LIST:rsa_pkcs1_sha256,rsa_pkcs1_sha384,rsa_pkcs1_sha512,rsa_pss_rsae_sha512,rsa_pss_pss_sha512
Find the LDAP attribute pae-SSLClientSignatureSchemes and add the following entry: \LIST:rsa_pkcs1_sha256,rsa_pkcs1_sha384,rsa_pkcs1_sha512,rsa_pss_rsae_sha512,rsa_pss_pss_sha512
IMPORTANT: The new list must include at least rsa_pkcs1_sha256 and rsa_pkcs1_sha384 to avoid breaking other outgoing connections.
Restart the Connection server service on all brokers in the cluster.
References
For reference, the default list of schemes is as follows:
If, like me, you have a lot of legacy systems which are reliant on Abode Flash for their management UIs (eg vSphere Client) then Flash being killed off is very inconvenient
Luckily there is currently a fix!
This works as of January 12th 2021, who knows if it will be killed off.
This requires the creation of a file in the data directory of your browser
Google Chrome
To enable Flash in Chrome you need to create a file and provide it with some custom config.
Browse to your user’s local appdata directory ( %localappdata% can be used if it’s configured)
Within in browse to \Google\Chrome\User Data\Default\Pepper Data\Shockwave Flash\
Create a new Folder called “System” and within here create a new file called mms.cfg
edit this file in notepad (other text editing programs are available) and enter the following text:
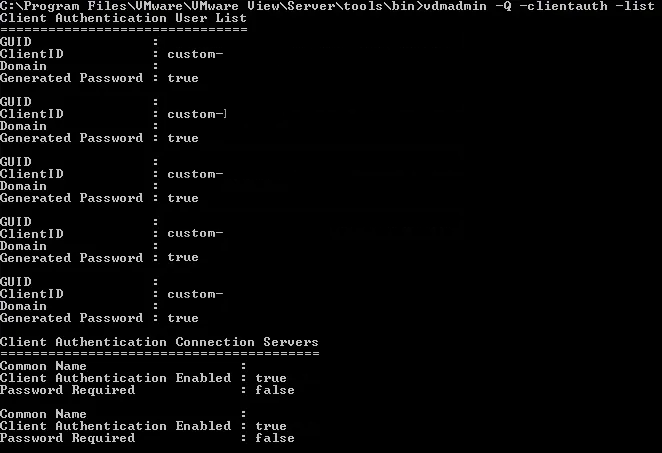
The setup of kiosk mode in VMware Horizon View requires the use of the command line tool vdmadmin.
Step 1: create a new organisational unit (OU) specific for kiosk users
This OU will contain all kiosk mode VDIs and all accounts that will have access to a kiosk mode VDI. Specific GPOs can be associated with this OU to lock down the VDI session.
Example: OU=kiosk,OU=vdi,DC=mydomain,DC=local
Step 2: create a new Active Directory Security group
This security group will contain all accounts that will have access to a kiosk mode VDI
Example: sg_kioskMode
Step 3: create a new floating Desktop pool in VMware Horizon View
Add all the VDIs to the OU created in Step 1
Make sure to delete or refresh the VDI immediately at logoff
Entitle the group you created in step 2 to this desktop pool
Step 4: Set default values for the organisational unit (OU), password expiration, and group membership of clients in kiosk mode.
This is done by executing the vdmadmin command line utility. The vdmadmin utility is located at C:\Program Files\VMware\VMware View\Server\tools\bin of each VMware Horizon View Connection server and should be executed from a command line (as administrator) directly from a VMware Horizon View Connection server.
NOTE: if you aren’t using a security group use “-nogroup” instead
Step 5: Add accounts for clients in Kiosk mode
The VMware Horizon View Connection Server creates Active Directory user account and passwords for each client based on the client’s MAC address or client ID, which it uses to authenticate the client when connecting it to the View desktop.
The clientid parameter must be in the form <MAC-address>, cm-<MAC-address> or custom-<name> where <MAC-address> is of the form aa:cc:ff:aa-33-99
Following on from obtaining VCAP-DTM, I’ve spent the last several months using my evenings to learn about VMware Airwatch to augment my vIDM knowledge. I am happy to say this has all paid off, and this weekend I have passed the exam for VMware Certified Professional – Digital Workspace (VCP-DW 2020)
I’ve used the old names here as everyone knows them, but for those that aren’t aware, late last year there was a few name changes to a number of the products.
Airwatch has been renamed to Workspace One Unified Endpoint Management (WS1 UEM)
As this will cause confusion with another EUC product called UEM…
VMware User Environment Manager, has been renamed to VMware Dynamic Environment Manager (DEM) …. although vRA still has a component called “DEM” …
and finally
VMware Identity Manager (vIDM) has been renamed to Workspace One Access. Which actually makes sense, since vIDM wasn’t a real Identity Manager, and caused a lot of confusion with new customers when trying to explain it’s role in the EUC stack. However it causes more confusion when it is deployed without an EUC stack, to use for authentication and SSO for vROps and vRLI.
For anyone wishing to attempt the VCP-DW I can confirm that it is not a simple exam, due to requiring knowledge of vIDM/WS1A, UAGs, Airwatch/WS1UEM, VMware Tunnel, Horizon integration, and managing Android, iOS and Windows 10 devices.
The starting place is with the VMware Exam Blueprint which will highlight all the areas you require to study and the Exam Prep Guide lists all the recommended reading.
As always, the ever helpful Kyran Brophy (EUC-Kiwi) has compiling a lot of the VCP-DW collateral and helpful websites together into one zip file which can be obtained from here: LINK
You must remember that he sat the exam in 2018 and a few areas of the VMware products have changed since then, not least the names, so grabbing newer versions of the product PDFs would be recommended as well.
Some additional recommended reading is listed below which was compiled by Michael Rebmann (Cloud13.ch)
I wrote the following script to take a csv file of application name and description, and then connect to a Horizon Connection Server and cycle through the csv looking for an icon file in the format desc.png or desc-0.png and apply the icon to the application.
It is made up of three modules, one of which is a lightly modified version of a VMware staffer’s module, which included a load of “breaks” which I had to remove to ensure it would complete the full array.
############################################################
### Add Icons to Horizon Application from a CSV File
### .NOTES
###    Author                      : Chris Mitchell
###    Author email                : mitchellc@vmware.com
###    Version                     : 1.0
###
###    ===Tested Against Environment====
###    Horizon View Server Version : 7.7
###    PowerCLI Version            : PowerCLI 11.3
###    PowerShell Version          : 5.1
###
###    Add-HVAppIcon -h VCS01.local.net -csv apps.csv -u admin -p Password01
###
############################################################

param (
    [string]$h = $(Read-Host "Horizon Connection Server Name:"),
    [string]$c = $(Read-Host "csv filename:"),
    [string]$u = $(Read-Host "username:"),
    [string]$p = $(Read-Host "password:")
    )


function Get-ViewAPIService {
  param(
    [Parameter(Mandatory = $false)]
    $HvServer
  )
  if ($null -ne $hvServer) {
    if ($hvServer.GetType().name -ne 'ViewServerImpl') {
      $type = $hvServer.GetType().name
      Write-Error "Expected hvServer type is ViewServerImpl, but received: [$type]"
      return $null
    }
    elseif ($hvServer.IsConnected) {
      return $hvServer.ExtensionData
    }
  } elseif ($global:DefaultHVServers.Length -gt 0) {
     $hvServer = $global:DefaultHVServers[0]
     return $hvServer.ExtensionData
  }
  return $null
}


function HVApplicationIcon {
<#
.SYNOPSIS
   Used to create/update an icon association for a given application.

.DESCRIPTION
   This function is used to create an application icon and associate it with the given application. If the specified icon already exists in the LDAP, it will just updates the icon association to the application. Any of the existing customized icon association to the given application will be overwritten.

.PARAMETER ApplicationName
   Name of the application to which the association to be made.

.PARAMETER IconPath
   Path of the icon.

.PARAMETER HvServer
   View API service object of Connect-HVServer cmdlet.

.EXAMPLE
   Creating the icon I1 and associating with application A1. Same command is used for update icon also.
   Set-HVApplicationIcon -ApplicationName A1 -IconPath C:\I1.ico -HvServer $hvServer

.OUTPUTS
   None

.NOTES
    Author                      : Paramesh Oddepally.
    Author email                : poddepally@vmware.com
    Version                     : 1.1

    ===Tested Against Environment====
    Horizon View Server Version : 7.1
    PowerCLI Version            : PowerCLI 6.5.1
    PowerShell Version          : 5.0
#>

  [CmdletBinding(
    SupportsShouldProcess = $true,
    ConfirmImpact = 'High'
  )]

  param(
   [Parameter(Mandatory = $true)]
   [string] $ApplicationName,

   [Parameter(Mandatory = $true)]
   $IconPath,

   [Parameter(Mandatory = $false)]
   $HvServer = $null
  )

  begin {
    $services = Get-ViewAPIService -HvServer $HvServer
    if ($null -eq $services) {
      Write-Error "Could not retrieve ViewApi services from connection object."

    }
    Add-Type -AssemblyName System.Drawing
  }

  process {
	if (!(Test-Path $IconPath)) {
      Write-Error "File:[$IconPath] does not exist."

    }

    if ([IO.Path]::GetExtension($IconPath) -ne '.png') {
      Write-Error "Unsupported file format:[$IconPath]. Only PNG image files are supported."

    }

    try {
      $appInfo = Get-HVQueryResult -EntityType ApplicationInfo -Filter (Get-HVQueryFilter data.name -Eq $ApplicationName) -HvServer $HvServer
    } catch {
      # EntityNotFound, InsufficientPermission, InvalidArgument, InvalidType, UnexpectedFault
      Write-Error "Error in querying the ApplicationInfo for Application:[$ApplicationName] $_"

    }

    if ($null -eq $appInfo) {
      Write-Error "No application found with specified name:[$ApplicationName]."

    }

    $spec = New-Object VMware.Hv.ApplicationIconSpec
    $base = New-Object VMware.Hv.ApplicationIconBase

    try {
      $fileHash = Get-FileHash -Path $IconPath -Algorithm MD5
      $base.IconHash = $fileHash.Hash
      $base.Data = (Get-Content $iconPath -Encoding byte)
      $bitMap = [System.Drawing.Bitmap]::FromFile($iconPath)
      $base.Width = $bitMap.Width
      $base.Height = $bitMap.Height
      $base.IconSource = "broker"
      $base.Applications = @($appInfo.Id)
      $spec.ExecutionData = $base
    } catch {
      Write-Error "Error in reading the icon parameters: $_"

    }

    if ($base.Height -gt 256 -or $base.Width -gt 256) {
      Write-Error "Invalid image resolution. Maximum resolution for an icon should be 256*256."

    }

    $ApplicationIconHelper = New-Object VMware.Hv.ApplicationIconService
    try {
      $ApplicationIconId = $ApplicationIconHelper.ApplicationIcon_CreateAndAssociate($services, $spec)
    } catch {
        if ($_.Exception.InnerException.MethodFault.GetType().name.Equals('EntityAlreadyExists')) {
           # This icon is already part of LDAP and associated with some other application(s).
           # In this case, call updateAssociations
           $applicationIconId = $_.Exception.InnerException.MethodFault.Id
           Write-Host "Some application(s) already have an association for the specified icon."
           $ApplicationIconHelper.ApplicationIcon_UpdateAssociations($services, $applicationIconId, @($appInfo.Id))
           Write-Host "Successfully updated customized icon association for Application:[$ApplicationName]."

        }
        Write-Host "Error in associating customized icon for Application:[$ApplicationName] $_"

    }
    Write-Host "Successfully associated customized icon for Application:[$ApplicationName]."
  }

  end {
    [System.gc]::collect()
  }
}


Function AddIconToApp($a) {

    foreach($Item in $a)
    {
        $IconFile = $IconFolder+"\"+$Item.DisplayName+".png"
        if (!(Test-Path $IconFile)) {
            $IconFile = $IconFolder+"\"+$Item.DisplayName+"-0.png"
        }
        Write-Host Trying $IconFile
        if (Test-Path $IconFile) {
            Write-Host "Adding Icon to" $Item.DisplayName
            $ItemName = $Item.Name
            HVApplicationIcon -ApplicationName $ItemName -IconPath $IconFile -ErrorAction SilentlyContinue
        } else {
                Write-Host "File Doesn't Exist"
        }

    }
}


$dir = Get-Location

$IconFolder = $dir.Path + "\png"


Connect-HVServer $h -u $u -p $p

$csv = Import-Csv .\$c

AddIconToApp $csv

Disconnect-HVServer -Server * -confirm:$false
The important thing to note here is that it only accepts PNG files as input. However what if you only have a giant collection of ICO files you want to use.
That’s where I found myself with a few hundred icons which i needed to convert to PNG and remove the transparency setting it as white, so I wrote the following PowerShell Script to extract the bitmaps from the ico and then convert to PNG.
#Convert-ICO2PNG.ps1
$files = Get-ChildItem "C:\icotest" -Filter *.ico -file -Recurse |
foreach-object {

$Source = $_.FullName
$test = [System.IO.Path]::GetDirectoryName($source)
$base= $_.BaseName+".png"
$basedir = $test+"\"+$base
Write-Host $basedir
Add-Type -AssemblyName system.drawing
$imageFormat = "System.Drawing.Imaging.ImageFormat" -as [type]
$image = [drawing.image]::FromFile($Source)

# Create a new image
$NewImage = [System.Drawing.Bitmap]::new($Image.Width,$Image.Height)
$NewImage.SetResolution($Image.HorizontalResolution,$Image.VerticalResolution)

# Add graphics based on the new image
$Graphics = [System.Drawing.Graphics]::FromImage($NewImage)
$Graphics.Clear([System.Drawing.Color]::White) # Set the color to white
$Graphics.DrawImageUnscaled($image,0,0) # Add the contents of $image

# Now save the $NewImage
$NewImage.Save($basedir,$imageFormat::Png)}
Now you’ve got your PNGs you can add them to your application. See here for a script on doing that: LINK
I’ve been doing some EUC projects lately and had a requirement to do a Mandatory profile. As there were a number of little bugs in the version I was capturing (Windows 10 64 bit 1803) I’m putting some of the answers here to keep them together for future use. These have been compiled from various sources including the fantastic James Rankin to whom I owe many thanks for discovering and sharing the most complex steps in this process.
I’ll start off with the workarounds and prerequisites, as there are a number of them, including the requirement to create an unattend.xml file for sysprep to copy over default profile which can then be exported to a mandatory profile.
Installing Windows ADK Setup fails
First off, the very annoying bug which causes the install of the Windows 10 Windows Assessment and Deployment Kit (ADK), which we will use later for creating the unattend.xml answer file, to fail and roll back with little information. This is overcome by running it with PSExec from SysInternals (HERE).
The Windows ADK can be downloaded HERE and installed on a machine where you will have access to the Windows 10 install.wim, this can either be on the Windows 10 profile capture VM, or just your normal machine.
First step, download PSExec, from the above, and extract it somewhere convenient (I used c:\psexec\). Then we need to copy the downloaded ADK into this folder.
Open a powershell window and change into your psexec folder and run the following command
.\PsExec.exe /sid powershell.exe
In the new powershell 1.0 window that opens, change into your psexec directory again and run the ADK installer
.\adksetup.exe
Now complete the installer as normal, but be amazed that it now doesn’t rollback and actually installed. Hurrar.
We only need to install the “Deployment Tools” option, so unselect everything else and install.
Convert Install.ESD to Install.WIM
If you’re not using Windows Enterprise, chances are the install.wim file isn’t in the DVD sources directory, but there is an install.esd. So how do you get the wim file needed for creating the unattend.xml answer file?
First things first, we need to copy the install.esd from <DVD>:\sources\install.esd to a read/write folder, the easiest is the root of c:\
Once we’ve got the esd file we need to run a dism command to find the correct image for our install and then extract that image from the esd into a wim
dism /Get-WimInfo /WimFile:install.esd
Take a note of the number which corresponds to your version, for example on my DVD Windows 10 Pro is Index “6”. Now we know which image, lets extract our wim
If you receive an error, then change the /Compress variable from “max” to “fast”, “none” or “recovery”.
Creating the unattend.xml answer file
Now we can create the unattend.xml answer file I alluded to earlier, in order to tell sysprep what to do.
Firstly run “Windows System Image Manager” which we installed as part of the ADK earlier. From the File menu, choose “New Answer File”. On the pop up messagebox click [Yes] and then point to the install.wim file we copied to our c:\ drive earlier. Click [Yes] to create a catalogue file.
In the bottom left “Components” section, right click on the item starting with “amd64_Microsoft-Windows_Shell-Setup” and select “Add Setting to Pass 4 specialize” which will add it to the “Answer File” section
Click on this heading under “Specialize” and set the CopyProfile property on the right-hand pane to “true”. Set any other options within the answer file you wish, however we only need this one.
Validate the answer file by selecting Tools –> Validate answer file, and then save it to the root of c:\ drive as “unattend.xml”
If you built this on another machine, now copy the file to the root of your capture VM.
If you have no network access, there is always the PowerCLI applet Copy-VMGuestFile. However this will require a local user account and VMTools installed so will not work in Audit Mode.
Now we’ve finished discussing prerequisites, lets go look at creating our new profile.
In case you have problems creating the unattend.xml this is a precanned one for Windows 10 1803 Enterprise. It may well work on other versions as well.
Due to the changed way of capturing a mandatory profile in Windows 10, we are now required to create a custom default profile with which to generate our mandatory profile.
The first step is to deploy a new VM, install Windows 10 to the configuration point, and enter Audit Mode.
So when you get to the above screen after installing Windows 10 you need to hammer Ctrl + Shift + F3 which will log you in as Administrator in Audit Mode.
Cancel the sysprep dialog box and make any changes you want on a device or user level. You can remove the Universal Windows Platform (UWP) apps here as well, I created an article on this HERE. Typical user level changes are:
Setting the background image and branding
Changing Explorer to open “my PC” instead of “Quick Access”
Show file extensions
Create any desktop icons as required
Pin Taskbar items
Arrange and remove the Start tiles
Configure IE/Edge homepage
Once all this is done we need to export the Start tile layout
If you haven’t already created the unattend.xml answer file, install the Windows ADK and create it now as above. If you’ve created it on another machine, copy it to the root of the c:\ drive
Once we’ve created the answer file and put it on the root of the capture VM, we need to run sysprep.
If sysprep fails to run for any reason, check the log file, but the most likely culprit will be a UWP which was removed from one place but not the other. The log file will detail which one is causing the conflict.
Once complete the VM will shutdown with the new default profile.
Additionally we can shrink down this default profile using the following commands from a powershell or cmd window by restarting the VM, and either entering audit mode again or completing sysprep.
We could leave this here which would be suitable for many VDI installs, however I will go on with the creation of the mandatory profile.
Creating a mandatory profile
Having completed all of the steps from above, log on to the VM as an administrative user.
Open the Advanced section of System settings (either from Control Panel, Win + Break or Right click on My PC and click Properties). Click on the Advanced tab, and click on Settings to get to the User Profiles dialogue.
Click on the Default Profile and click [Copy To].
Fill in the “Copy profile to” location with the folder where you would like to store the mandatory profile.
I store it on the root of the c:\ drive and call the folder “mandatory.v6” as 1803 has profile version 6
Check the “Mandatory profile” checkbox.
Click [Change] and add “Authenticated Users” into the Object field.
Click [OK] and the folder you have specified as a destination will be created.
Weirdly there is no success message and the window remains open after clicking [OK], so hit [Cancel] to exit the dialog box.
Bug Time!
So there’s a weird bug in at least this version I’m using (1803) where it doesn’t copy the ntuser.dat and .ini files into the new folder. Helpful. If this happens to you, just go ahead and copy these two files from c:\users\default into your new folder.
Set permissions on filesystem
Now we’ve got our mandatory profile, we need to check that the filesystem permissions are correct. The copy will have added “Authenticated Users” with Read and Execute permissions, but we also need to add the “All Application Packages” user with “Full Control” and ensure that the Administrators group owns the folder, along with all subfolders.
So add these permissions and set them to replace all child objects and press [OK]
Set permissions on Registry
We also need to set the same permissions for the Registry. So lets fire up regedit, click on the HKEY_USERS hive, go to File –> Load Hive and select the ntuser.dat file from our mandatory profile folder.
Give the hive a temporary name (this doesn’t affect anything) and the hive name will now show under HKEY_USERS.
Right-click on the root of the hive and select Permissions.
Modify the permissions to allow both “Authenticated Users” and “All Application Packages” to have “Full Control”
Click [OK] and [OK] again on the error that pops up.
Clean up the Registry
Now we can clean up the Registry to trim it down a bit.
Remove all references to the Administrator username from the Registry hive using Edit –>Find
Delete any Registry keys or values that you deem unnecessary. For example:
any Policies keys under HKCU\Software
HKCU\Software\Microsoft\Windows\CurrentVersion.
HKCU\Software\AppDataLow
Other people have managed to massively reduce the ntuser.dat by being ruthless. I will have to test how far we can go but feel free to follow their suggestions.
Once complete you must remember to unload the hive by selecting the hive name you chose and going to File –> Unload Hive
If you don’t do this, you will lock the profile meaning no one will be able to access it.
After unloading the hive there will be a number of new *.log* and *.blf files in the folder, these can be deleted.
Making it Mandatory
To make this profile “mandatory” we need to rename the ntuser.dat file to ntuser.man. Additionally you can rename the folder to mandatory.man.v6 to make it super-mandatory! This just means that a temporary profile will never be used.
Finally some Group Policy
Setting the mandatory profile in group policy requires us to set the following:
Computer Configuration –> Policies –> Administrative Templates –> System –> User Profiles
Set “Set roaming profile path for all users logging onto this computer” to the profile location but omit the .V6 extension.
In addition to applying the mandatory profile, we need to set one additional option, else you will suffer from a broken Start Menu.
After almost a decade of working with VMware’s EUC offerings I have finally found time to sit (and pass) a VCAP7-DTM Design after a lot of badgering from VMware.
The exam itself is very similar to other VMware multiple choice exams such as all the VCPs. However for the VCAP they now have some drag and drop questions for matching a statement to a definition.
Unfortunately for those who are new to the Horizon Suite or completing client design meetings, I can’t say it will be easy. Many of the questions revolve around architecture design and requirement’s gathering, so having an understanding of VMware’s best practice design methodology is a must.
Luckily VMware have produced a blueprint for the exam which identifies the areas which are covered so that you know the product sets to focus on. It’s important to note the product versions which are required as the exam does not use the latest versions and this will affect sizing estimates and feature availability. If it’s not in the blueprint, it’s not required, so don’t go focusing too much on the technical details of NSX for Desktops for example, but do have an understanding of the sizing limits of Horizon and vSphere.
The appendix of the blueprint lists 115 references which I would highly recommend reading before the exam. Helpfully someone has bundled these all together in a single zip file to save us having to sort through all this ourselves. So a massive thank you to Kyran Brophy for doing this.
Kyran has also broken down the blueprint to complete a VCAP7-DTM Design Study Guide, and I can highly recommend reading through it to make sure you have an understanding of the requirements. His Study Guide’s start page can be found HERE
The cost for VCAP exams is now quite significant ($450) so unless you’re lucky enough to have a free exam at VMworld or EMPower, I would recommend a few weeks dedicated study time before the exam for running through the reference architectures and the aforementioned references and study guide.
This post was written by Cameron Fore and is being reproduced here just for posterity purposes for a future implementation. Original link HERE
vROps for Horizon provides end-to-end visibility into key User session statistics that make it easy for Horizon admins to visualise and alert on performance problems impacting the user’s of their environment. One of the key metrics used in determining how well user’s are connected to their virtual app or desktop session is Session Latency (ms), as it most visually impacts the user’s perspective of their session performance. The lower the session latency, the quicker video, keyboard, and mouse inputs are redirected to and from a user’s endpoint client, giving the user a more native-like PC experience.
As the latency trends higher (>180ms), the experience begins to
degrade, and the user can begin to notice “sluggishness“ – slow keyboard,
mouse, and video responsiveness.
vROps for Horizon gives us direct visibility into when these issues are occurring across all of the Active User Sessions of the Horizon View environment. However, once the session becomes inactive, it will go into a stale object state and be removed from vROps during a clean-up window.
To be able to view this information historically on Pools and User
objects, you can create Super Metrics that simply maps the session latency to
the objects you want to report on.
Creating the Super Metric
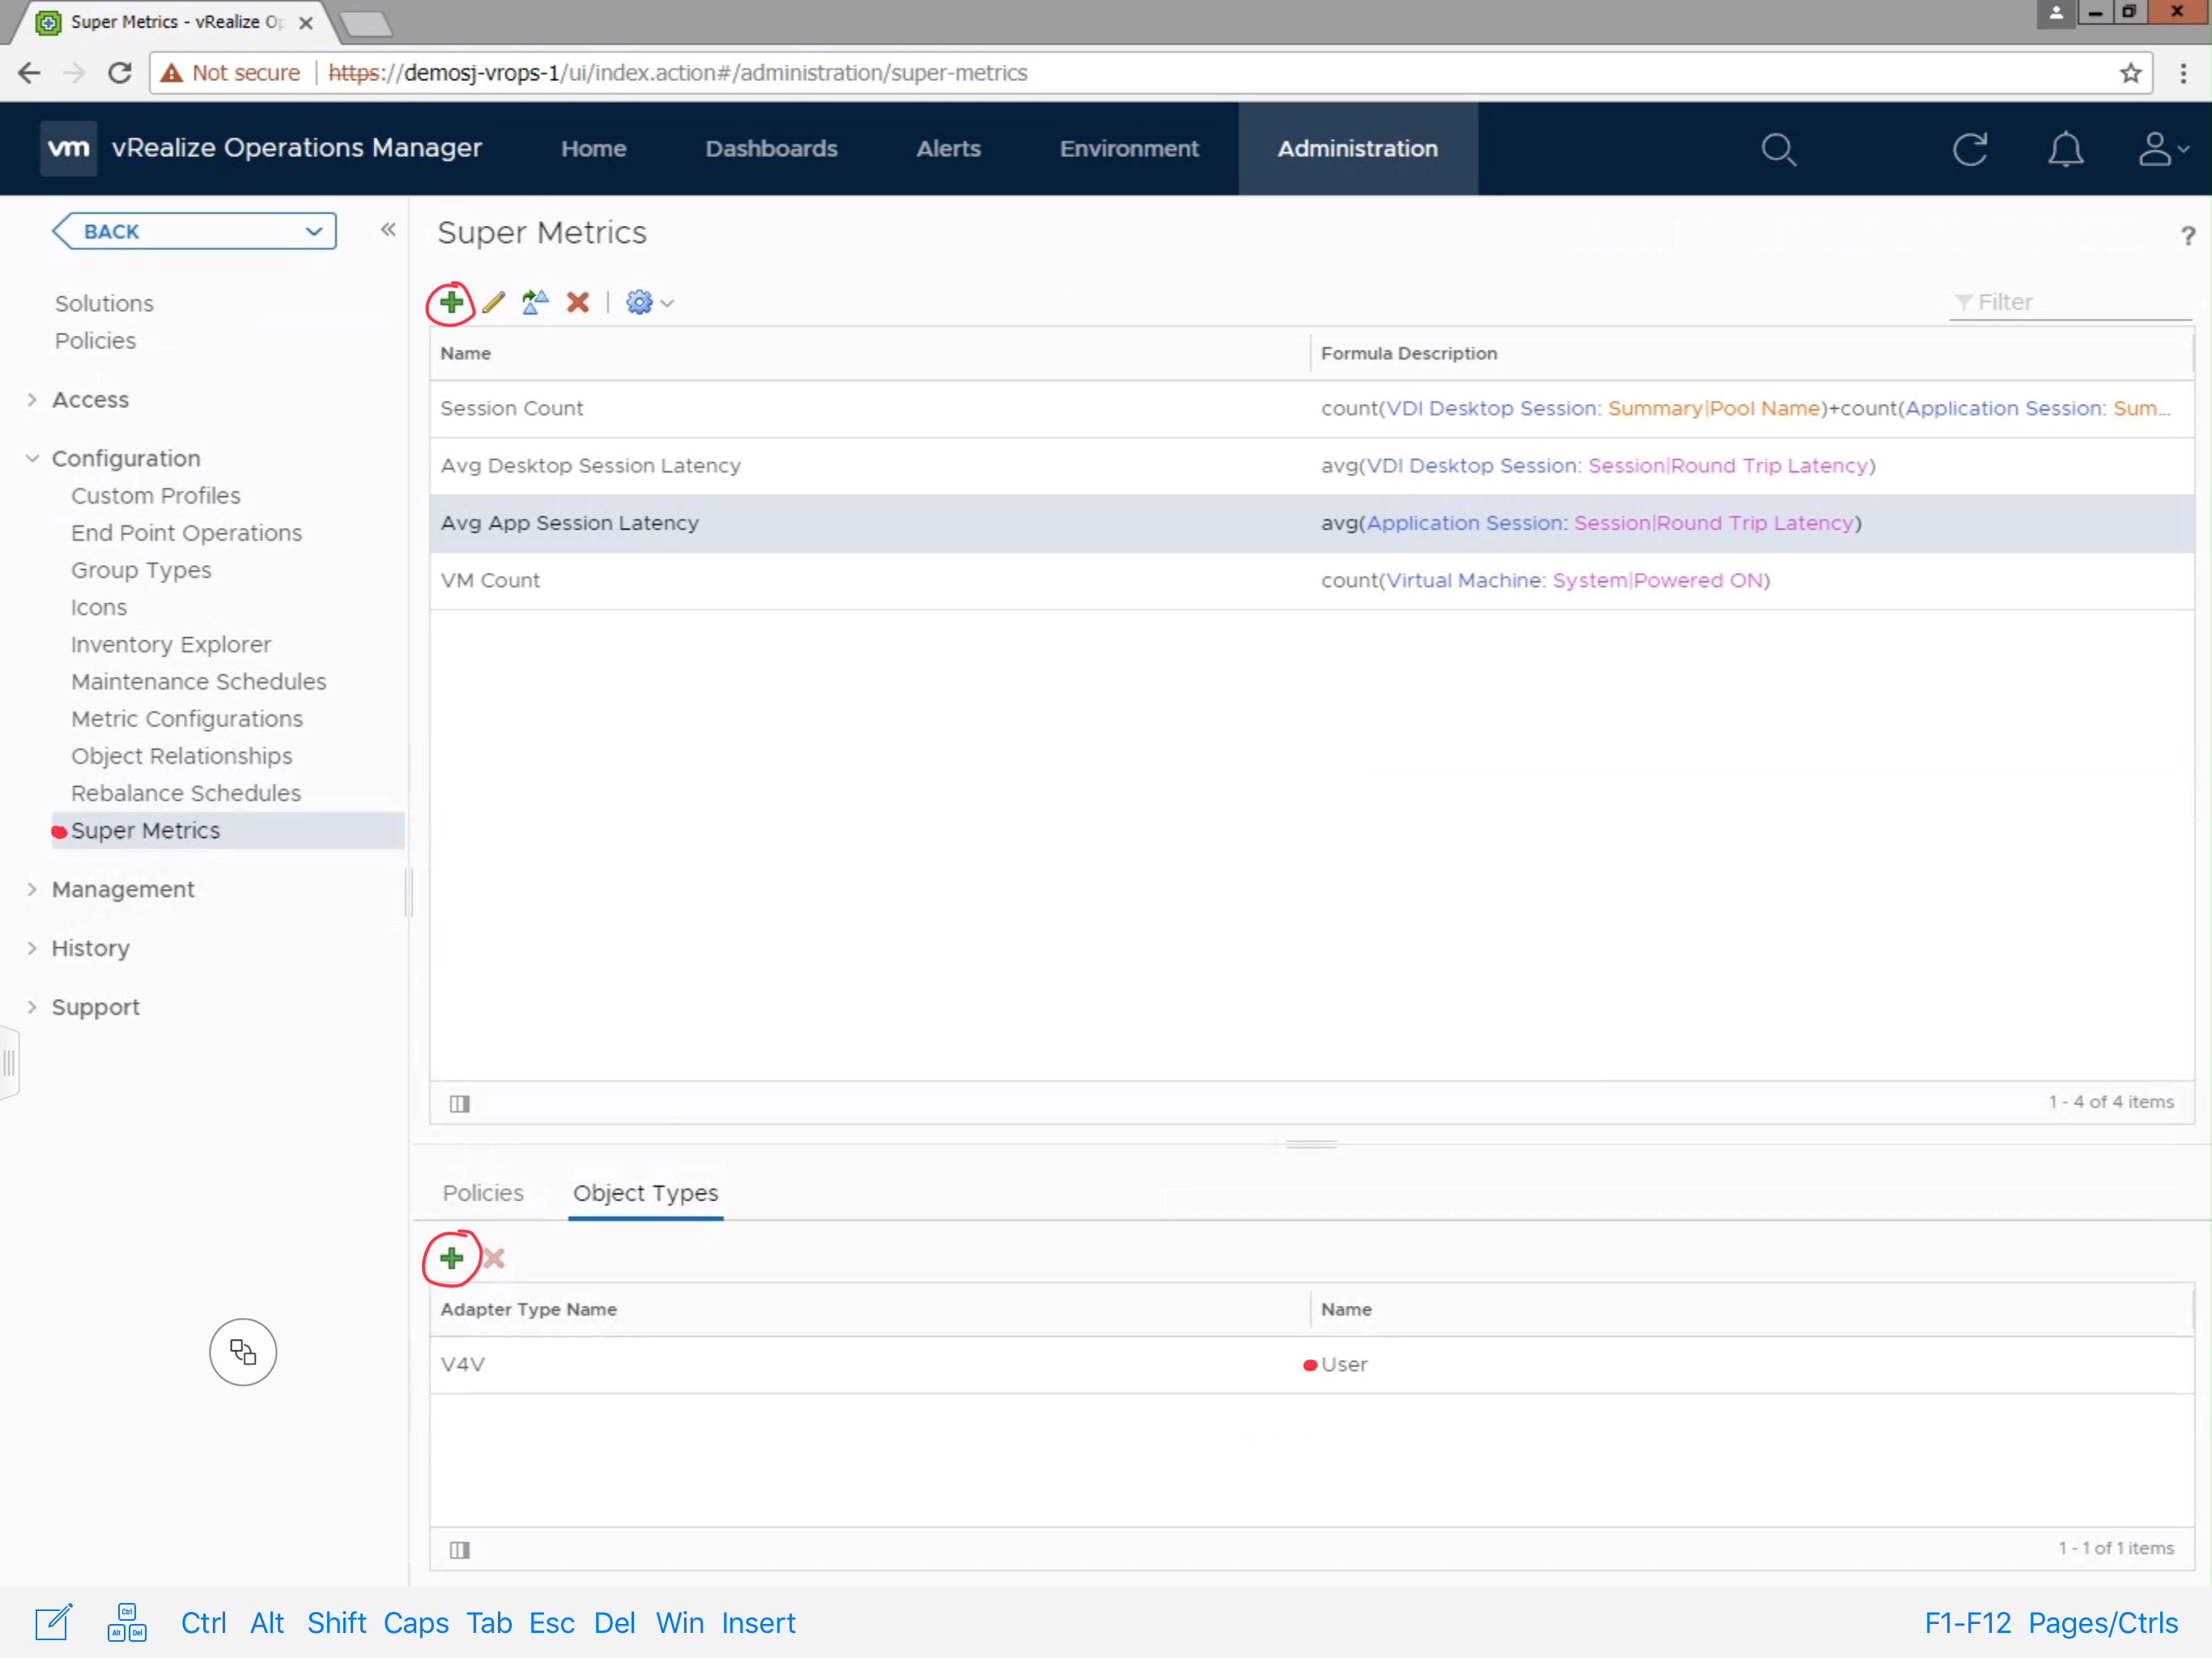
To create the Super Metric, Navigate to Administration ->
Configuration -> Super Metrics. Click the green + sign to create a new
Super Metric.
Provide the Super Metric a unique name, in this case we are using “Avg
App Session Latency”. Search for the “Application Session” Object
Type, and click “Round Trip Latency (ms)” to add it to the Super Metric.
Since, we are looking for the average latency, select “avg” from the
available functions list, making sure that the average function applies to the
metric by encapsulating it parenthesis as demonstrated in the image below.
Click Save to finish the Super Metric.
Next, you will need to add the Super Metric to the “User” object type.
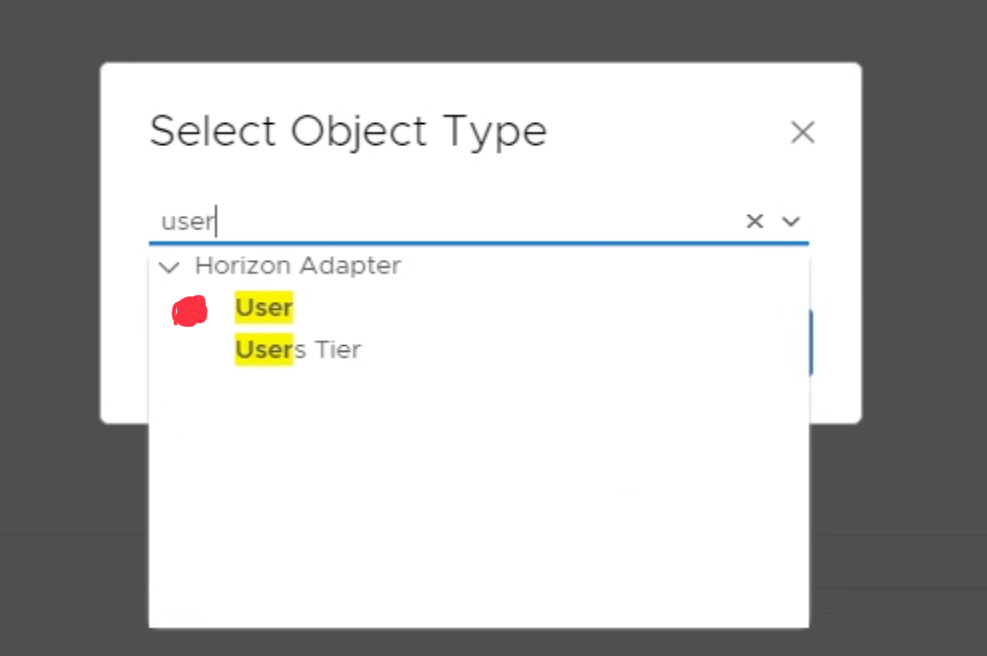
Click the green + sign under the “Object Types” section. Search and
select the “User” object type.
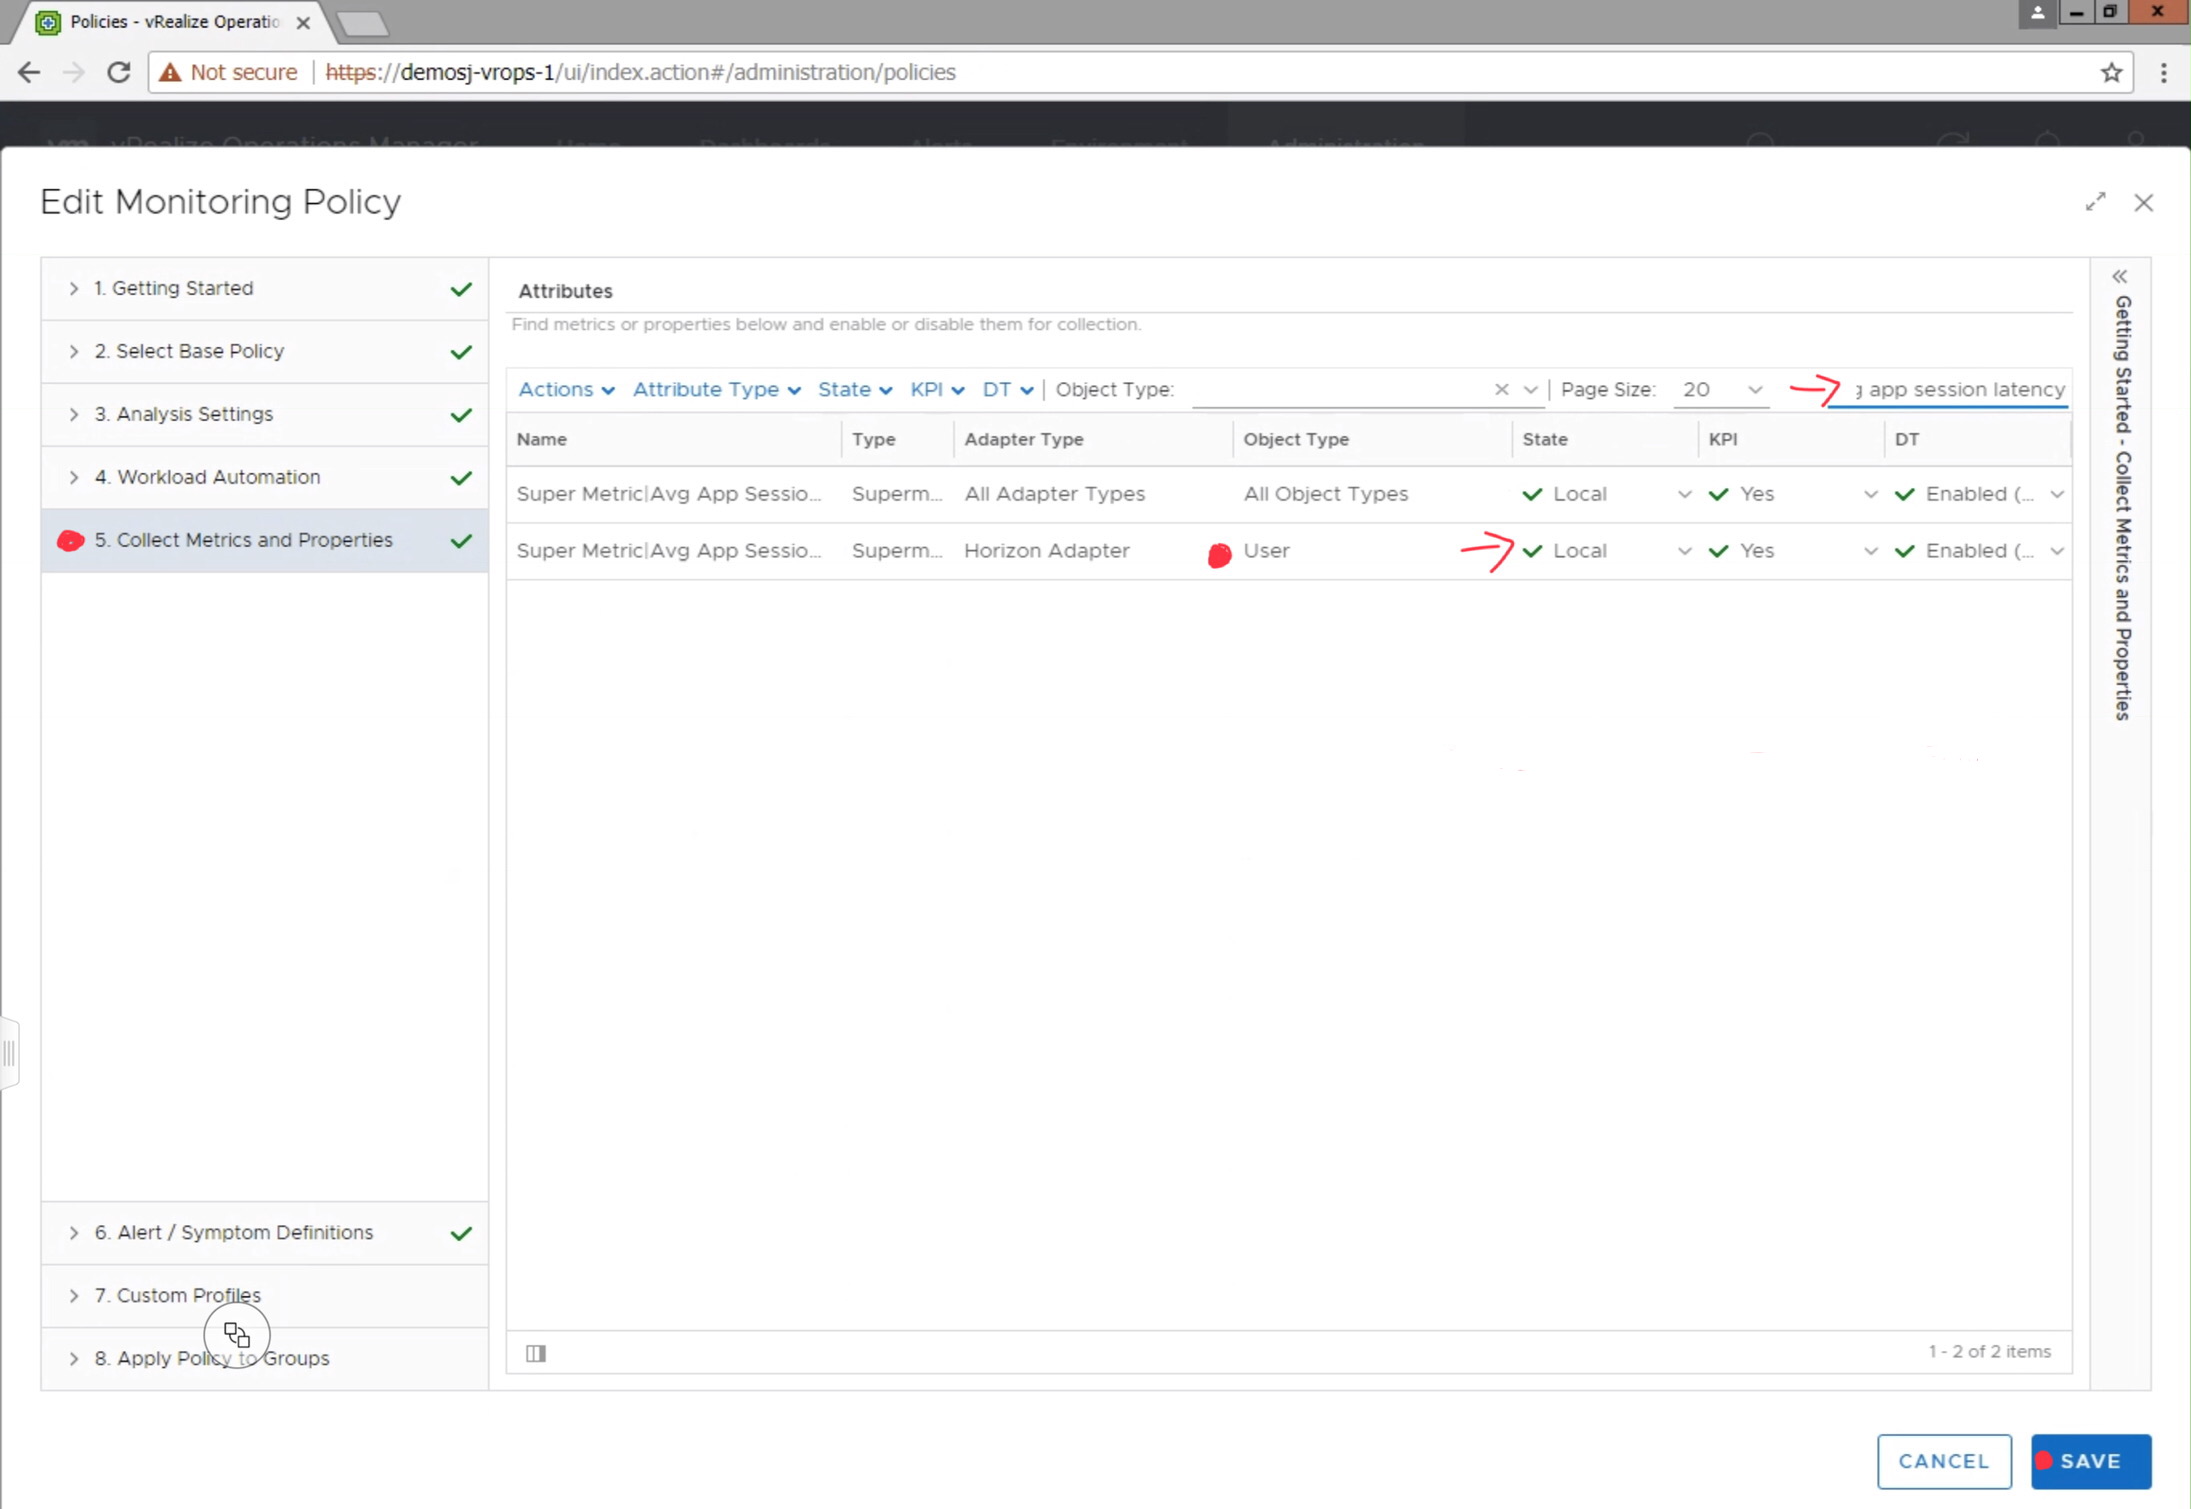
Before the Super Metric will begin collecting data, you will need to
navigate to Administration-> Policies, and edit the active monitoring policy
to enable the metric for collection.
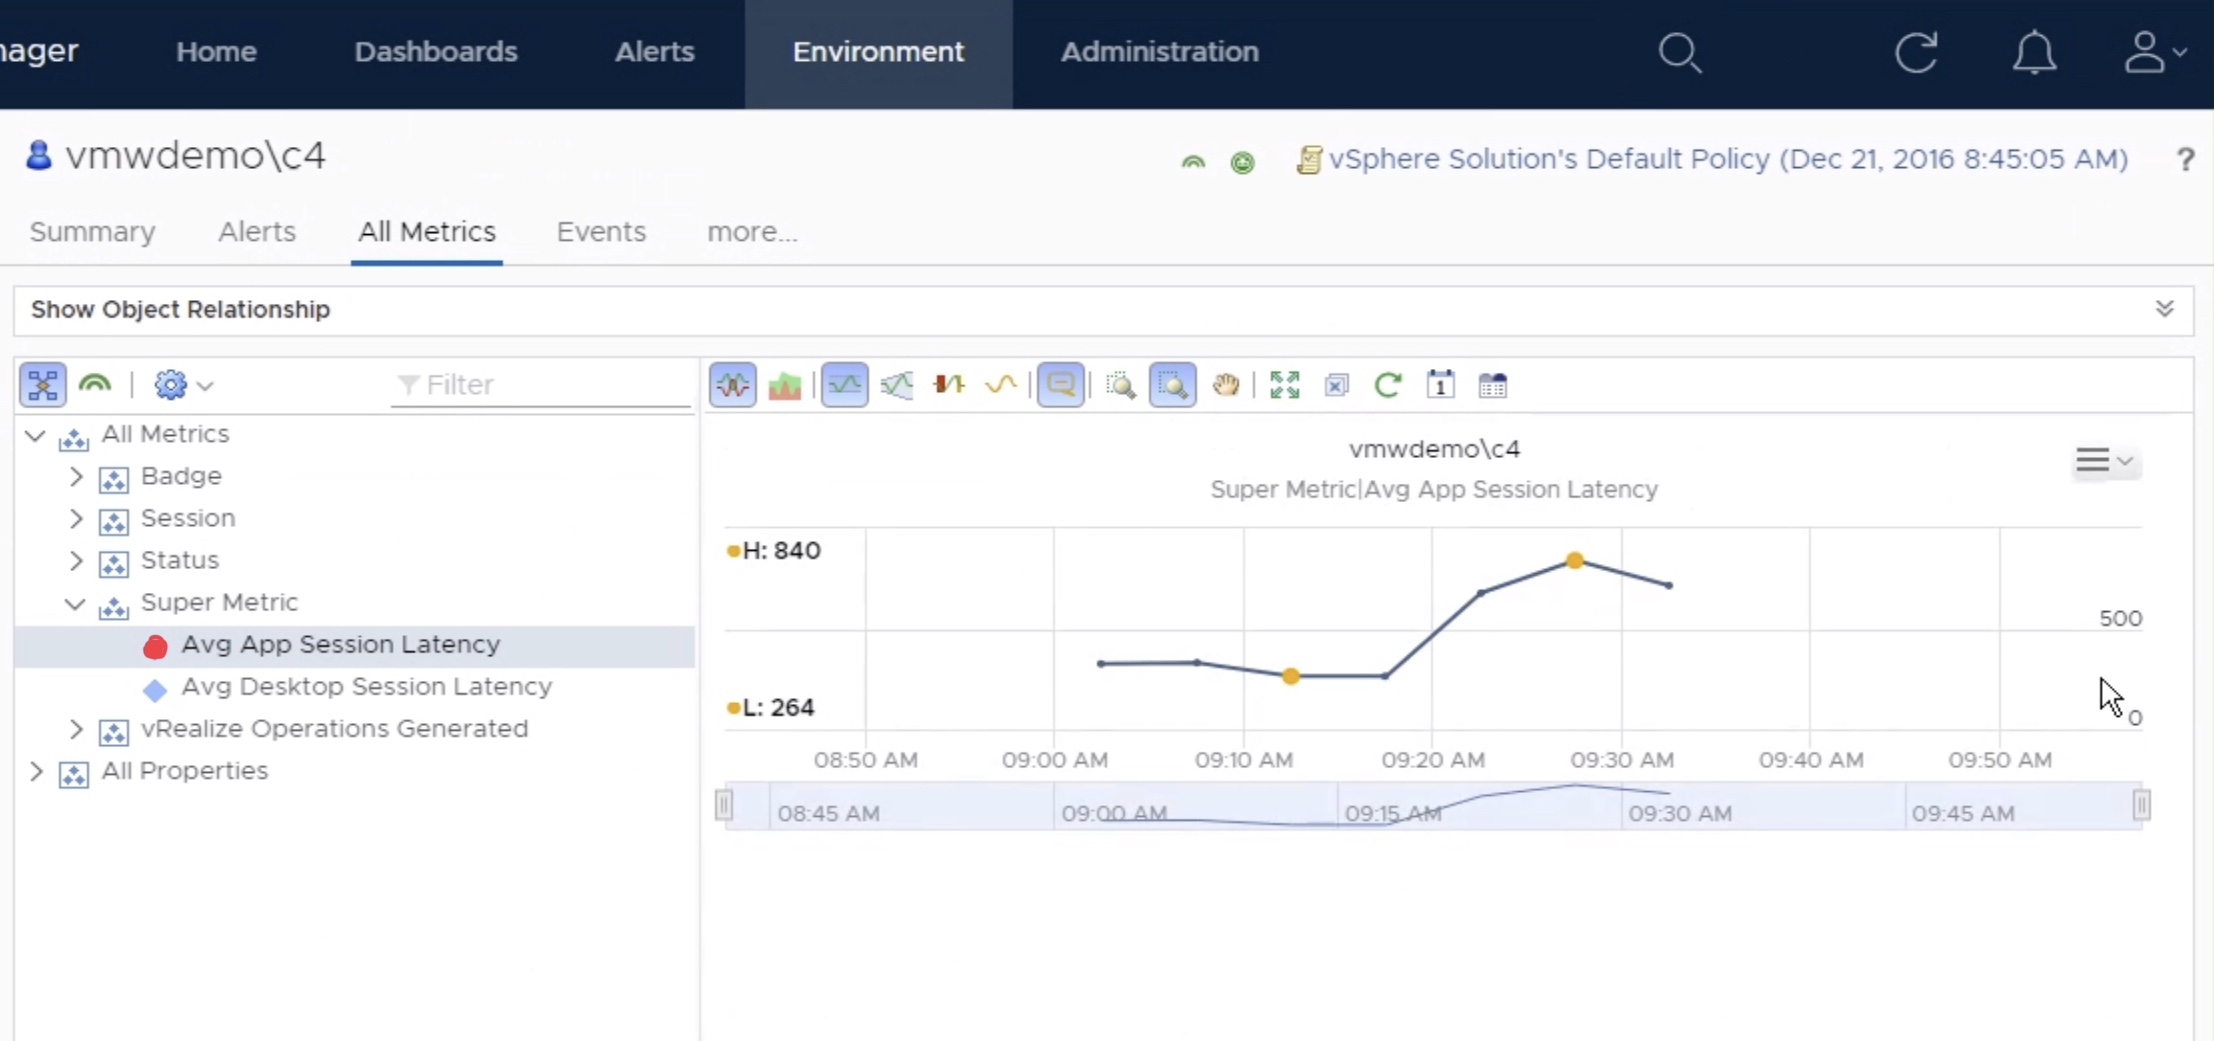
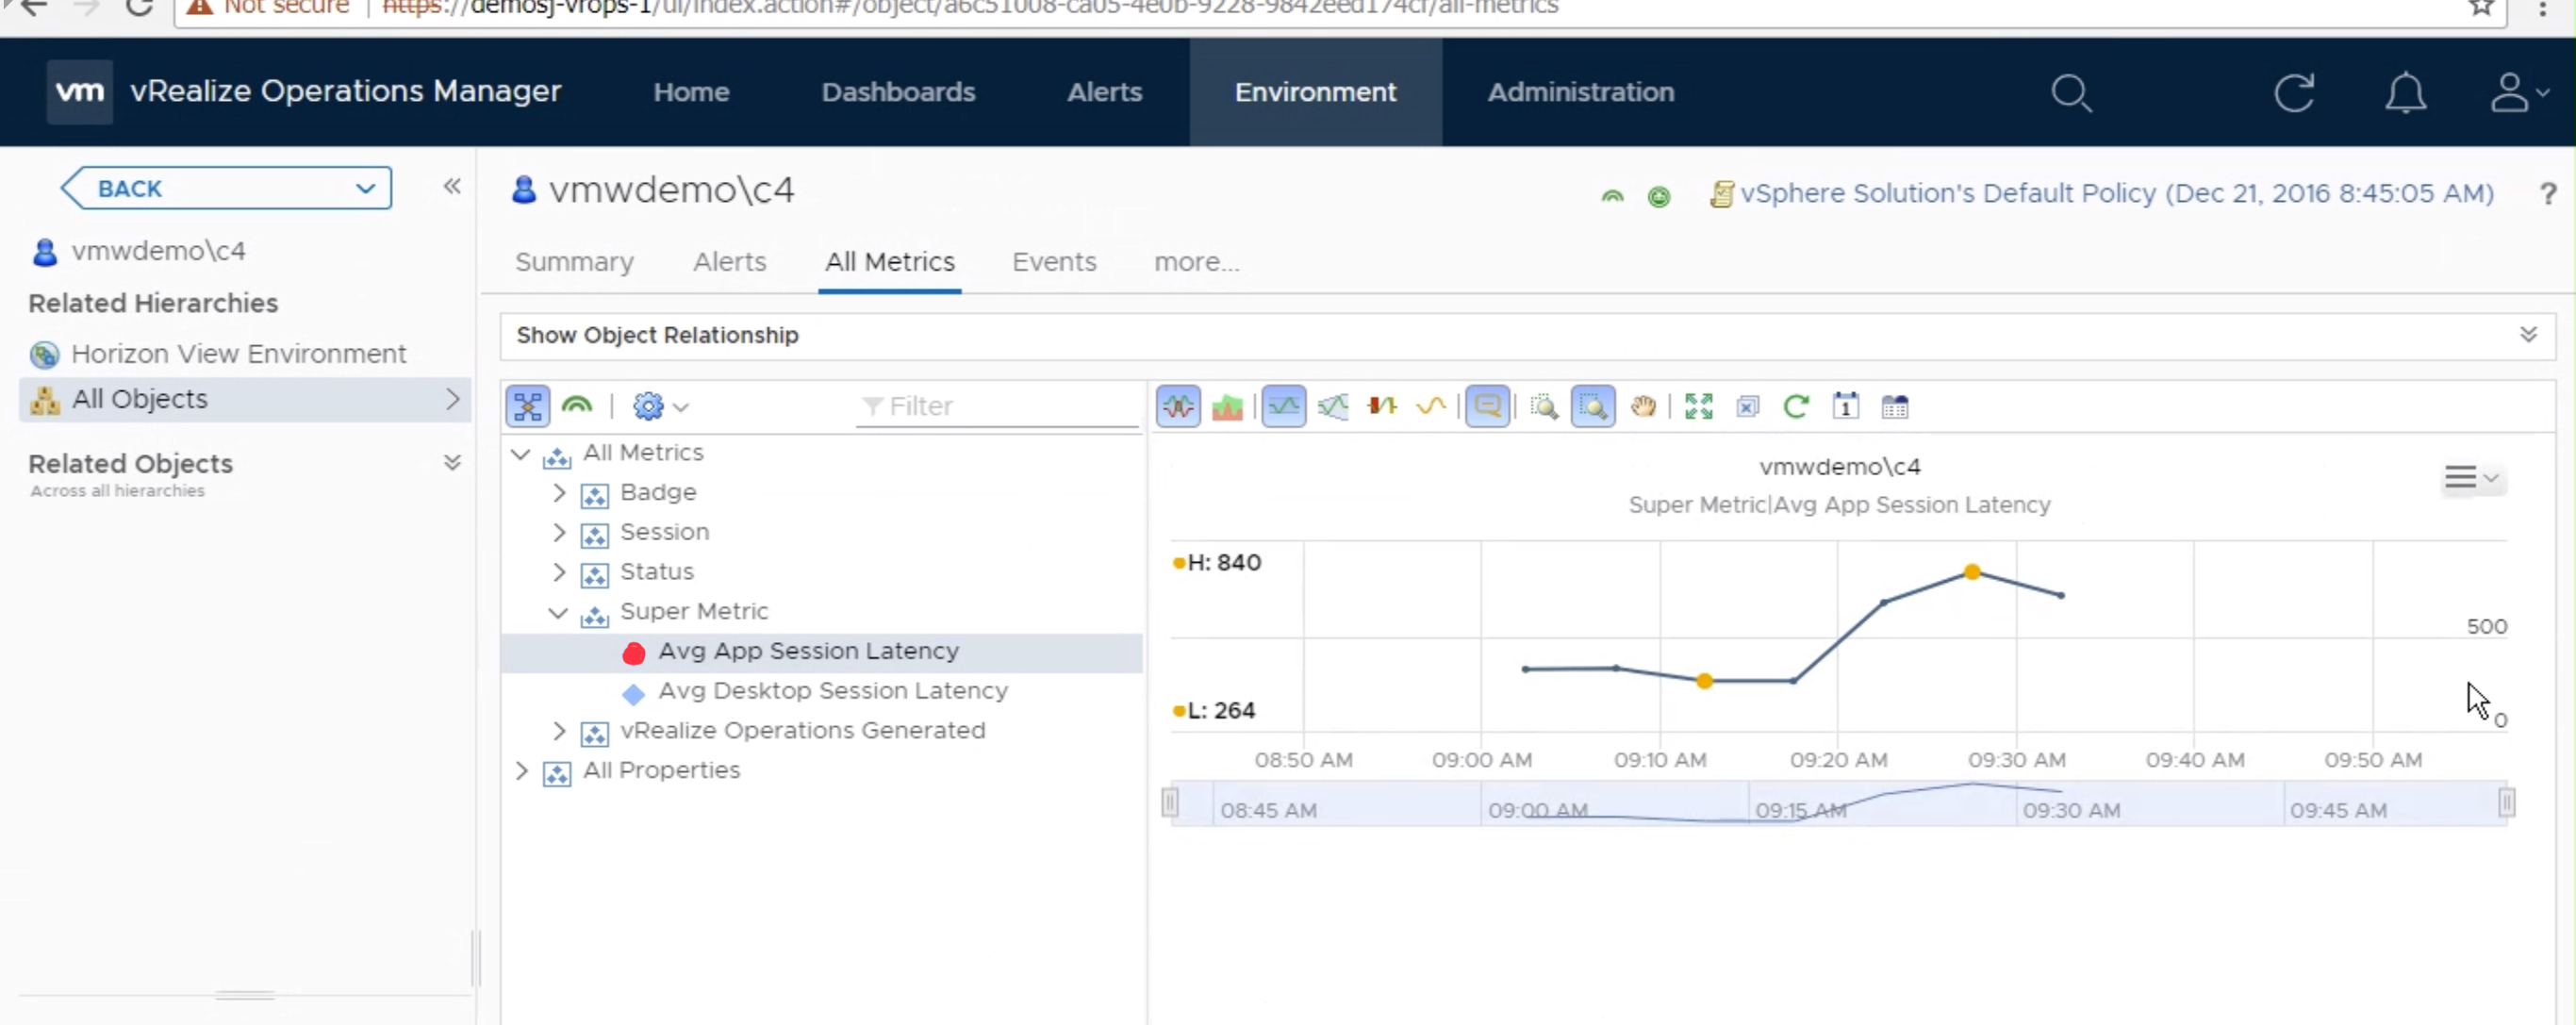
Once the metric has started to collect data, you can view the data on a
individual “User” object by selecting “All Metrics” -> Super Metric ->
select metric.
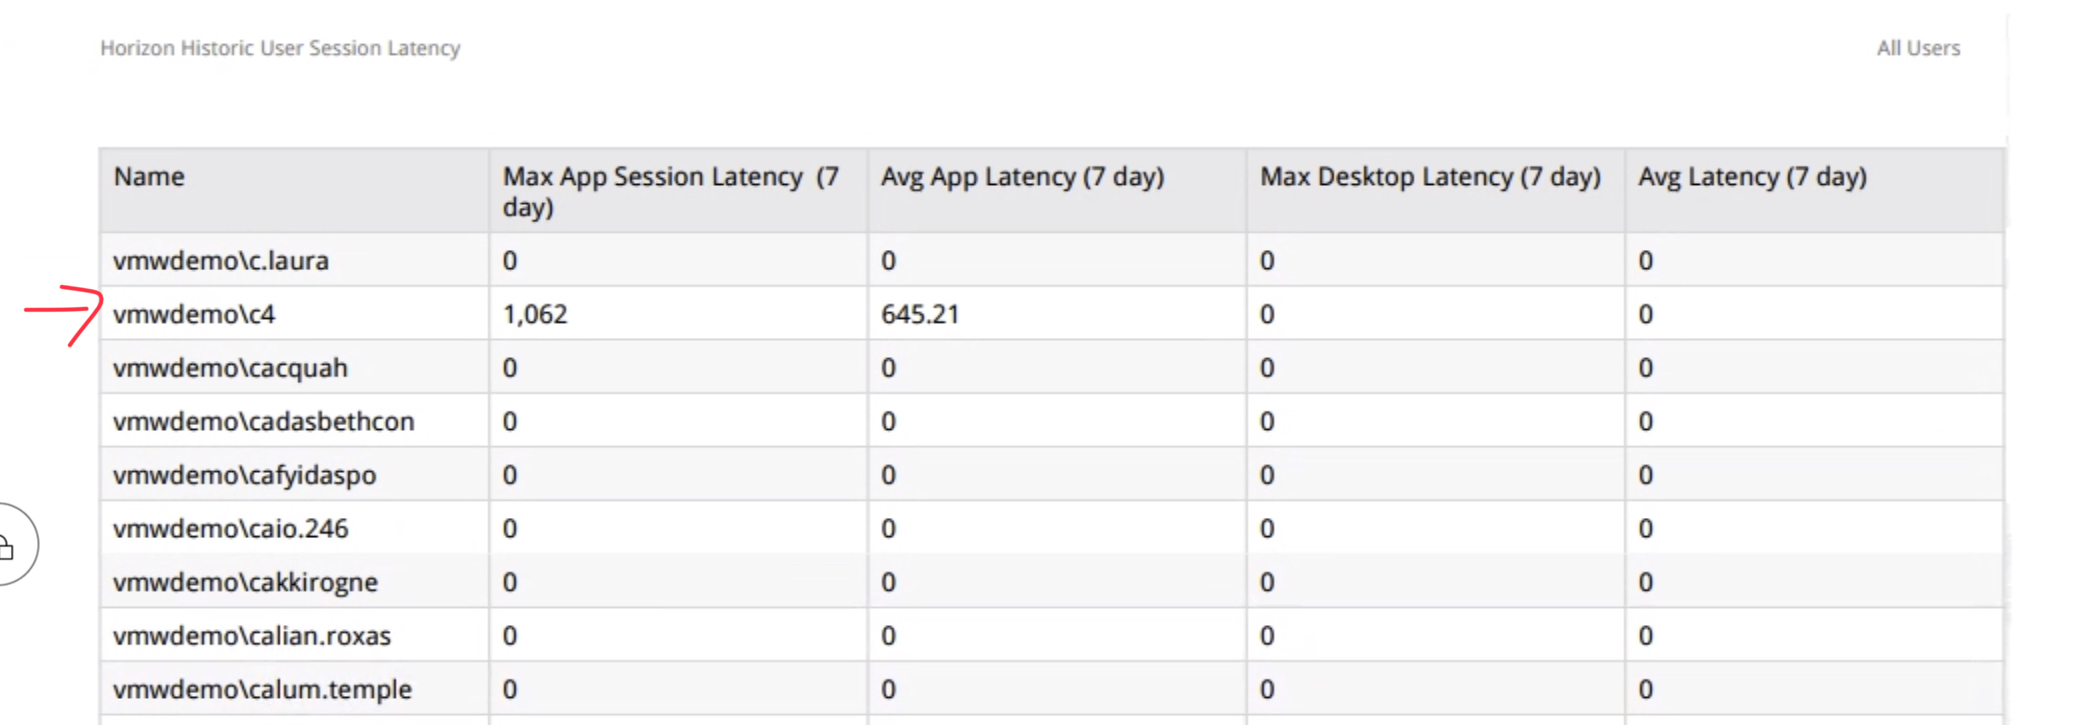
You can also create custom Views that display the historical latency for all users of the environment, as well as perform simple roll-up statistics.
This is a prezi presentation for at a talk I presented at a TechnologyUG event discussing the steps involved in planning any EUC project and the pitfalls to avoid.
I promise it was better with the full talk around the highlighted points, but it covers the major steps of going through an EUC project. Note that I say “EUC” not “VMware Horizon VDI” because it is better to discover the correct fit for a customer. I have seen projects fail because a consultant or customer have been doggedly attached to a specific idea or vendor where another solution or approach might be a better fit.
It doesn’t go into the greater detail of Application Virtualisation technologies such as AppVolumes, FlexApp, App-V, ThinApp due to time constraints but the greatest take away I want to push is that you must do a pre assessment of the current state. Without that you are doomed to failure.
I was asked to join a podcast with my colleague Matt Tupper to discuss all things VDI.
Joining us in this episode are Senior Consultants, Matt Tupper and Chris Mitchell, who talk us through Virtual Desktop Infrastructure (VDI). Our guests investigate the importance of VDI, its appeal to organisations, the key players within the space and the benefits that it’s adoption is bringing.
Matt and Chris also explore the trends in the adoption of VDI that Xtravirt are seeing among their clients, the potential pitfalls clients come across when moving towards it and the questions to ask to avoid mistakes, as well as where the future is heading.
What is VDI and why is it important?
Which market factors are driving adoption of the VDI model?
Who are the key players within VDI?
What are the potential pitfalls when moving towards a VDI model?